Lab 2: Overview of Anypoint Exchange
Overview
APIs are the reusable assets that simplify and accelerate the creation of modern software applications. As a MuleSoft developer you will need to consume APIs created by other members of the organization and publish new APIs for others to consume. This new consumption model is the foundation of a new approach for delivering software solutions where APIs form the building blocks of the modern enterprise.
This lab will focus on using Anypoint Exchange to search for APIs and other assets published in your Business Group’s private exchange as well as MuleSoft’s public exchange.
Learning Objectives
-
Become familiar with the various assets that can be stored in Anypoint Exchange.
-
Learn how to test the behavior of an API before you decide to use it in your application.
-
Learn how APIs may be shared via a public portal interface.
Step 1: Login to the Anypoint Platform
-
If you’re not logged into the Anypoint Platform, open your web browser and navigate to: http://anypoint.mulesoft.com
-
Enter your credentials into the Username and Password fields.
-
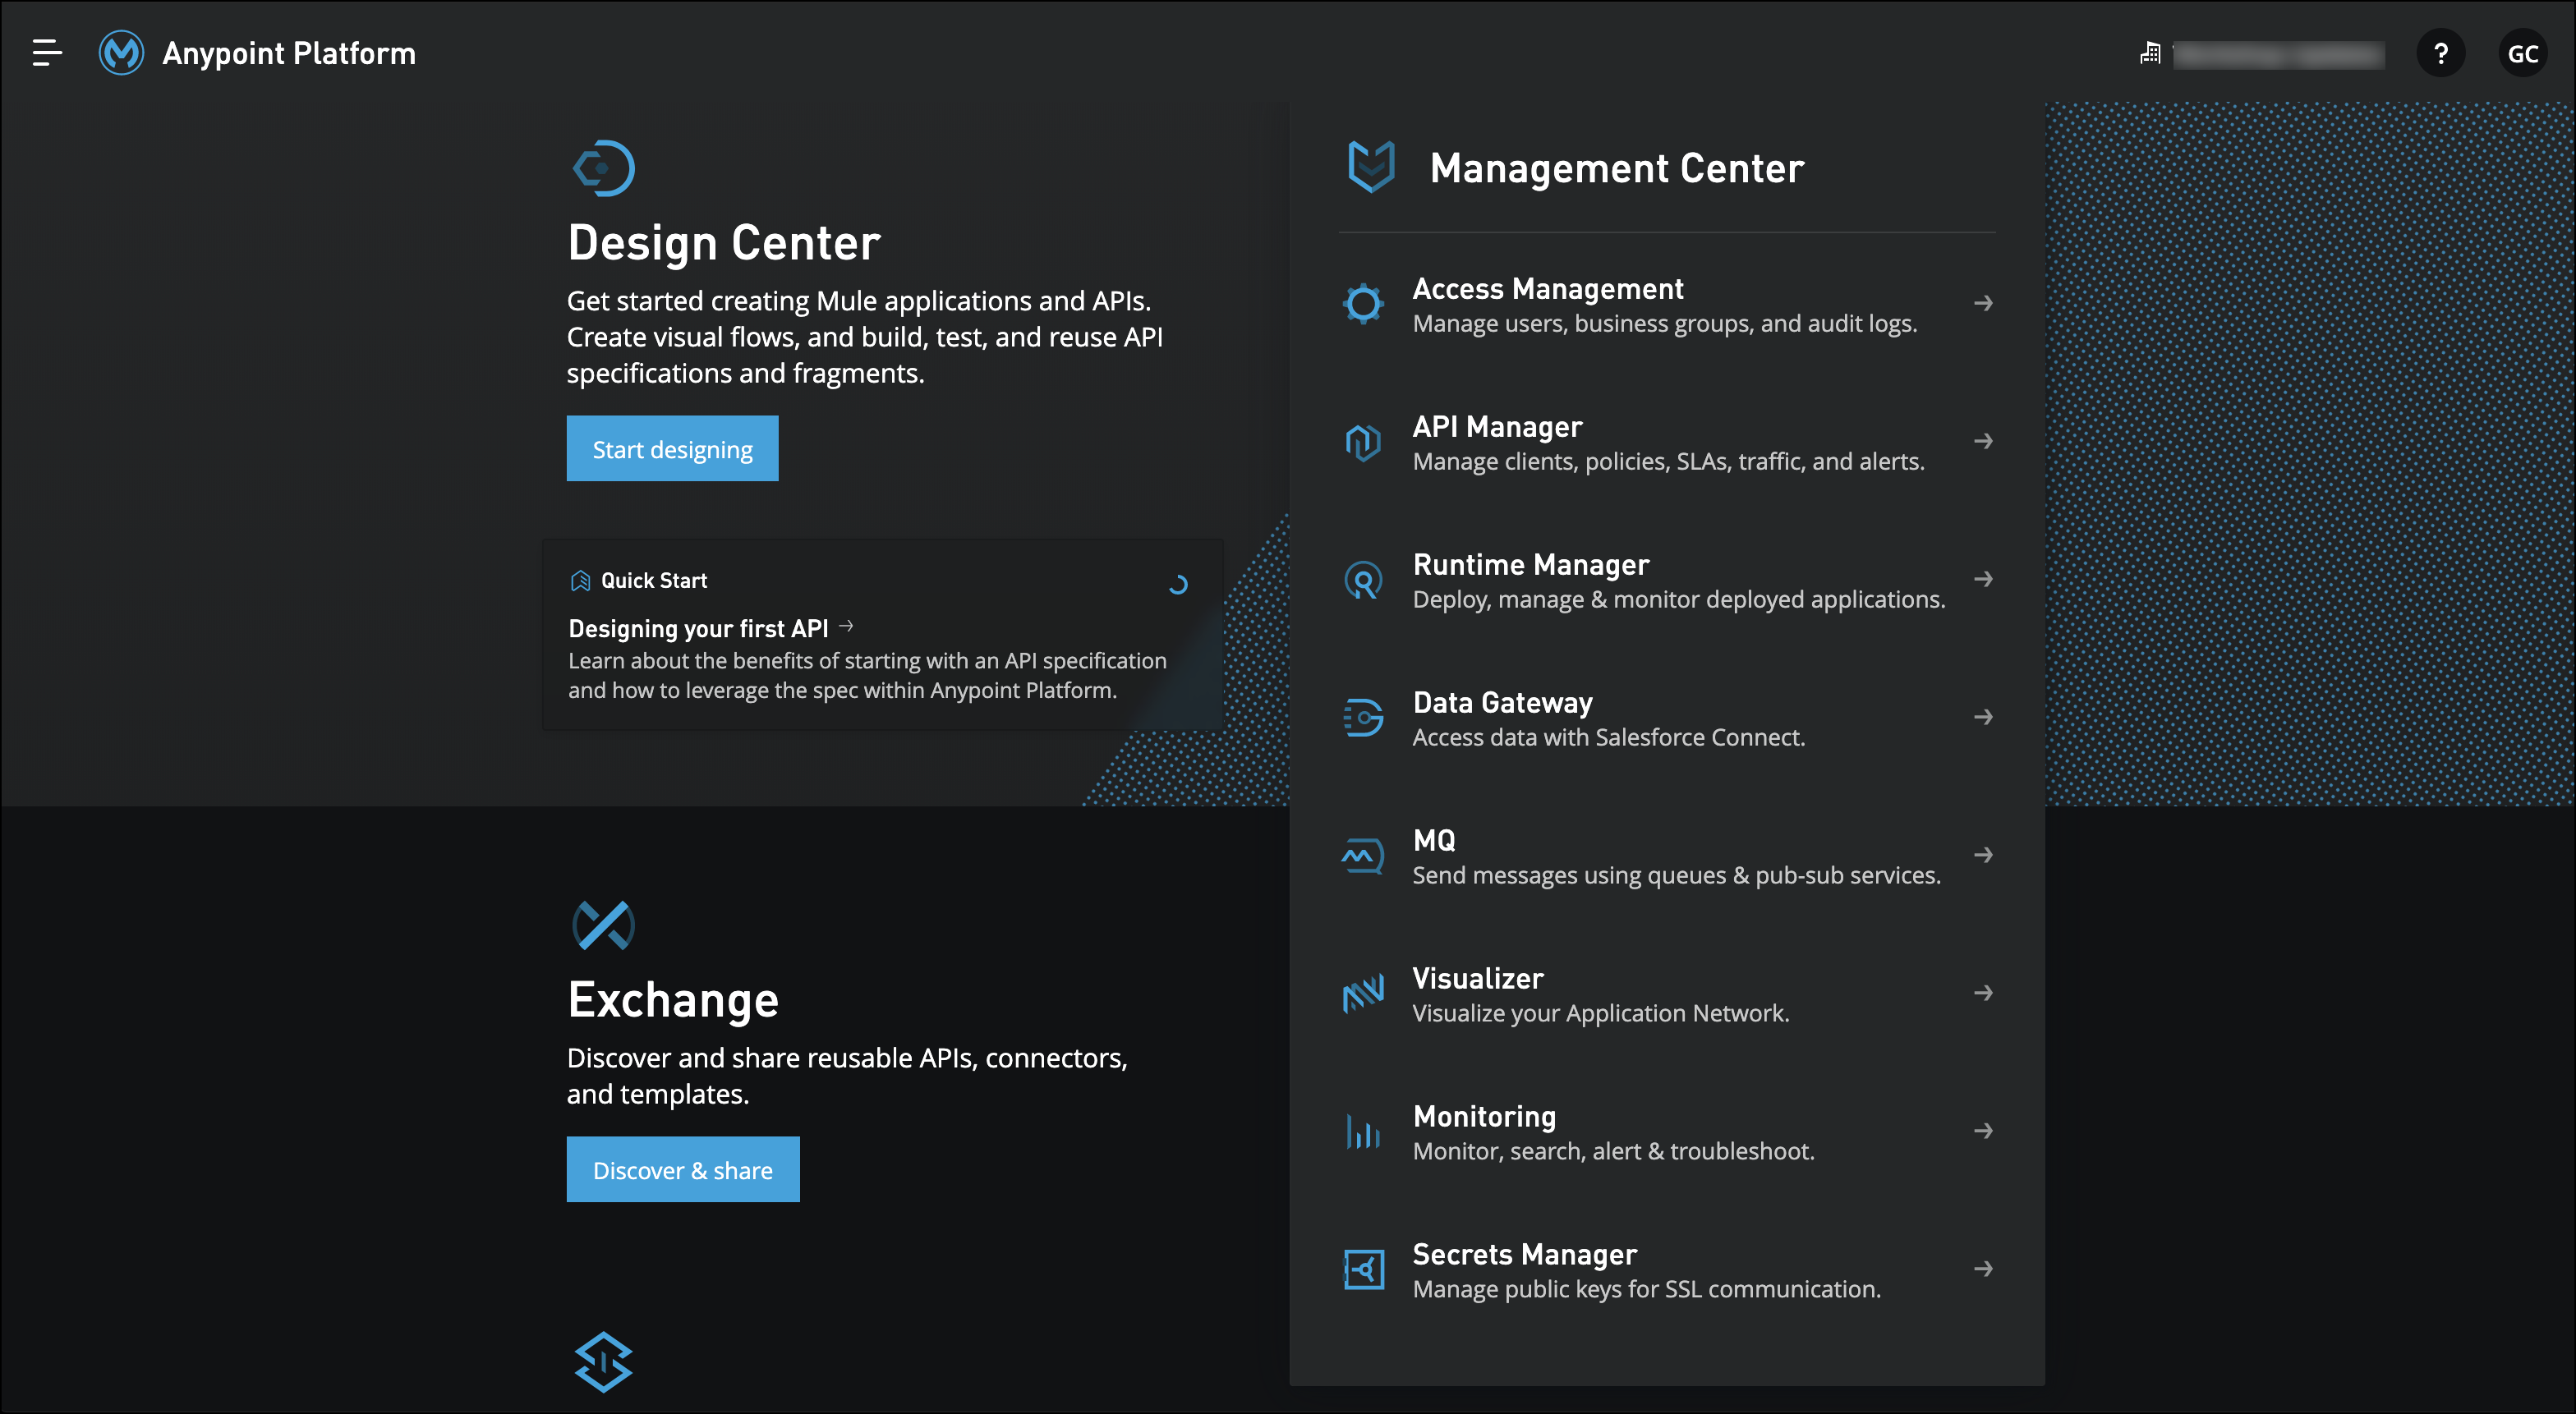
You should see the following landing page once you are logged in to Anypoint Platform.
Step 2: Access Anypoint Exchange
-
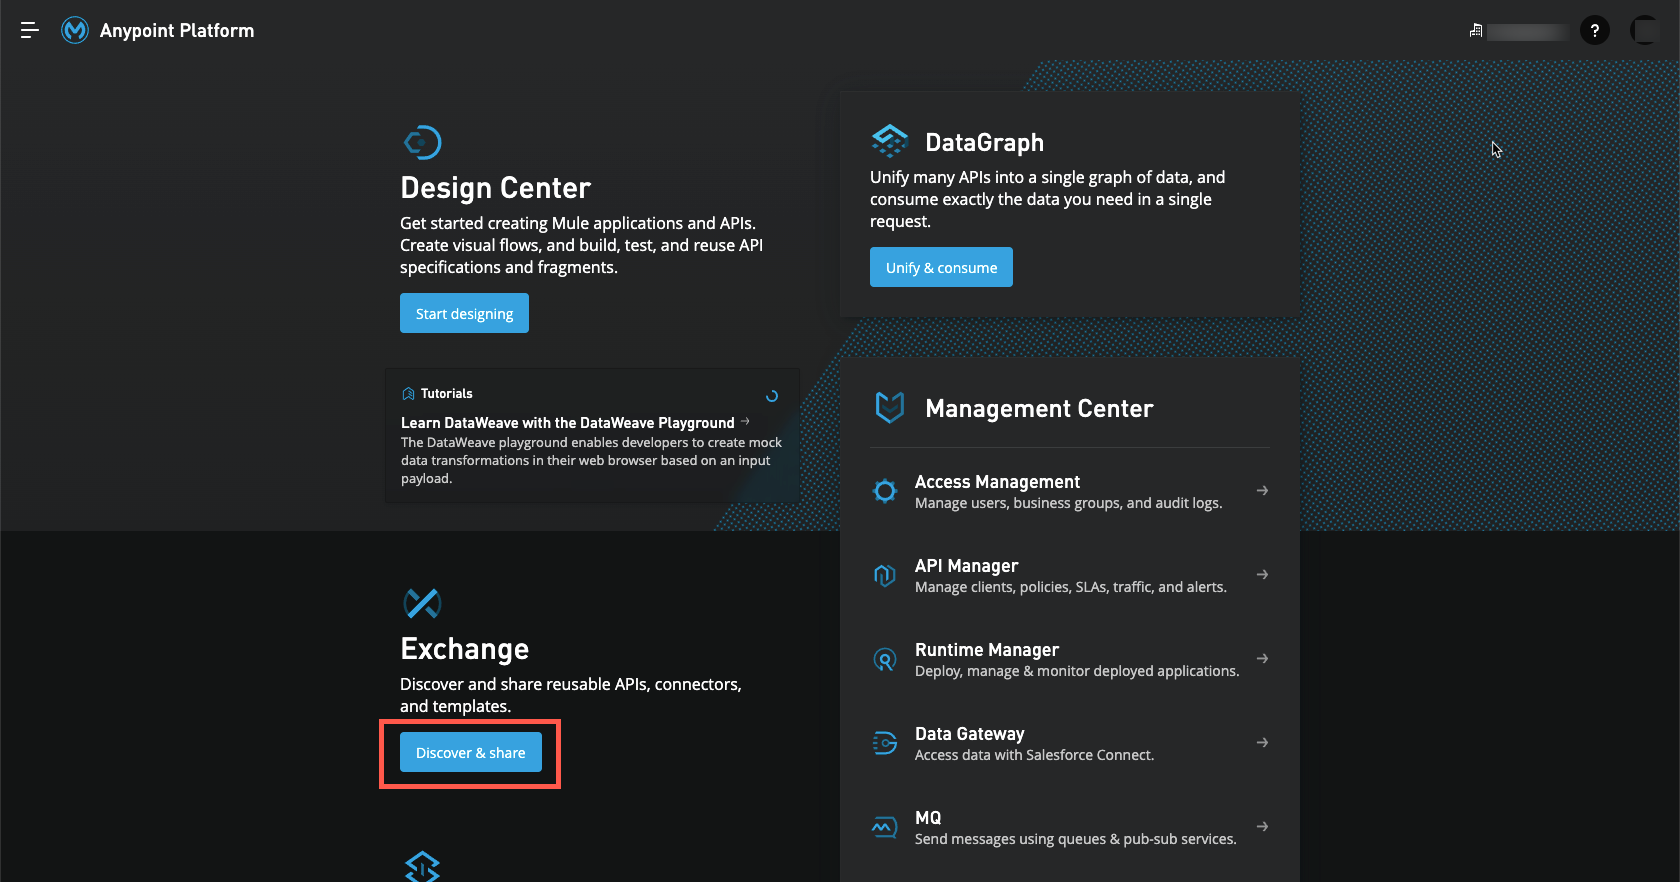
Click on the icon labeled Discover and share.
-
You will now be presented the landing page for the Anypoint Exchange portal.
Step 3: Review the Features of Anypoint Exchange
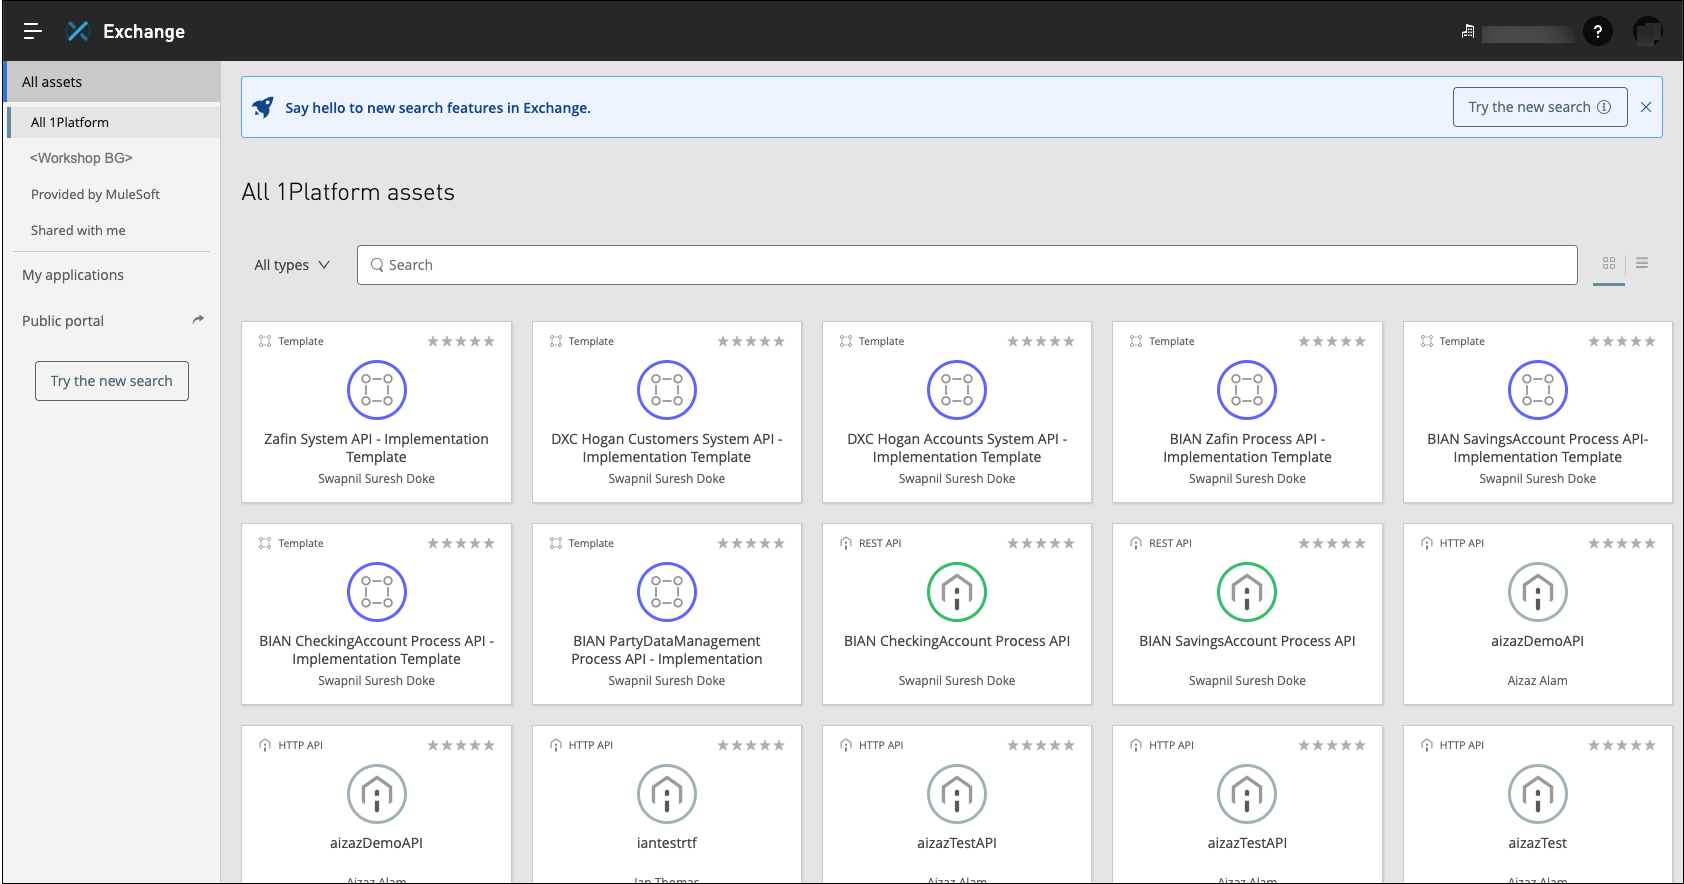
Anypoint Exchange should be your initial starting point for just about any project. If you are looking to reuse an API then Anypoint Exchange is obviously where you should start. But even if you are creating a new API it makes sense to first look in Exchange to see if there is an existing API that may be reused. Sometimes you will find that someone else has already undertaken the task of creating the API, or has created at least a portion of what you need.
-
Anypoint Exchange allows for discovery on the public or private exchange. Every organization will automatically have a private exchange created for them. Note the following items in the following screen capture:
-
<Workshop BG> selects all assets that are associated with the organization that you are logged into. Your organization will be another name.
-
HLS Workshop selects only those assets that are associated with the HLS Workshop Busines Group. Again, your Business Group will likely be another name.
-
Provided by MuleSoft selects only those assets that are provided by MuleSoft.
-
All assets selects all assets from all sources.
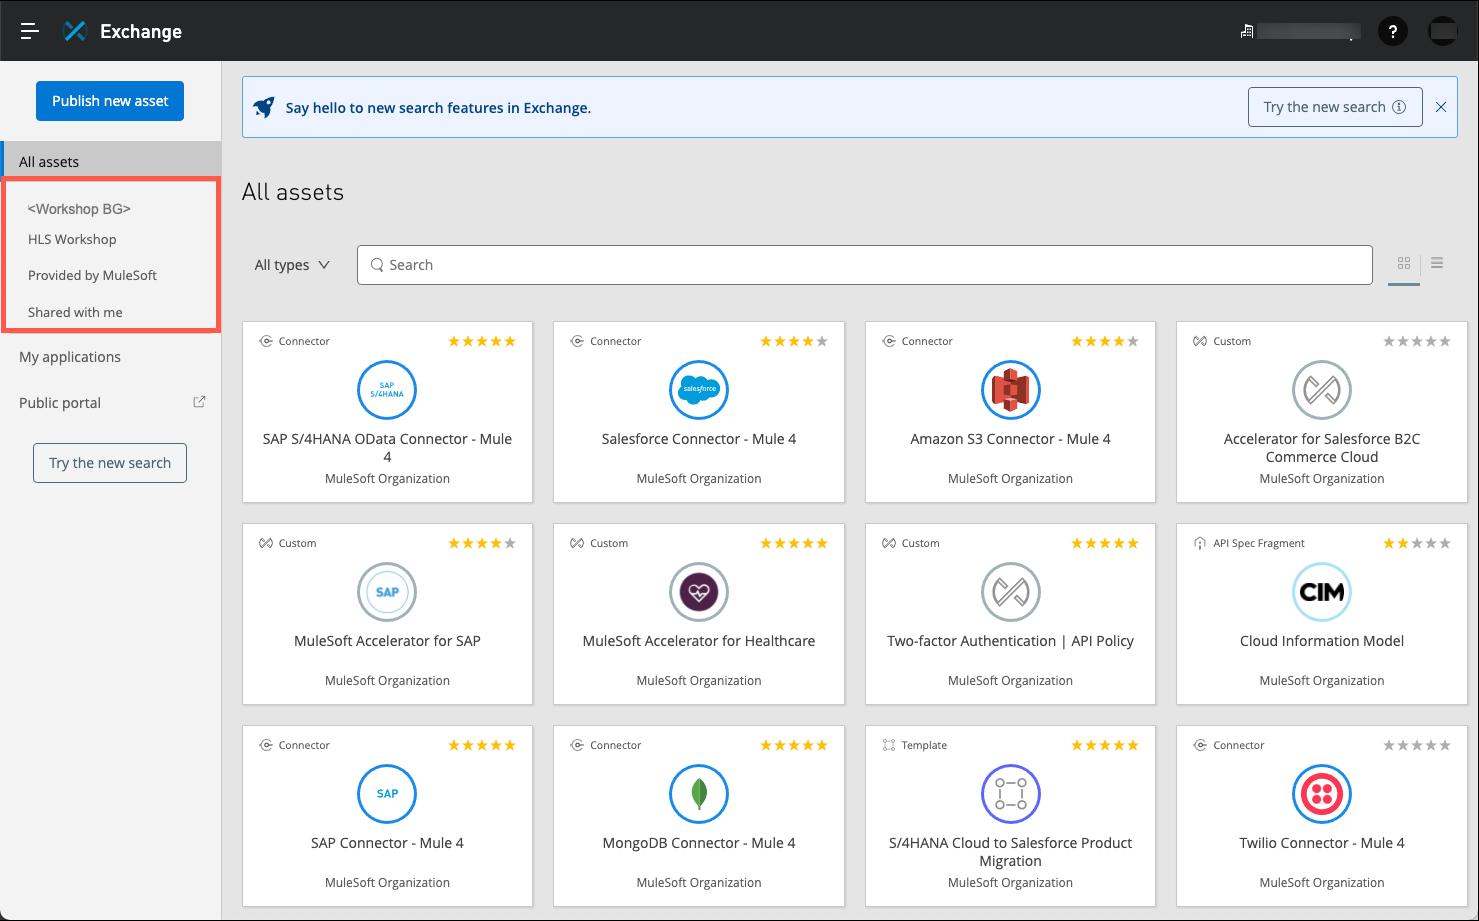
Note: Software assets stored in Anypoint Exchange can only be discovered by users that have permissions to the private exchange for that organization. Furthermore, organization administrators can also create independent business groups to provide even more restrictive discovery. Anypoint Exchange users can only search within their currently selected business group.
-
-
There are two more links listed on the page:
-
My applications: These are the client applications that are registered in the organization, and that are consuming the APIs that are deployed to Runtime Manager.
-
Public Portal: You can define a public portal to let any user consume any public org API that the organization may decide to publish.

-
-
To search for an API, first select which exchange you would like to limit your search to, then use the search bar at the top of the Anypoint Exchange portal:

Anypoint Exchange supports keyword searching to find the API you are looking for. However, Anypoint Exchange can be also used as a discovery tool for more than just APIs. Anypoint Exchange is the enterprise repository for the following types of reusable software assets:
-
Connectors - Packaged connectivity to an endpoint developed and deployed on MuleSoft’s Anypoint Platform with third-party APIs and standard integration protocols.
-
Templates - Packaged integration patterns that address common use cases and are built on best practices. Applications to which you add your scenario-specific information to complete a use case or solution.
-
Examples - Implementation projects that explain development elements within Anypoint Studio and how these can be leveraged to achieve specific API and integration objectives.
-
Policies - Custom API policies that may be applied to MuleSoft API gateways.
-
API Groups - Custom groupings of APIs where API policies may be applied to the group with a single specification, without having to apply the policies to each API individually.
-
REST APIs - API descriptions in RAML format that make the consumption of REST APIs faster and easier.
-
SOAP APIs - API descriptions in WSDL format that make the consumption of a SOAP APIs faster and easier.
-
AsyncAPIs - Specifications for asynchronous APIs.
-
HTTP APIs - An HTTP API lets Anypoint Exchange users specify a placeholder for an endpoint. After you create the HTTP API endpoint, you can optionally manage the endpoint with API Manager.
-
API Spec Fragments - Shared fragments of RAML files that can be used to assemble new APIs with common traits.
Custom - A general category for sharing resources such as links, blogs, articles, videos and more.
-
-
To limit your searches to the categories listed above click on the All types button to the left of the Search box and select the type of asset you would like to limit your search to.

-
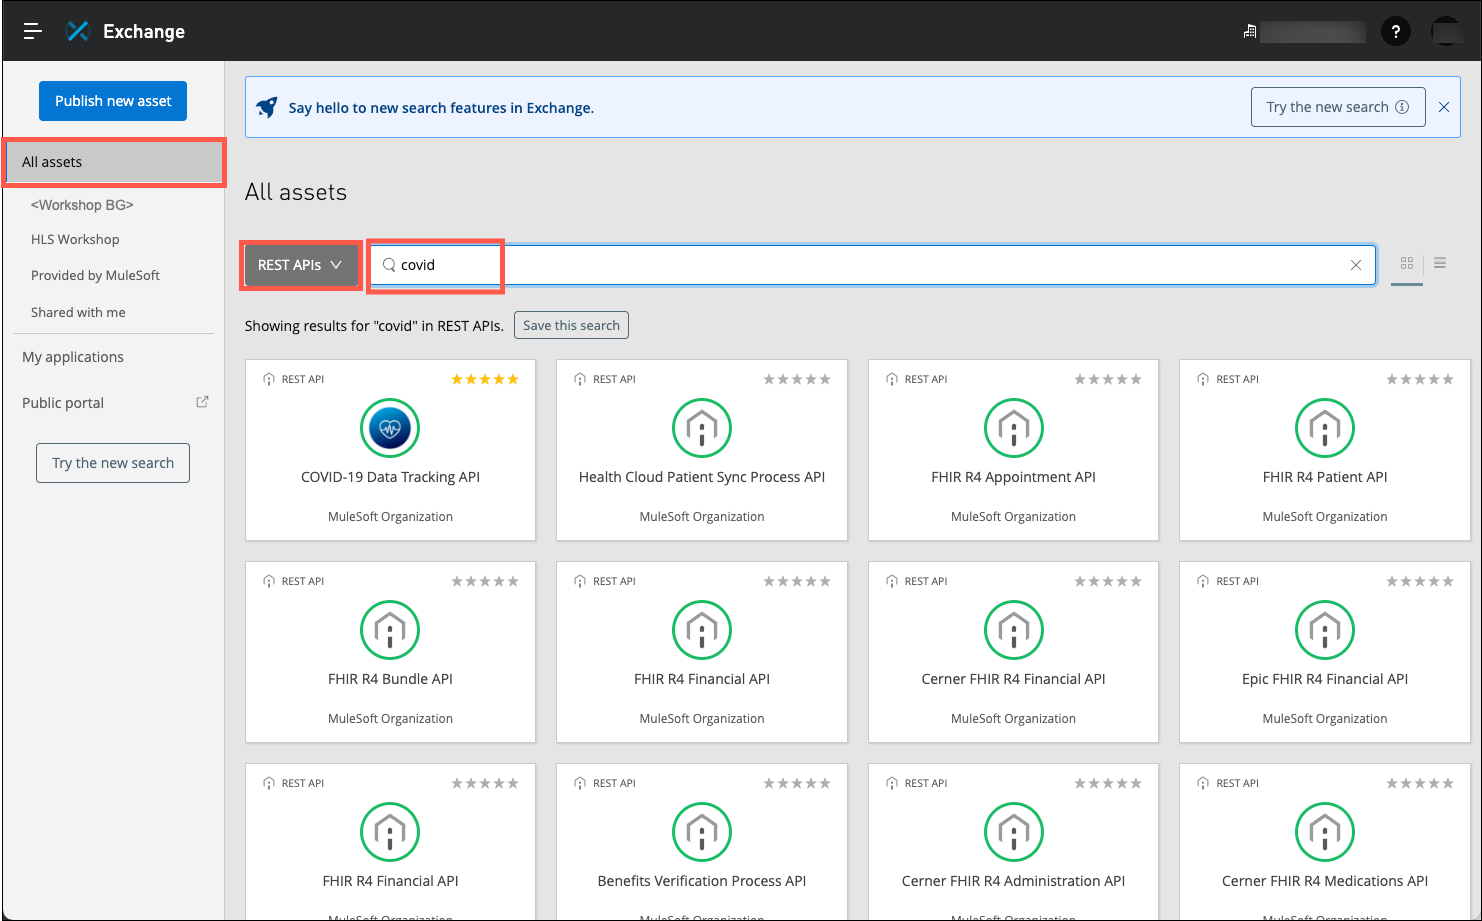
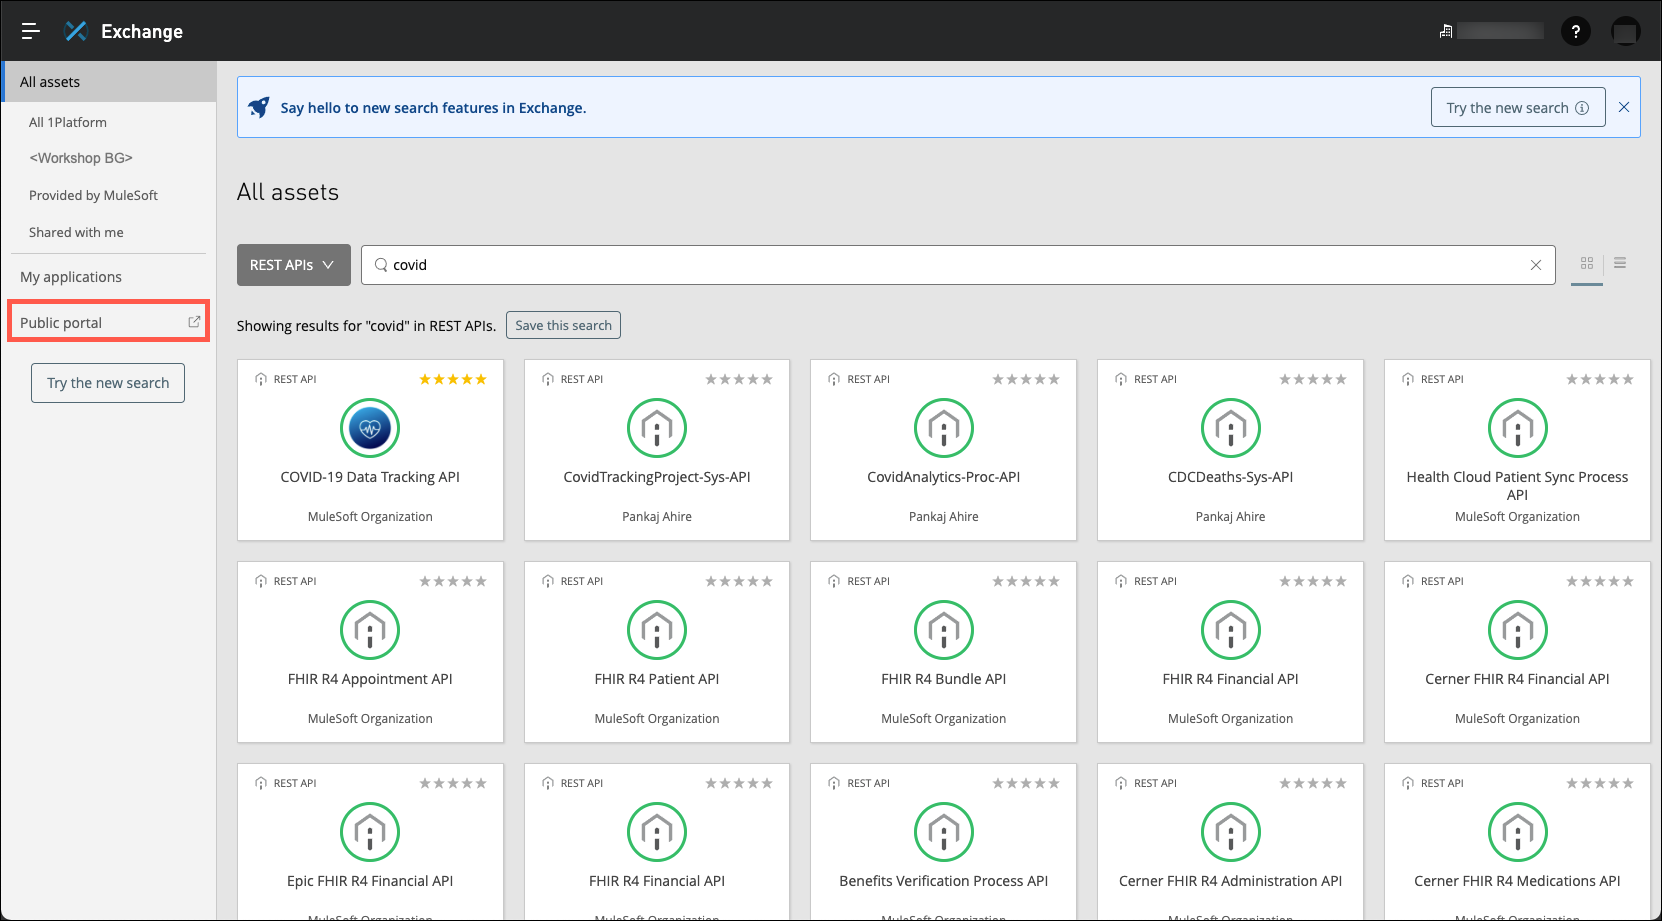
To test out searching for assets in Anypoint Exchange select All assets, enter covid in the Search field, select REST APIs as the type of asset to search for, then press the Enter key. The list of assets should look similar to the screen capture below.
-
Click on the tile named COVID-19 Data Tracking API.
Note:Ensure that you click on the asset that is owned by MuleSoft Organization.
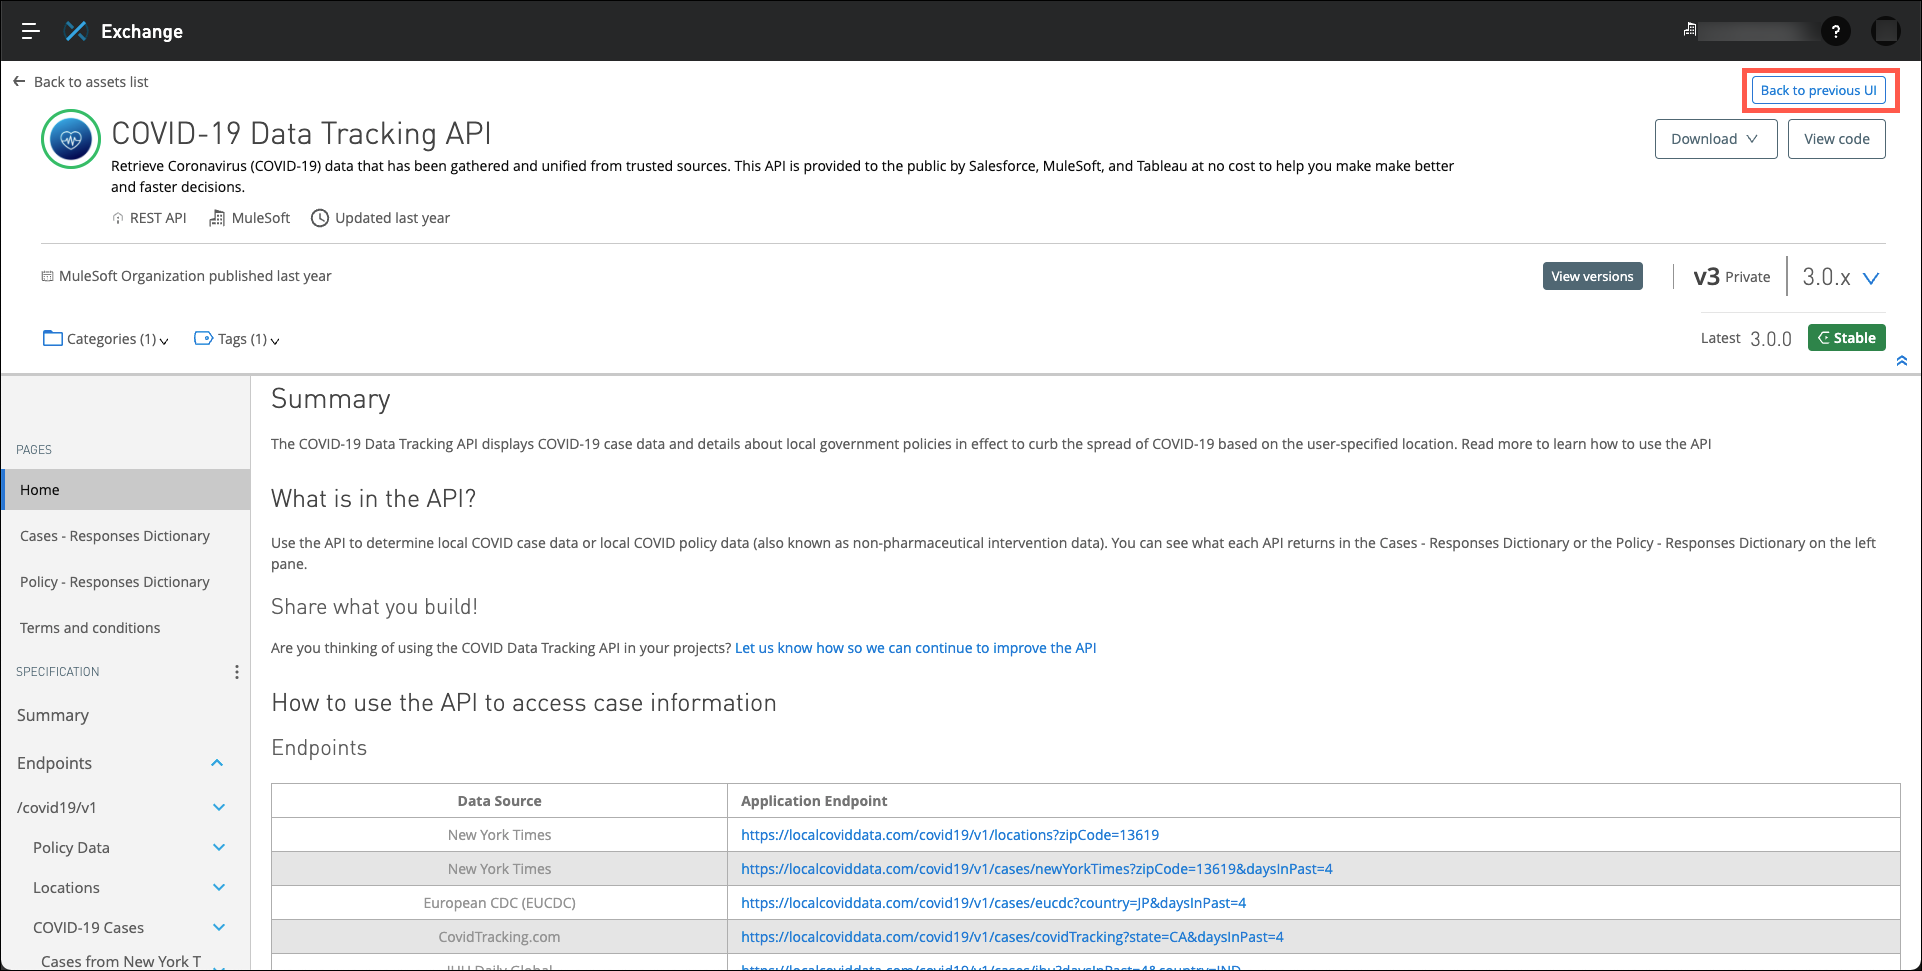
Also, an updated user interface for Anypoint Exchange was just introduced prior to this workshop. If you are presented with the newer version of the user interface simply click on the back to previous UI button in the upper right corner to have all remaining screen match the layouts in this student guide.
-
You should now see the page that describes this API specification.
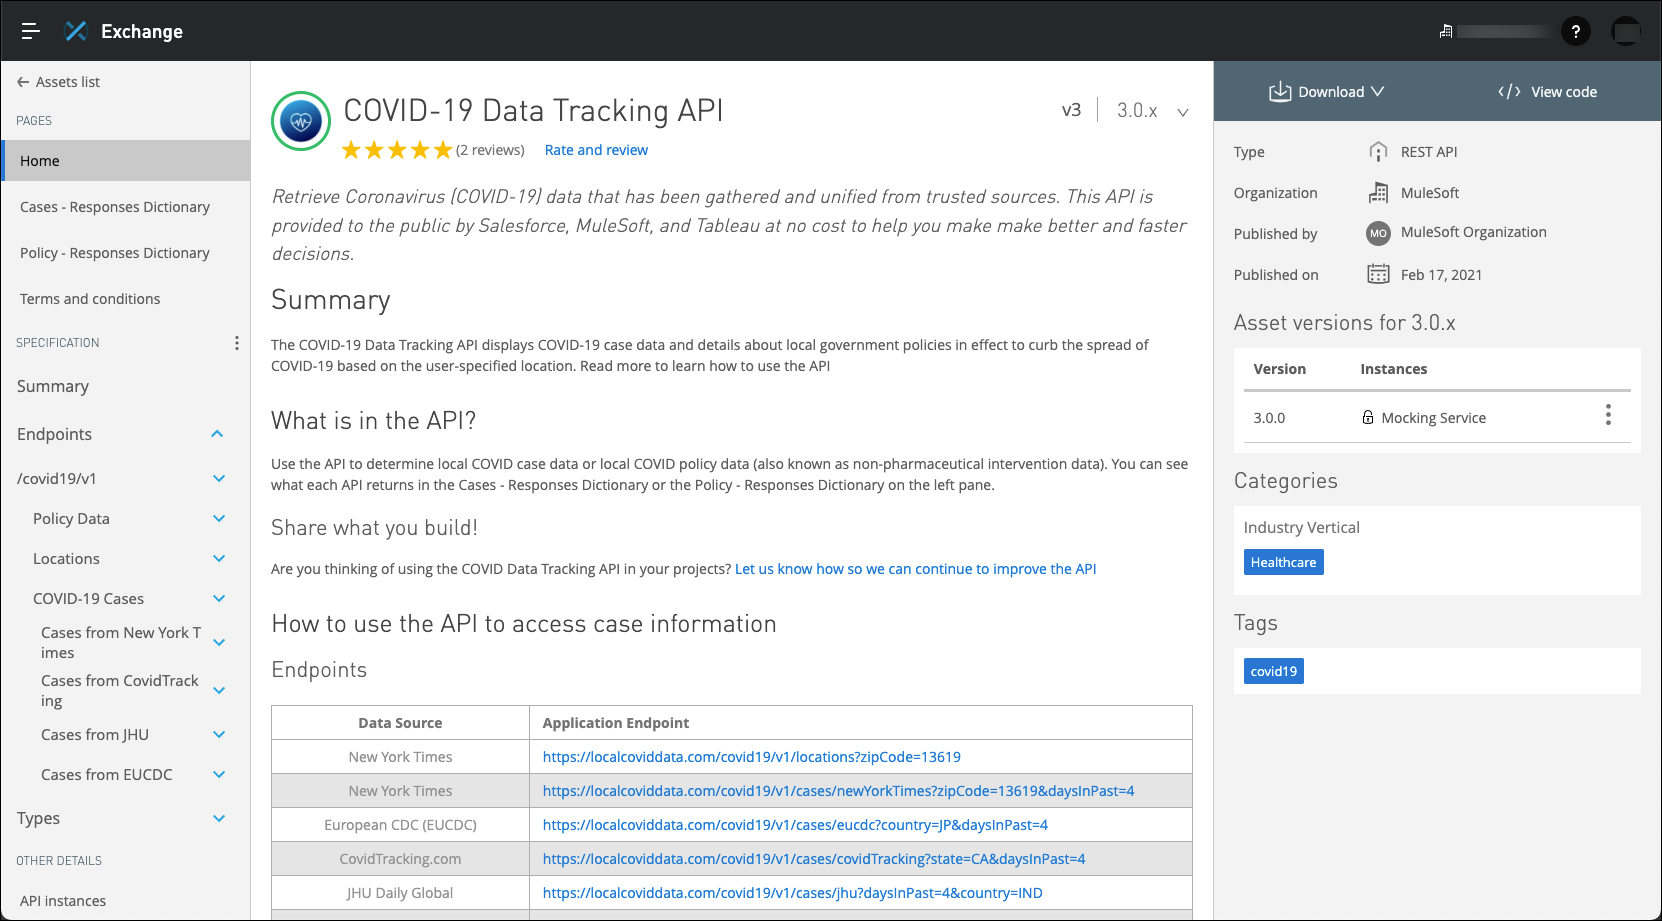
-
Anypoint Exchange enables API developers to provide comprehensive documentation for the APIs that they develop. Developers may use either Markdown or a visual editor to add text, graphics, and hyperlinks.
As in most development projects, the more detail that is added to the API’s documentation, the more likely there will be more consumption and reuse of the API.
Step 4: Explore an API Specification in Anypoint Exchange
Exchange provides several features to support and encourage discovery and collaboration.

-
Options Panel - The options panel will display the various operations that you may perform on the API. These options will vary based on security and the type of asset you are reviewing. For this example, the following options are available:
-
Download - You can download this asset as a RAML or OAS specification, or you may download as a MuleSoft "Connector", which you can use in the Anypoint Studio. (You will be introducec to Anypoint Studio in the next lab exercise.)
-
View code - This option will allow you to view the underlying API specification that this asset is based on.
-
-
Information Panel - This provides general information about the API.
-
Asset Versions - A list of the different versions of the API. It also shows the instances that have been implemented.
-
API Summary - This is the API specification. API resources can be seen here. You can click on each resource and view the documentation.
-
API Instances - This gives you the opportunity to view API Implementation endpoints.
Step 5: Test the Methods of the API via the Mocking Service
A very useful feature available in Anypoint Exchange is having the ability to execute the API specification without having to code anything. Anypoint Exchange provides a mocking service that will read the API specification, create an example instance of the API/service and return example data responses.
The mocking service allows users to interact with the API as if it was built and deployed. This feature allows you to rapidly iterate the API design with its consumer to finalize the API contract.
Complete the following steps to explore the mocking service:
-
In the API Summary section locate and expand the /covid19/v1/Policy Data endpoint.
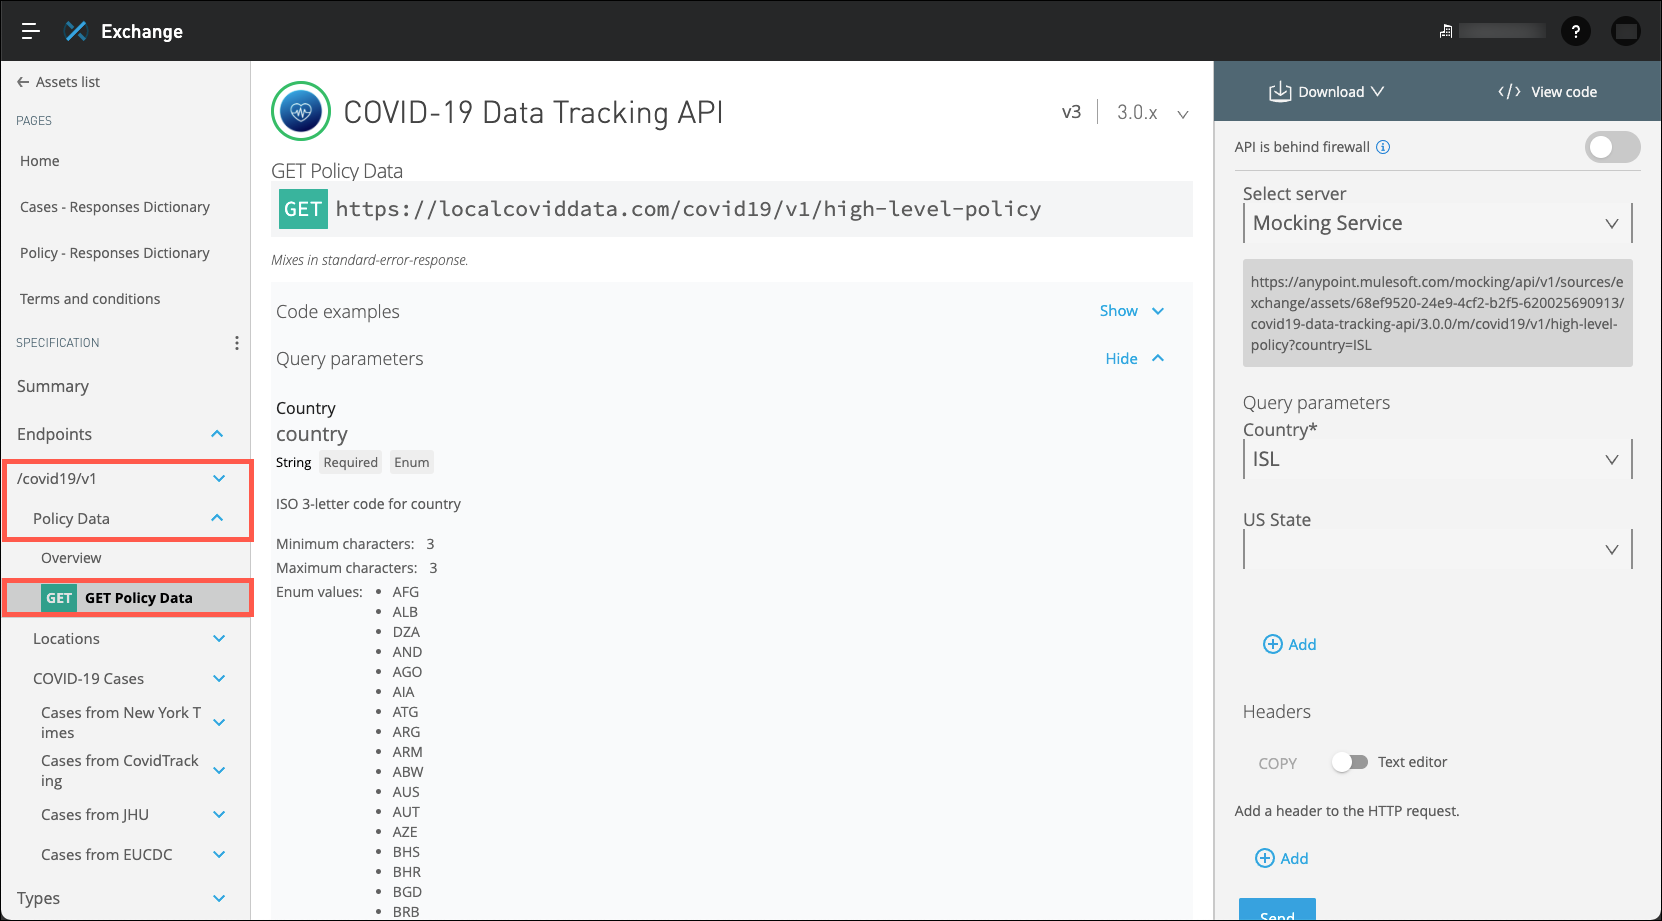
-
Click on the GET method. Details about the API specification will be displayed in the center of the page. On the right side you will see various fields that may be entered to test out the API. For this example, you can see the following fields
-
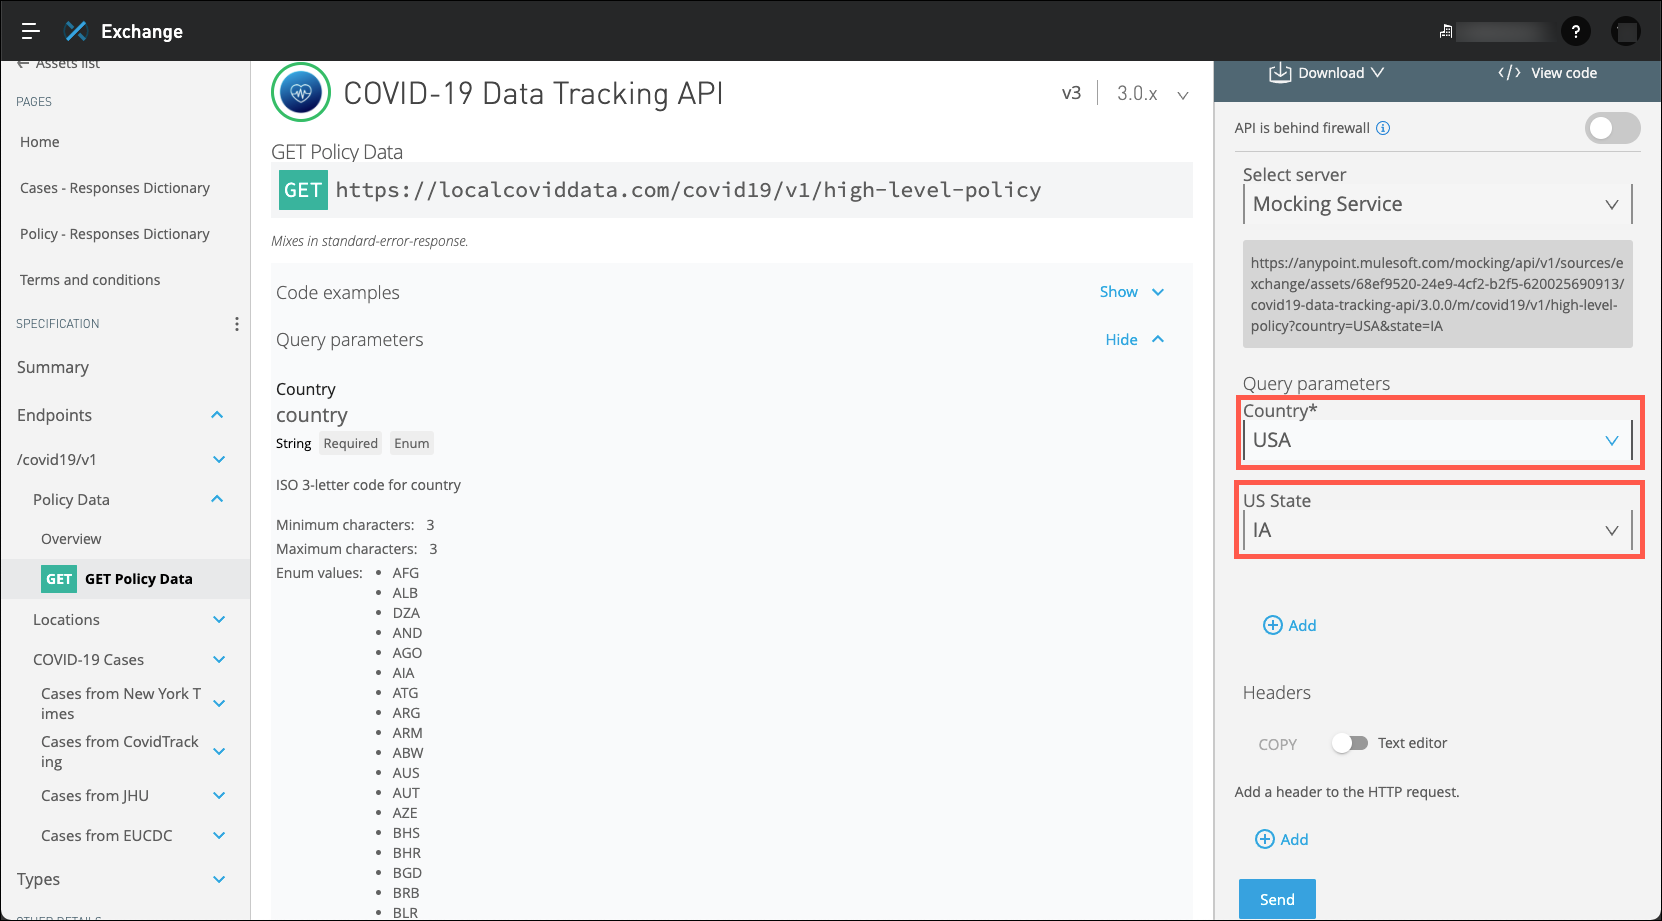
A Country query parameter is displayed. Note the asterisk next to this field. An asterisk indicates that this field is required. You must enter a value for the mocking service. Select USA.
-
A US State query parameter is also displayed. Select a value that corresponds to your state.
-
-
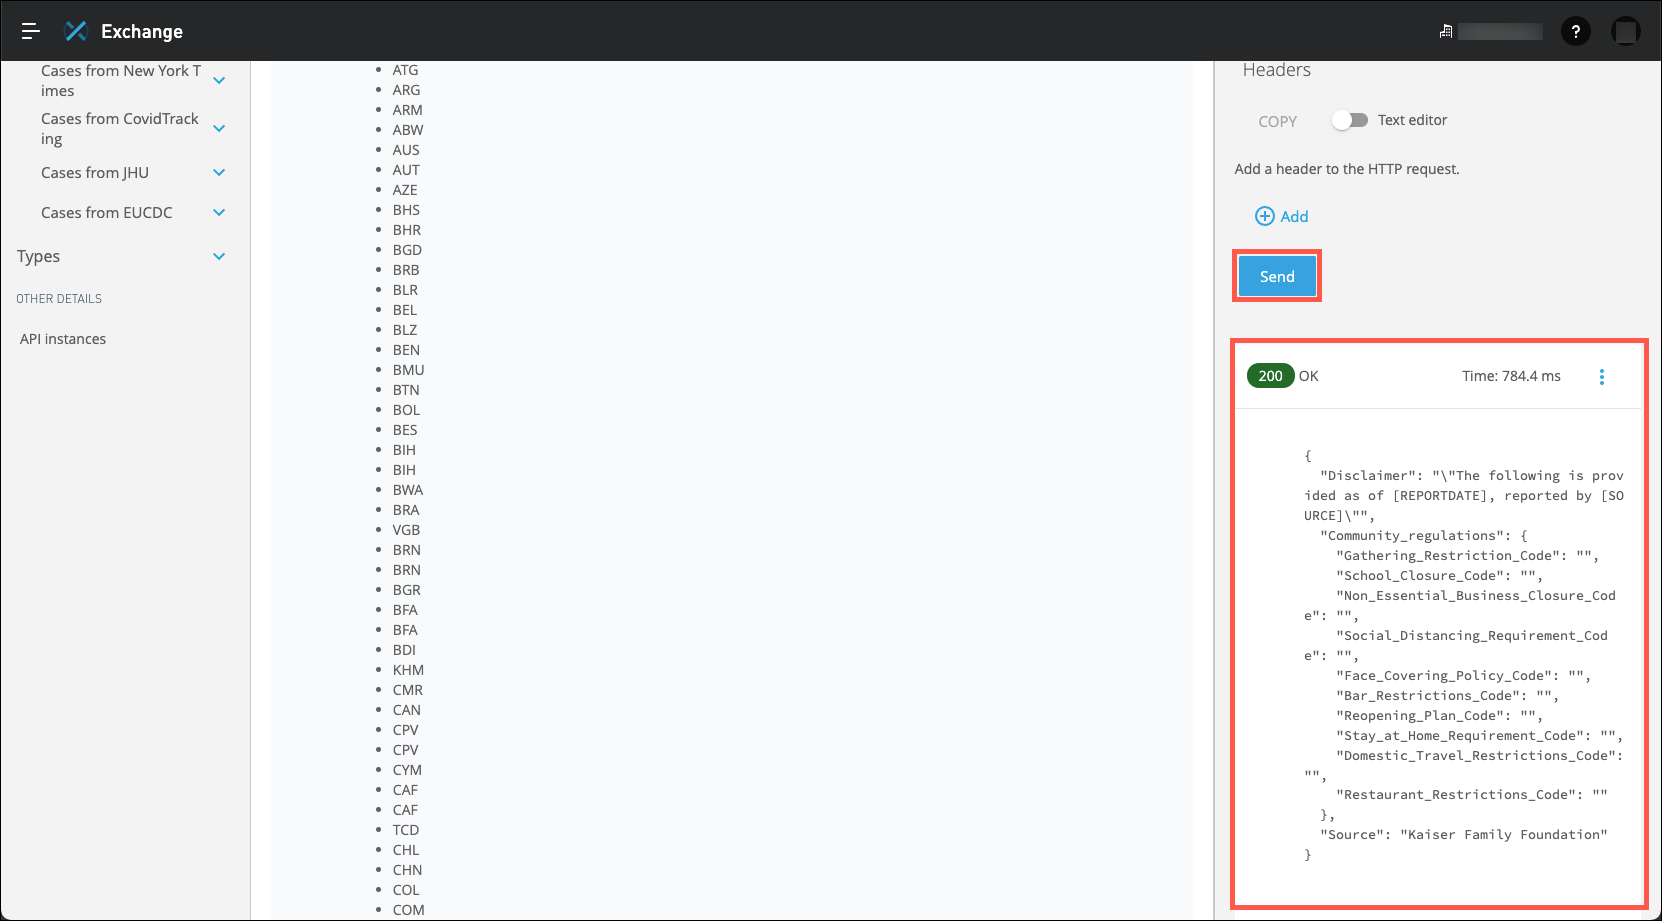
Scroll the page until the Send button is displayed. Click on the Send button to execute the mock GET method at /covid19/v1/high-level-policy. A sample response payload will be displayed.
-
Return to the Exchange Assets page by clicking on the Assets list link in the upper left corner of the page.
Step 6: Review the Public Portal
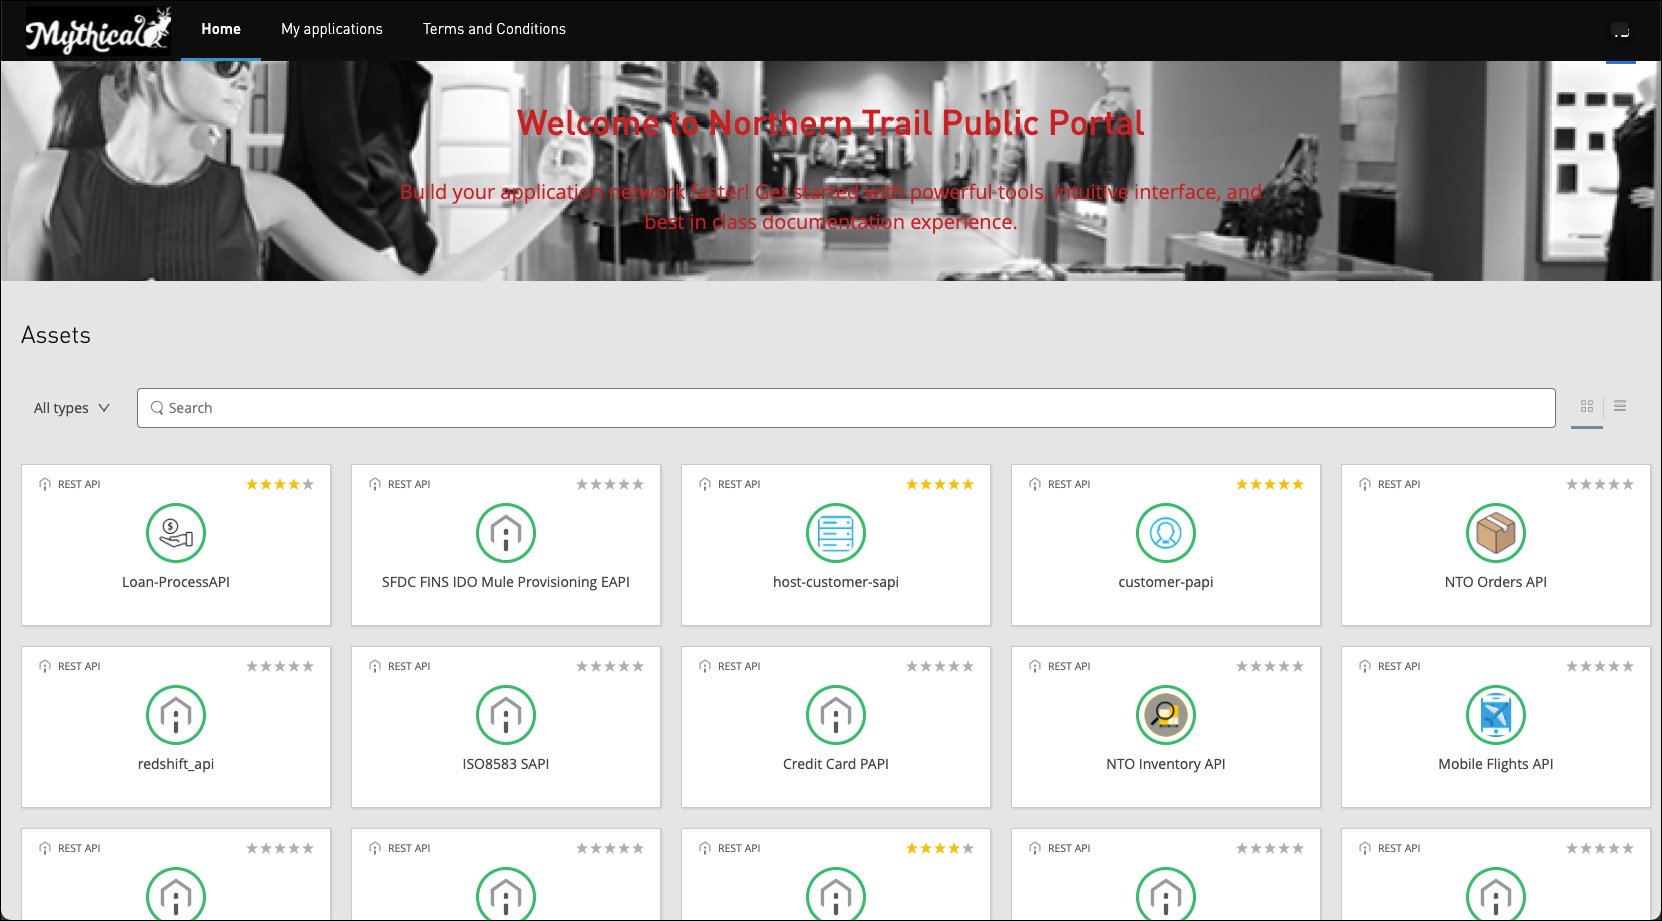
Anypoint Exchange provides a public portal where you can use to publish select API specifications for any users within your organization to access.
-
Click on the Public portal link on the left side of the page to see an example of the Public Portal.
-
The following is an example of a Public Portal. Note that yours may appear differently. Exchange administrators may tailor the appearance of the Public Portal to match your organization’s preferences.
Step 7: Creating an API Specification
Now that you’ve seen how Anypoint Exchange provides the ability to search for and try out an API specification, you will use the Design Center to create an API specification from scratch and publish it to Anypoint Exchange. For this exercise you will create a simplified version of the COVID-19 Data Tracking API
-
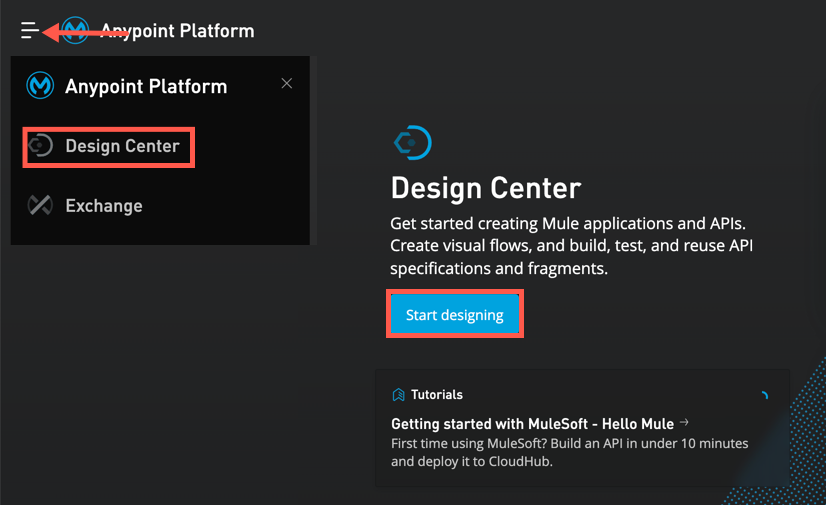
From the Anypoint Platform home page click on the Start designing link under Design Center. Or, you may click on the "hamburger menu" at the top left of the page and then click on the Design Center link.
-
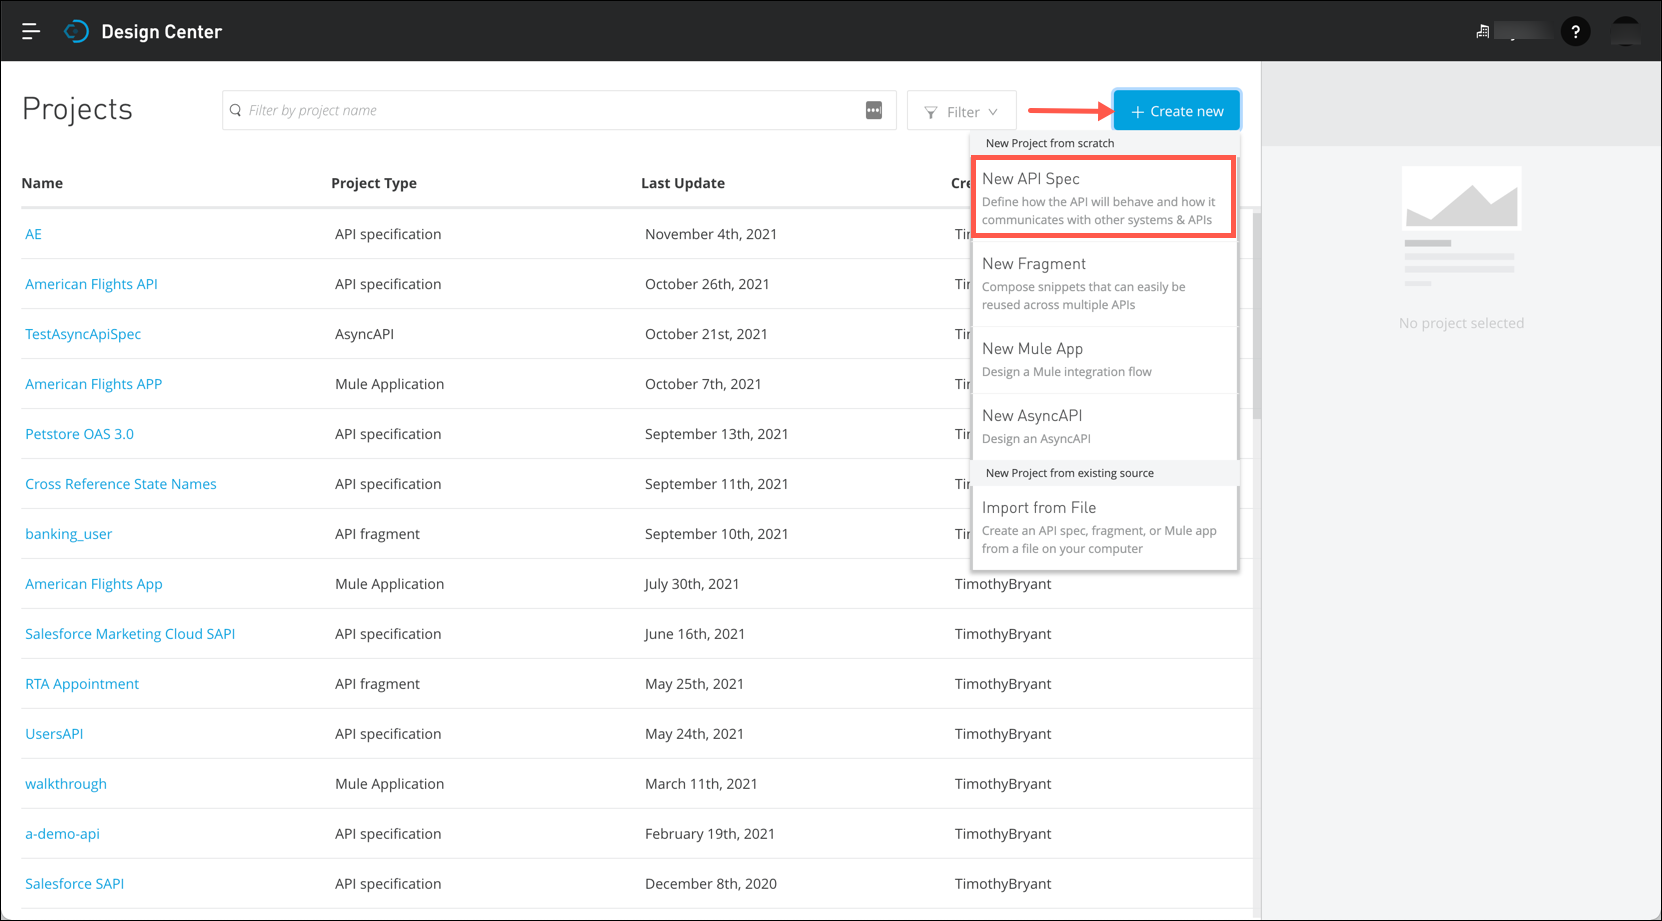
Click on the + Create new button and then click on the New API Spec menu option.
-
The Design Center provides a guided editor to help developers who are new to designing API specifications create a basic, yet functional API specification. Experienced API developers who want to take advantage of all of the capabilities of an API specification language may want to start with the advanced editor. The Design Center will allow you to start with the guided editor to get the basic layout of the API defined, then switch to the advanced editor to add capabilties that are not exposed in the guided editor.
For this exercise you will start with the guided editor, then switch over to use the advanced editor.
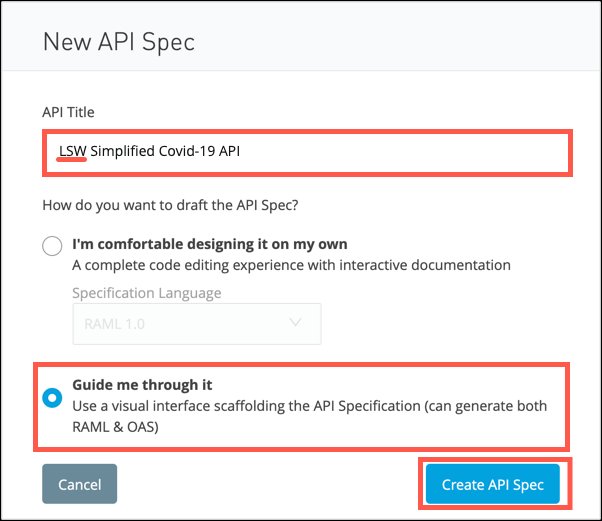
Enter a name for your API in the API Title text box, select the Guide me through it radio button and then click on the Create API Spec button.
Note: APIs deployed to CloudHub must have unique names. Add your initials as a prefix to the API in order to prevent duplicate API names.
-
Complete the entries as shown below. Note that the Protocols and Media type fields are drop down lists that allow you to select the proper entries for that property. Also, note that the Base URI Parameters drop down list will expose an Add Base URI Parameter button that will allow you to specify one or more URI parameters, as needed.
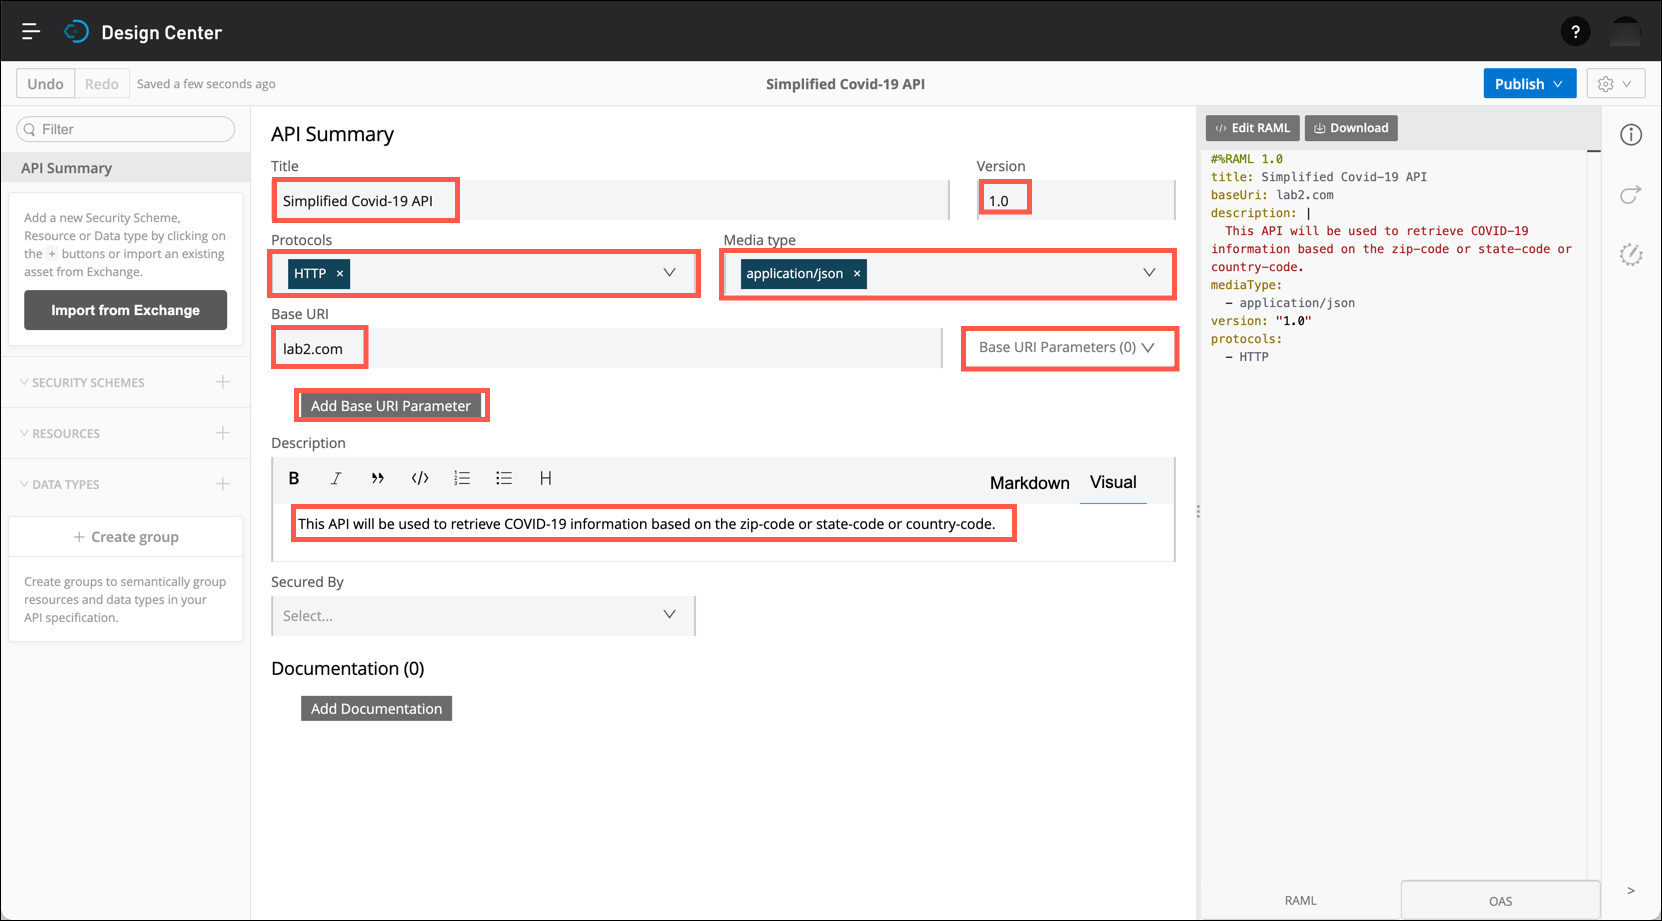
An API specification may include URI parameters as well as Query parameters. If you choose to include URI parameters you would click on the Add Base URI Parameter button to add one or more URI parameters.
On the right side of the editor you will see that as you are completing the various entries, the API specification is being created on the fly. At the bottom of the API specification pane you will see a RAML tab as well as an OAS tab. This will allow you to see how your API specification will be exported when you are ready to either download it to your workstation or publish it to Anypoint Exchange.

-
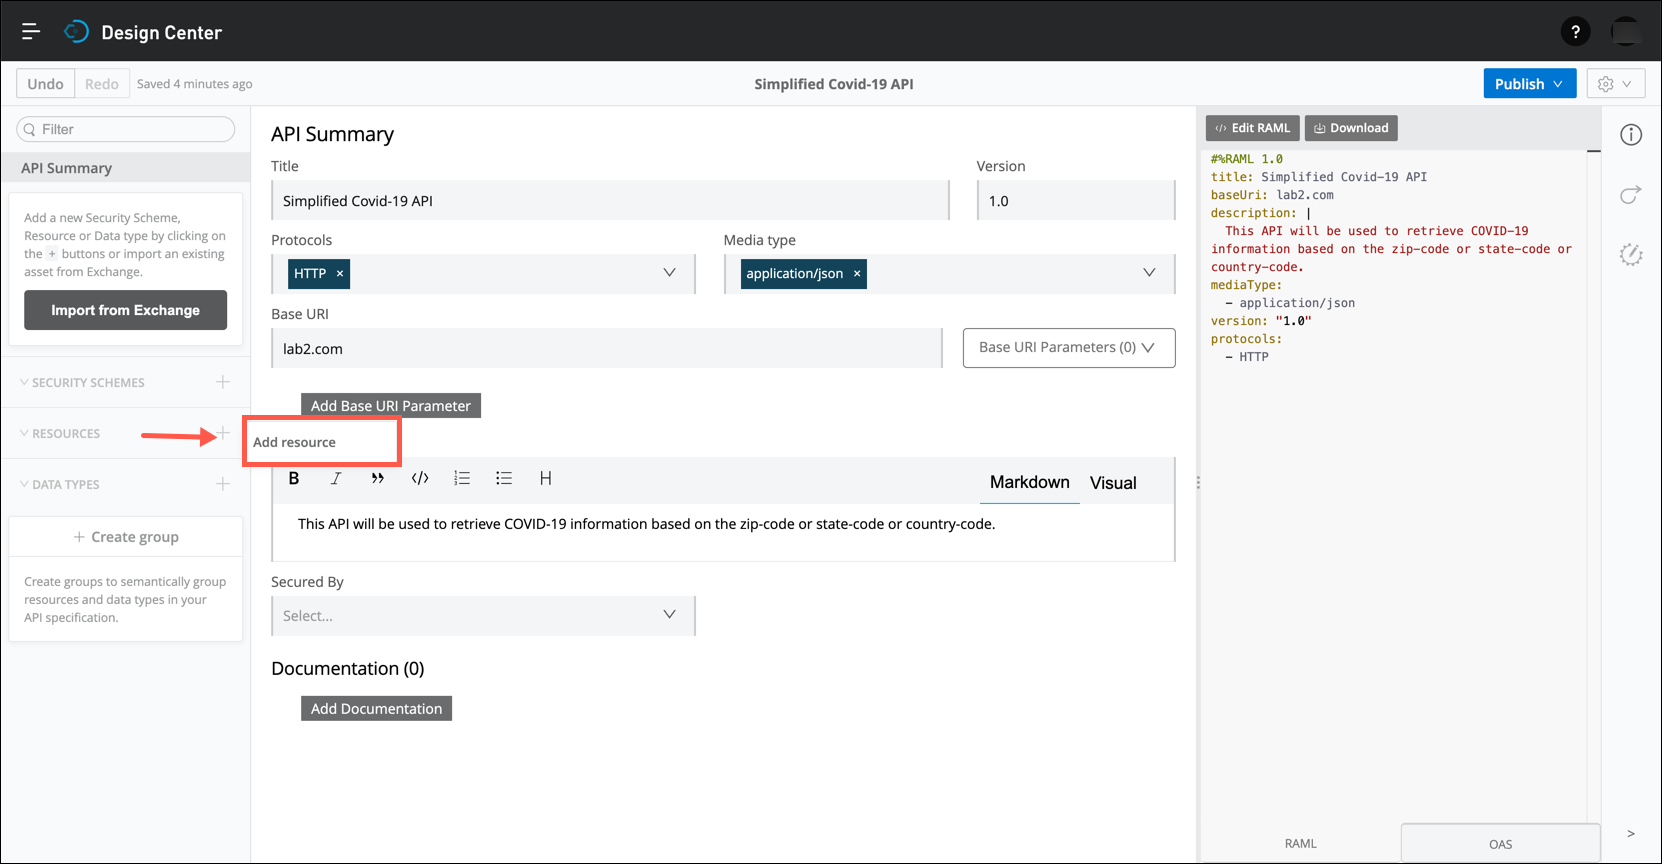
An API Specification must include at least one resource for it to be functional. For this simplified API you will create a resource named /covid19/v1/high-level-policy. Click on the + to the right of the RESOURCES drop down list, then click on the Add resource link.
-
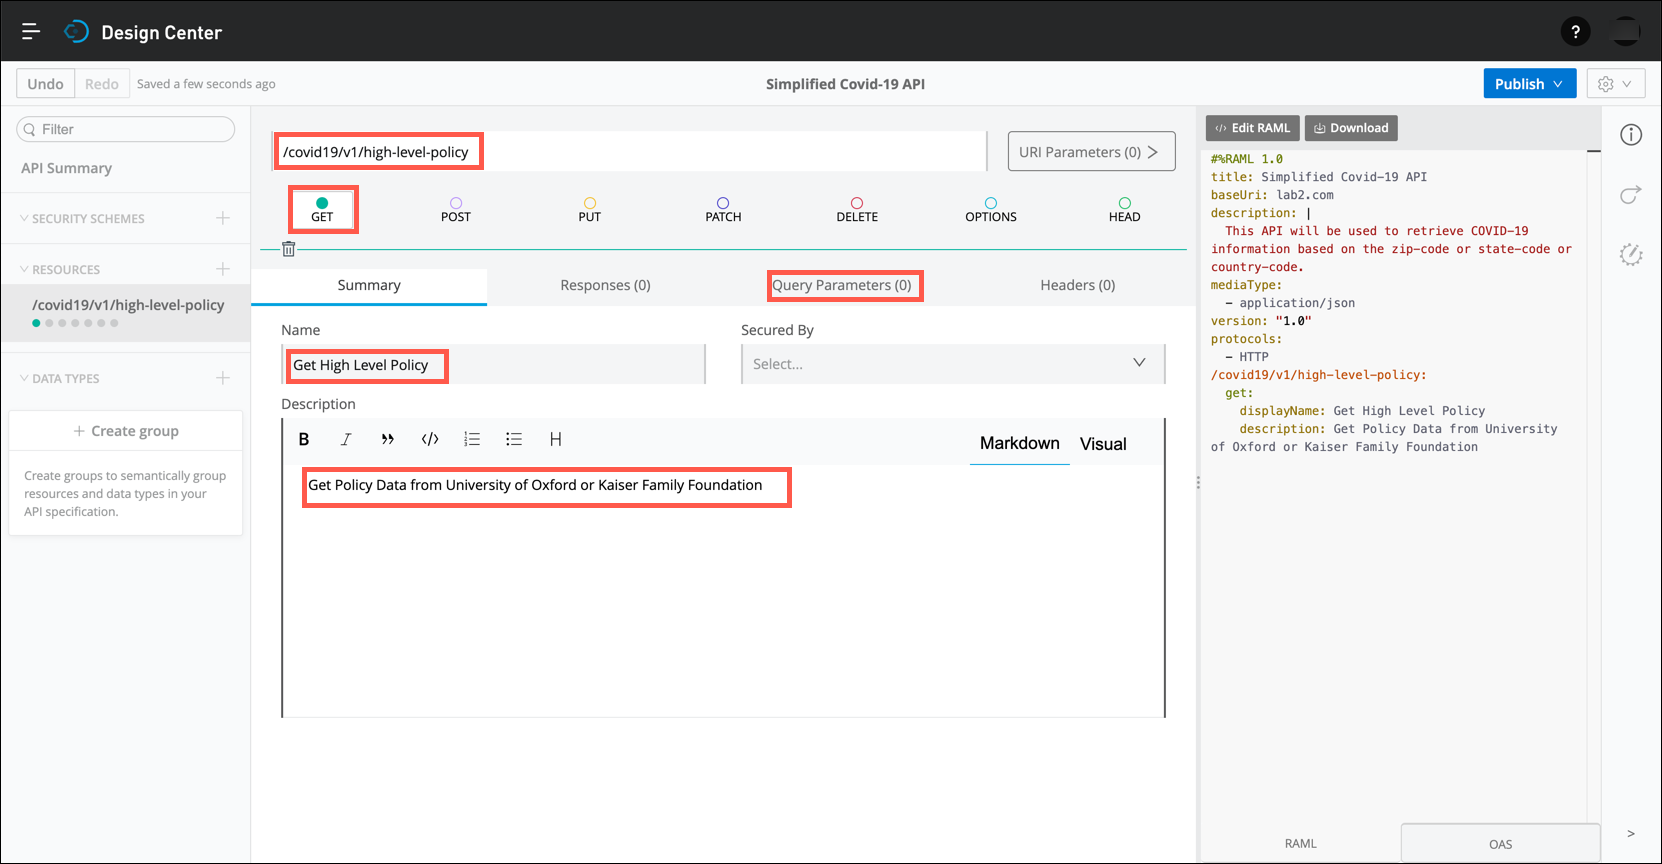
Enter the resource path at the top of the page, then click on the GET radio button. Provide an appropriate name for this resource/method and a description, then click on the Query Parameters tab.
-
Click on the Add Query Parameter button to add the country and state query parameters. Note and complete the following entries:
-
The country query parameter is a String data type and is required.
-
To view and set additional details you must click on the arrow on the right side of the query parameter name.
-
Valid entries must be from an enumeration. In this case, the country query parameter must be either USA or CAN.
-
The query parameter must be exactly 3 characters in length.
-
The default value for the country query parameter is USA.
-
The state query parameter is optional.

-
-
As you may expect, there are a number of additional attributes and constraints that you can apply to an API specification. Many are availble in the guided editor. However, as mentioned earlier, if you want to utilize more advanced features you can change your editor mode to the advanced mode by clicking on the Edit RAML button. Click on the *Edit RAML" button now in order to work with the advanced editor.
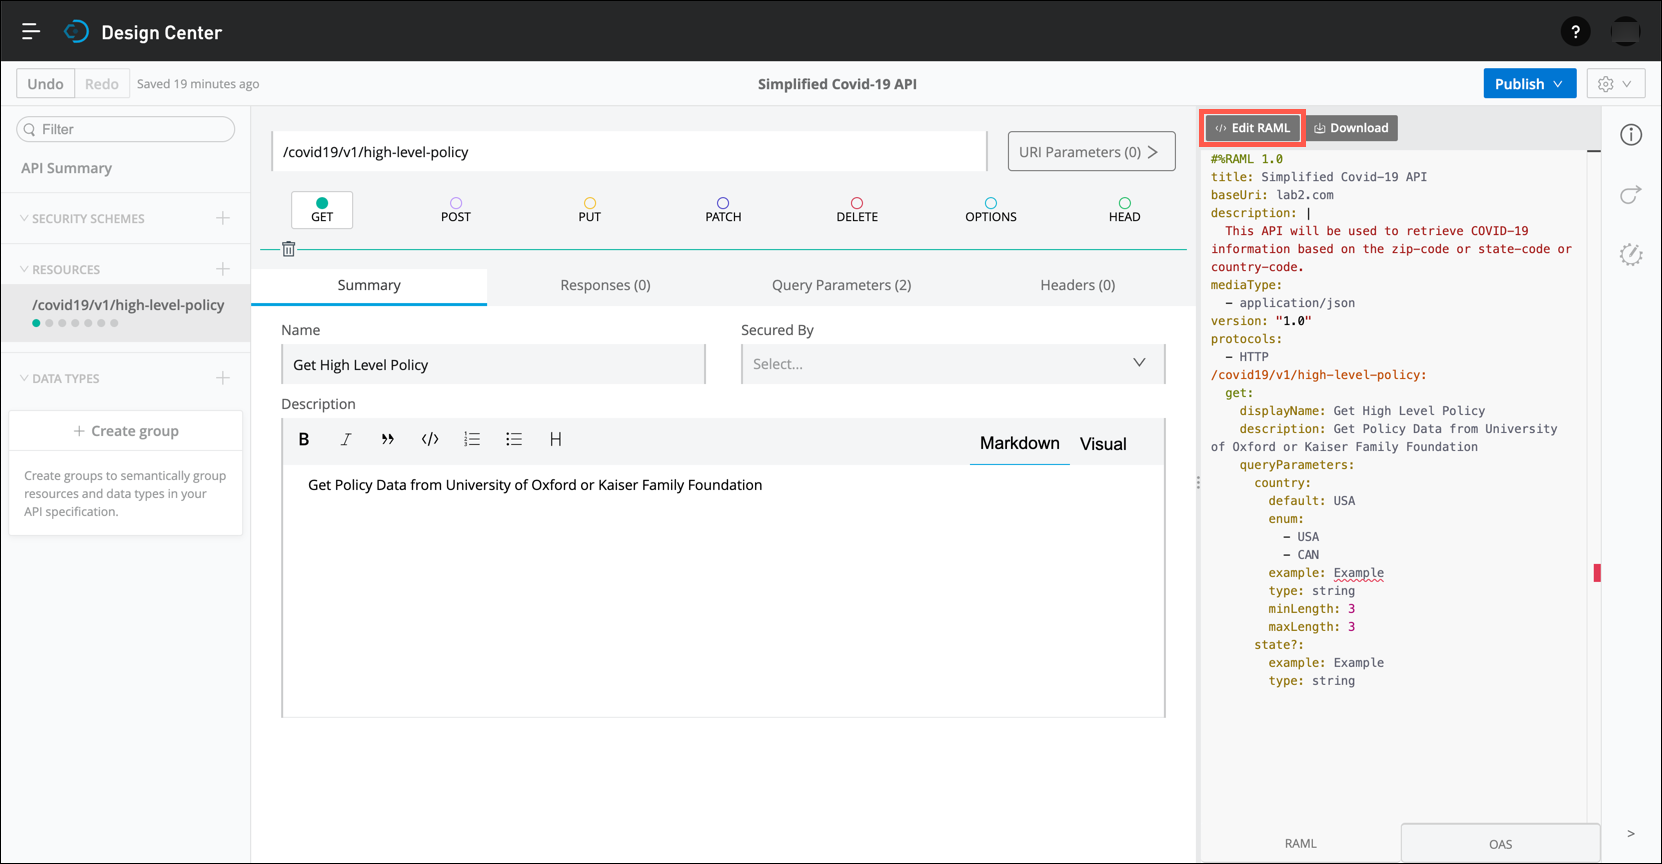
-
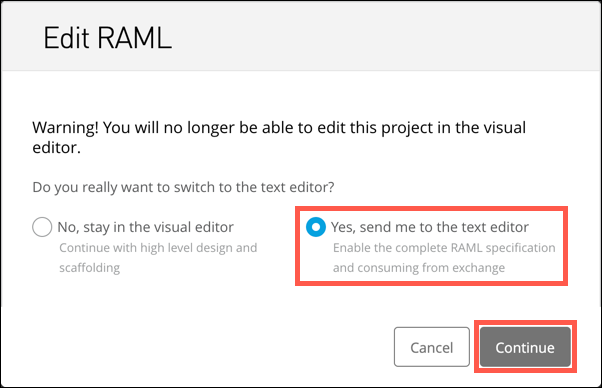
You will be presented with a verification prompt. Since using the advanced editor will allow you to include specifications that the visual editor does not support, switching to use the advanced editor will prevent you from making any further edits to this API specification with the visual editor.
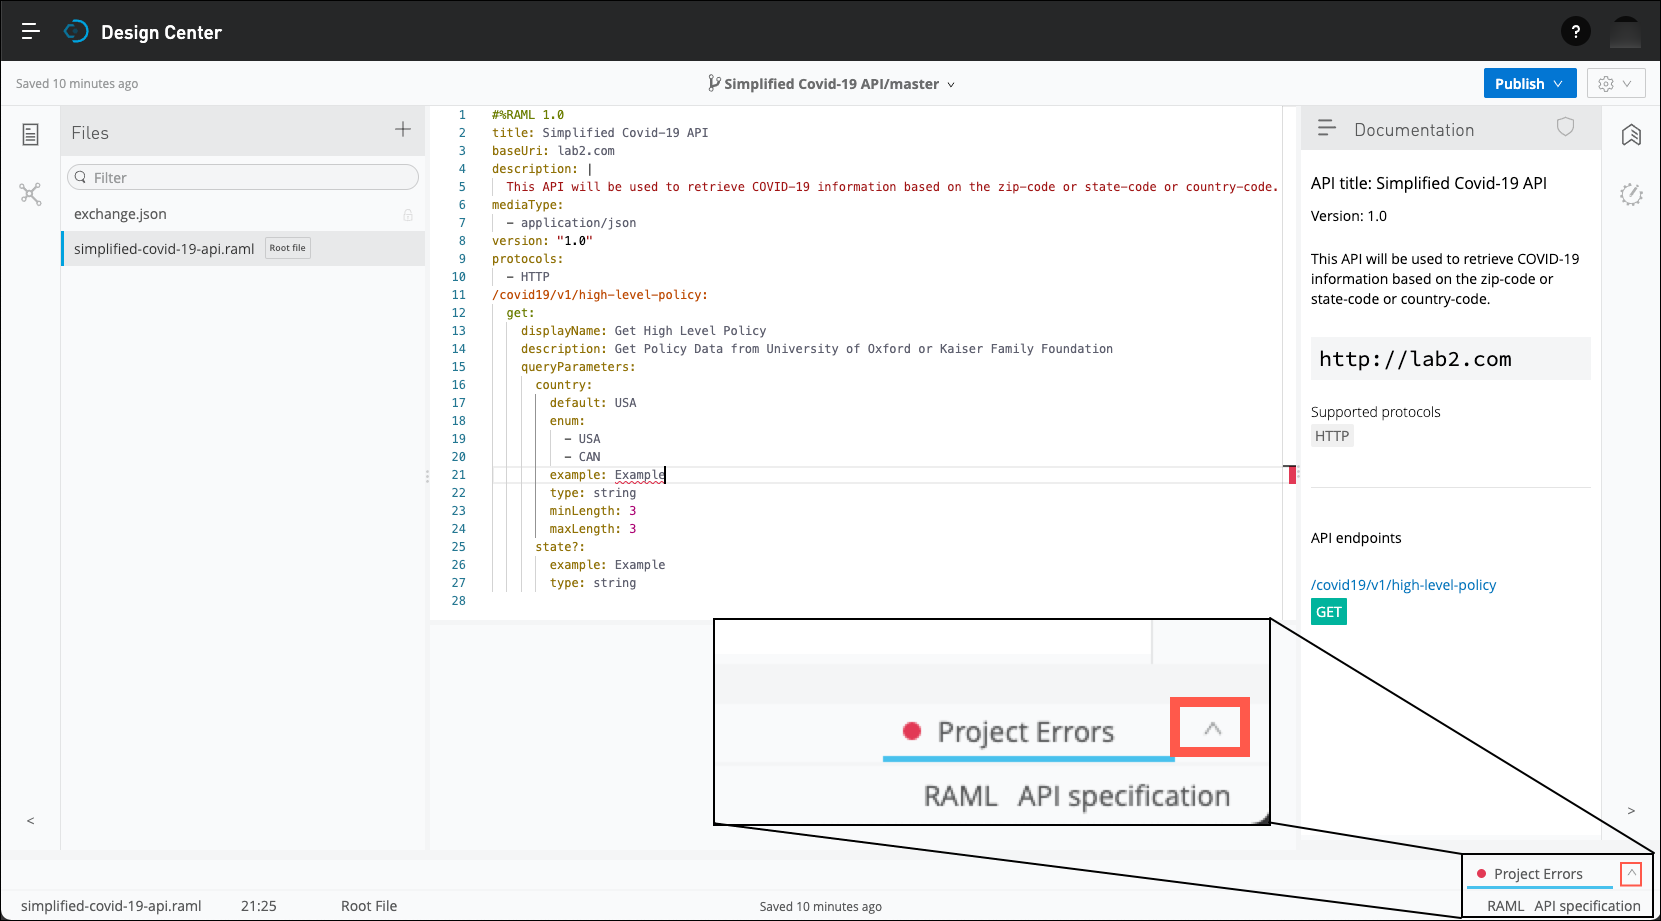
The advanced editor provides a number of productivity features that enables an API developer to quickly build our their API speficiation. Several of these features are higlighted below:
1) The Files and Dependencies icons allows a developer to create different parts of an API specification in separate files, then include them in a parent specification. This enables reuse of items such as message format definitions and code samples by multiple API specifications.
2) The main API editor is where developers create their API specification. Position your cursor at different points in the API specification and notice how the prompts in the lower panel change to show the valid entries that may be made at that position in the specification.
Note: Recall that RAML API specifications are based on YAML syntax. Identation level is significant, and the advanced API editor provides assistance in ensuring that the specification is coded properly.
3) The lower panel in the editor provides a prompt for which entries are valid at this point in the specification.
4) You have already been introduced to the mocking service that Anypoint Exchange provides. The same mocking service is available in the Design Center to enable API developers to test their specifications as they are being written.
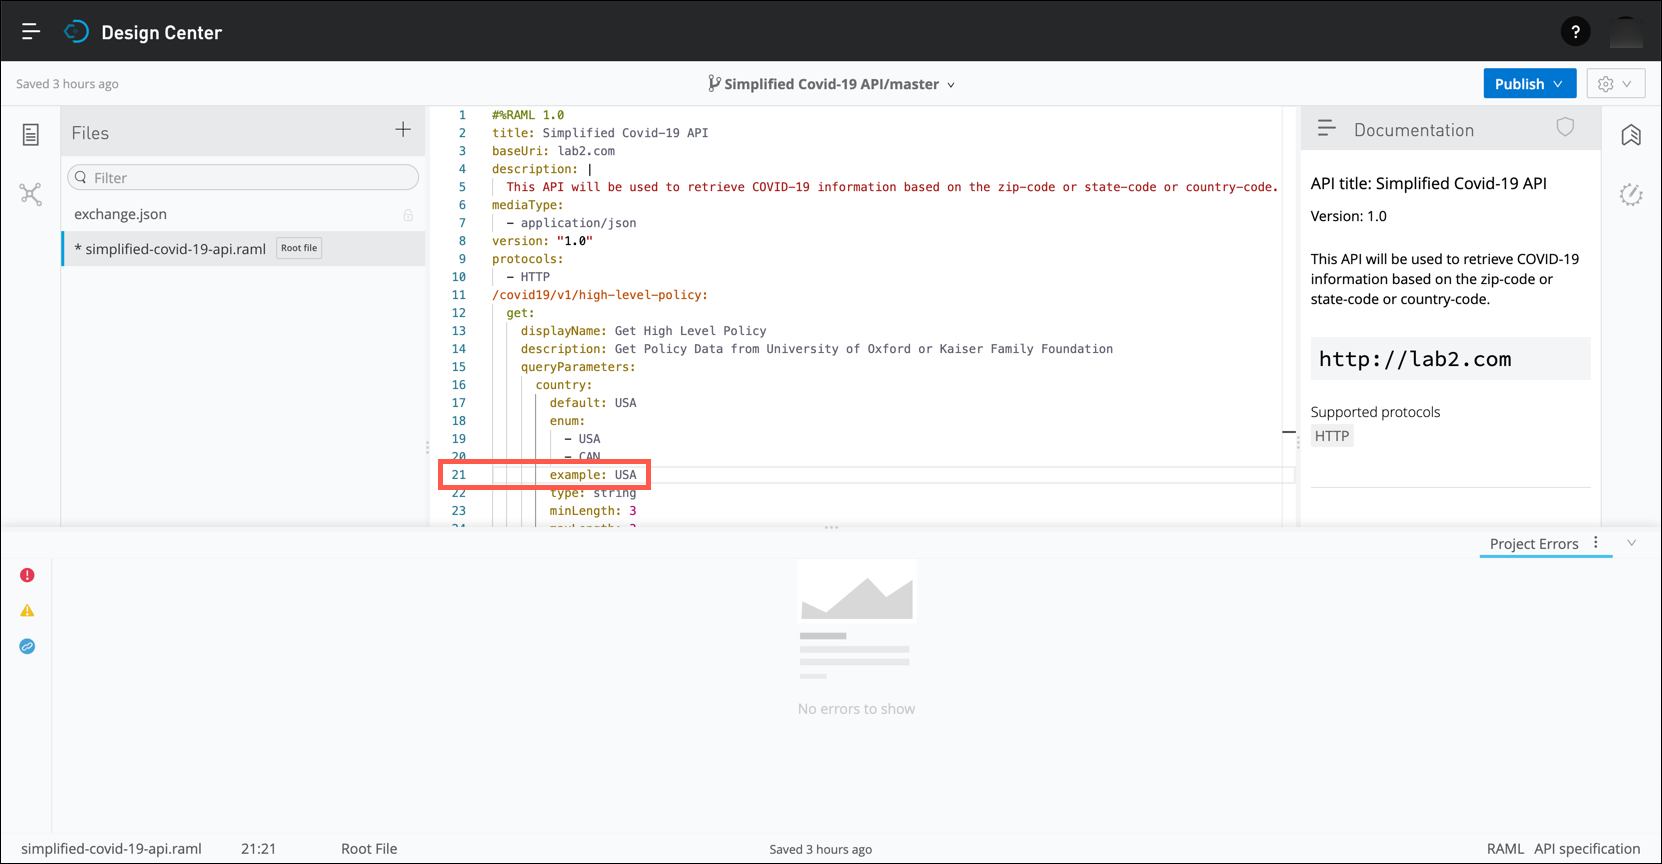
5) Errors that may be present in an API specification are noted in the lower, right corner of the editor. Click on the ^ link to display the error that is currently present in the specifcation.
-
You will see a list of errors that are currently detected in your API specification. Note the entry in the LOCATION column. It is referring to an error that is present in line 21, column 18 of the API specification. The DESCRIPTION column will provide additional detail on the nature of the error.
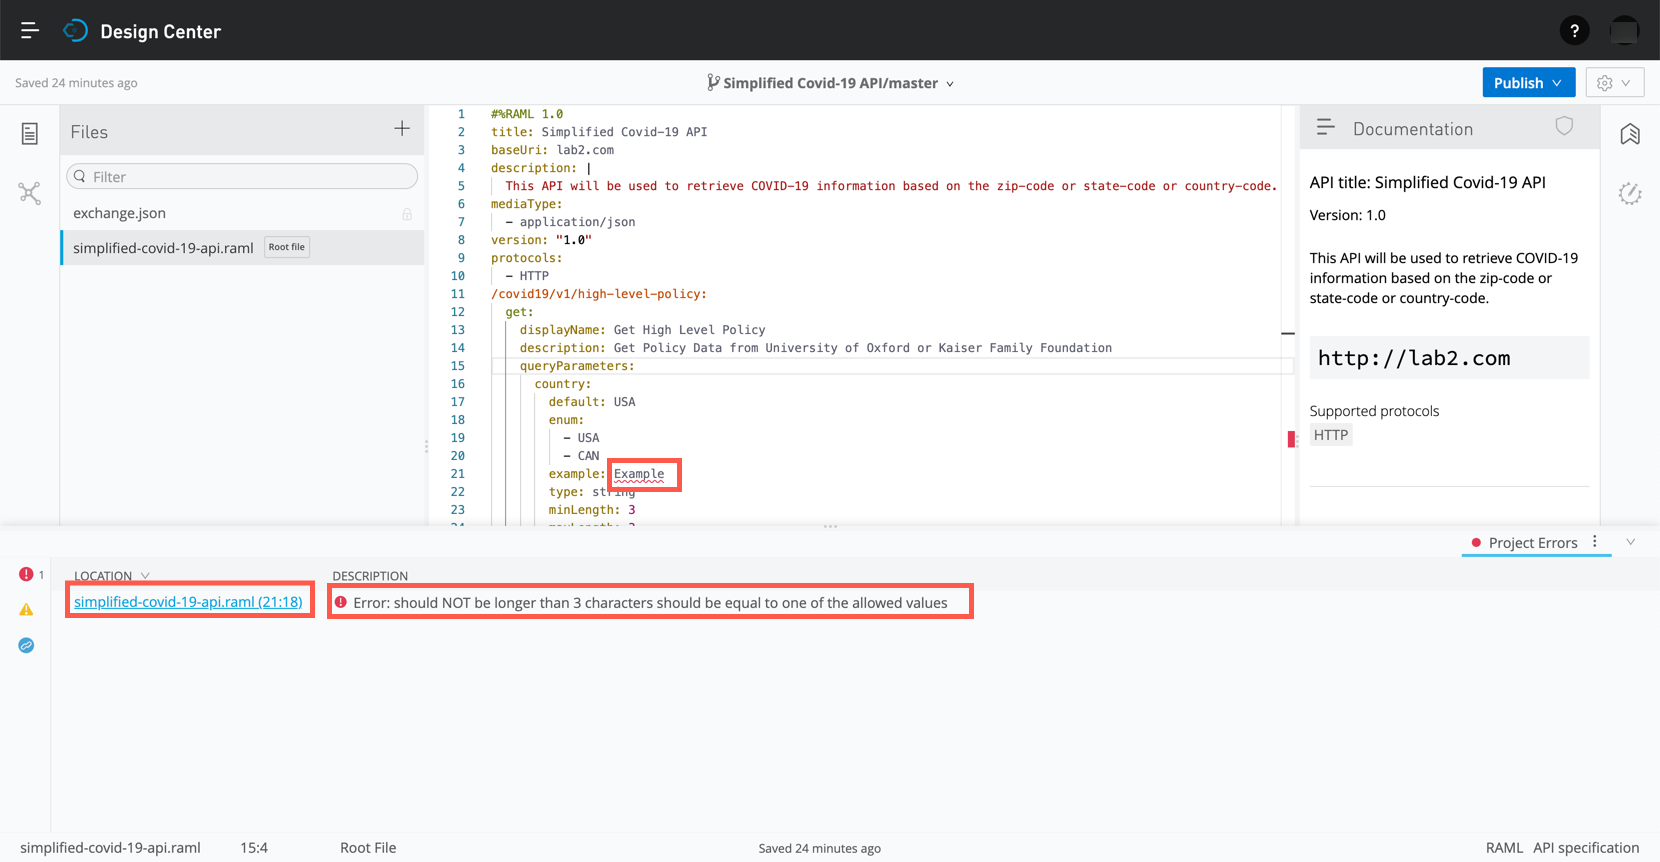
-
In this case, the country query parameter has been configured to accept entries that are exactly 3 characters. Line 21 includes an example stanza, with the value set to the word Example. Change this entry to either USA or CAN and you should see the error disappear.
-
Feel free to explore other features of the advanced editor. When you are ready, ensure that there are no errors reported in the Project Errors section, then click on the Publish and Publish to Exchange button to continue.
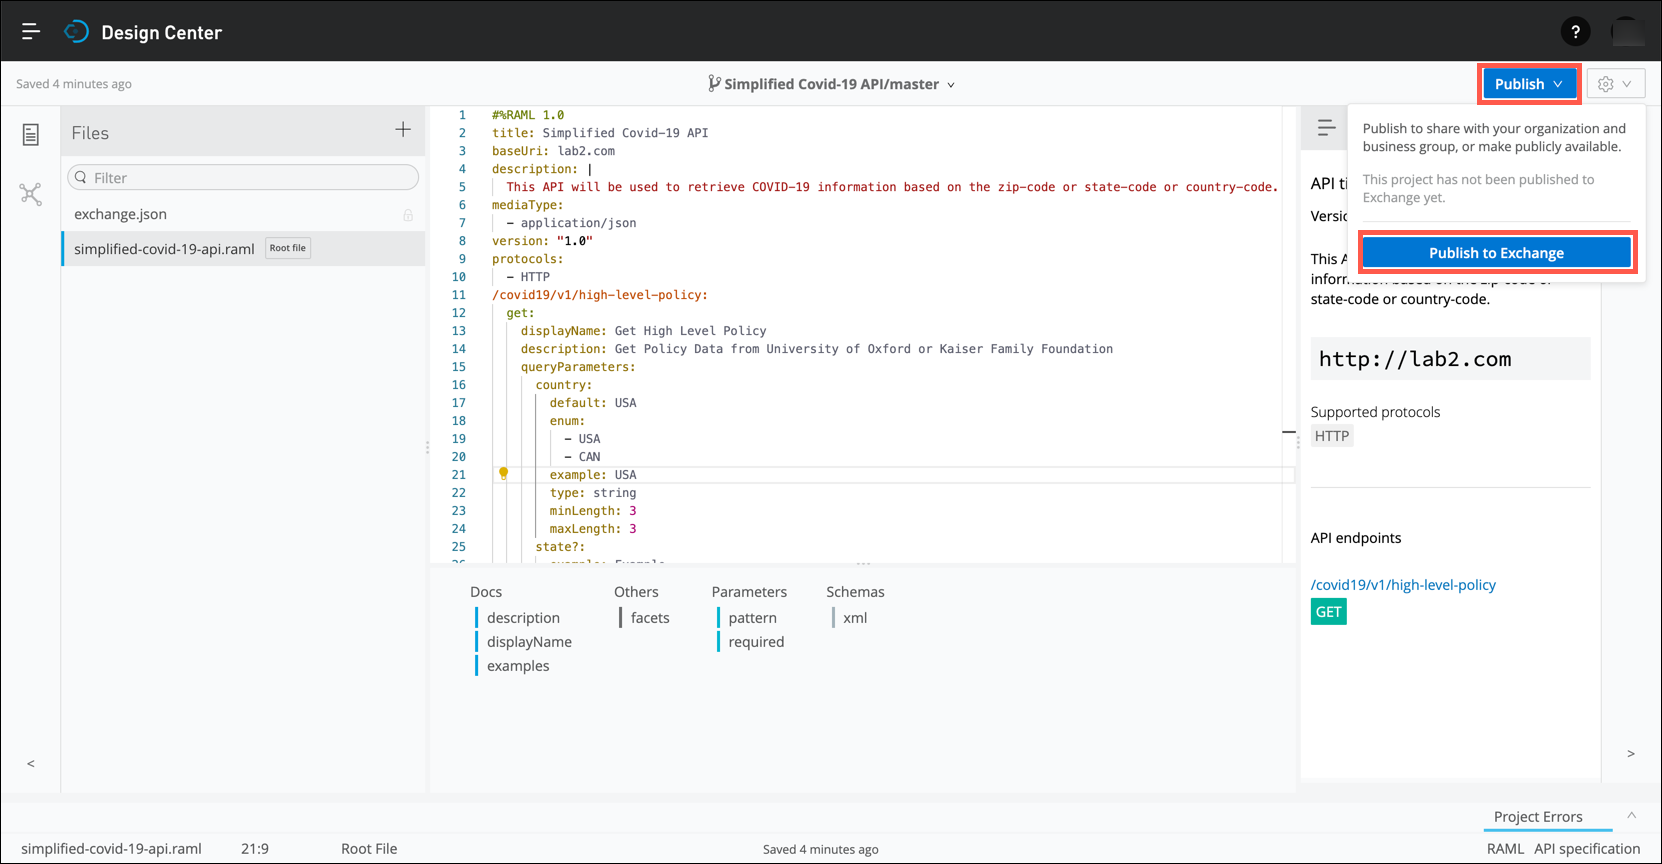
-
You will need to assign an Asset version value to your API specification. Once you have assigned a value click on the Publish to Exchange button to start the process.
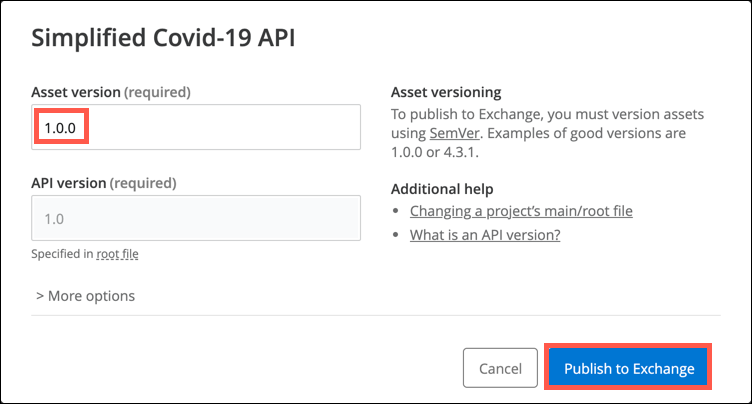
-
The API specification will be checked once again for errors, then will be published to Anypoint Exchange. Once publication has successfully completed the following message will appear. Click on the Exchange link to continue.
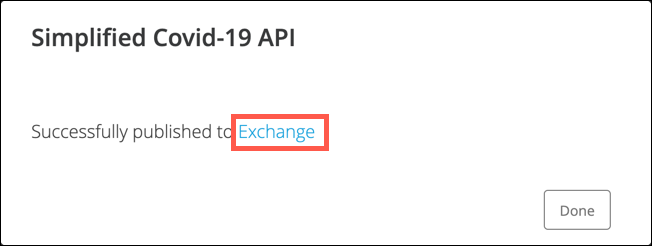
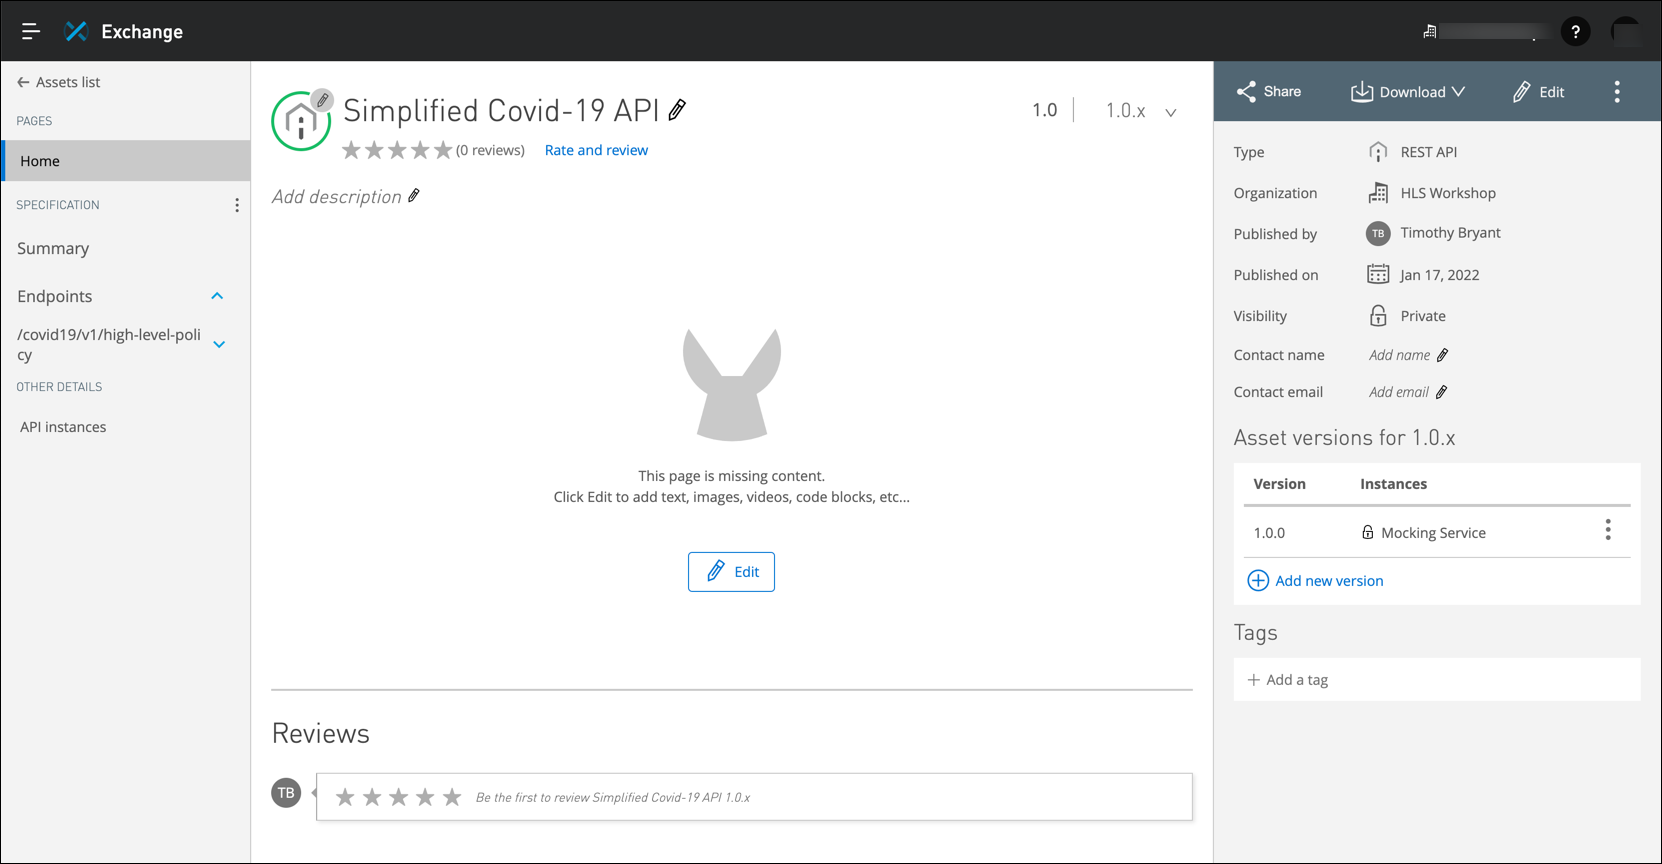
You should now see your API specification in Anypoint Exchange. From this point you can edit the details of this API specification to include text, tables, graphics etc.
Summary
Now that you have seen how you can access, test and create API specifications that are hosted in Anypoint Exchange you are ready to consume them in a MuleSoft application.
Proceed to Lab 3: Overview of Anypoint Studio to continue your introduction to the Anypoint Platform.