Lab 6: Implementing APIs in Anypoint Studio
Overview
By now you’ve had an opportunity to see how the Anypoint Platform can help with bringing together disparate applications to improve the speed and accuracy of processing MIRs and AERs. Now, it’s time that you try implementing an API that will route information to one of several back end systems, based on the type of request that was passed to your API.
Learning Objectives
By completing this lab exercise you will have experience in the following:
-
Reviewing RAML API specifications using the Anypoint Design Center editor.
-
Searching Anypoint Exchange for API specifications that you will use to create your own API implementation.
-
Using Anypoint Studio to:
-
Create a "Scaffold" of an API implementation from an API specification downloaded from Exchange.
-
Using MuleSoft generated connectors to call "System" APIs that are hosted on the Anypoint Platform.
-
Completing the API implementation using a "clicks, not code" approach.
-
Testing and debugging your API implementation using the built-in MuleSoft runtime.
-
Step 1: Review API Led Integration
In the Workshop Overview you were introduced to the concept of API led integration. The prior lab exercises enabled you to gain experience invoking APIs from Exchange as well as testing APIs that have been deployed to the Anypoint RUntime.
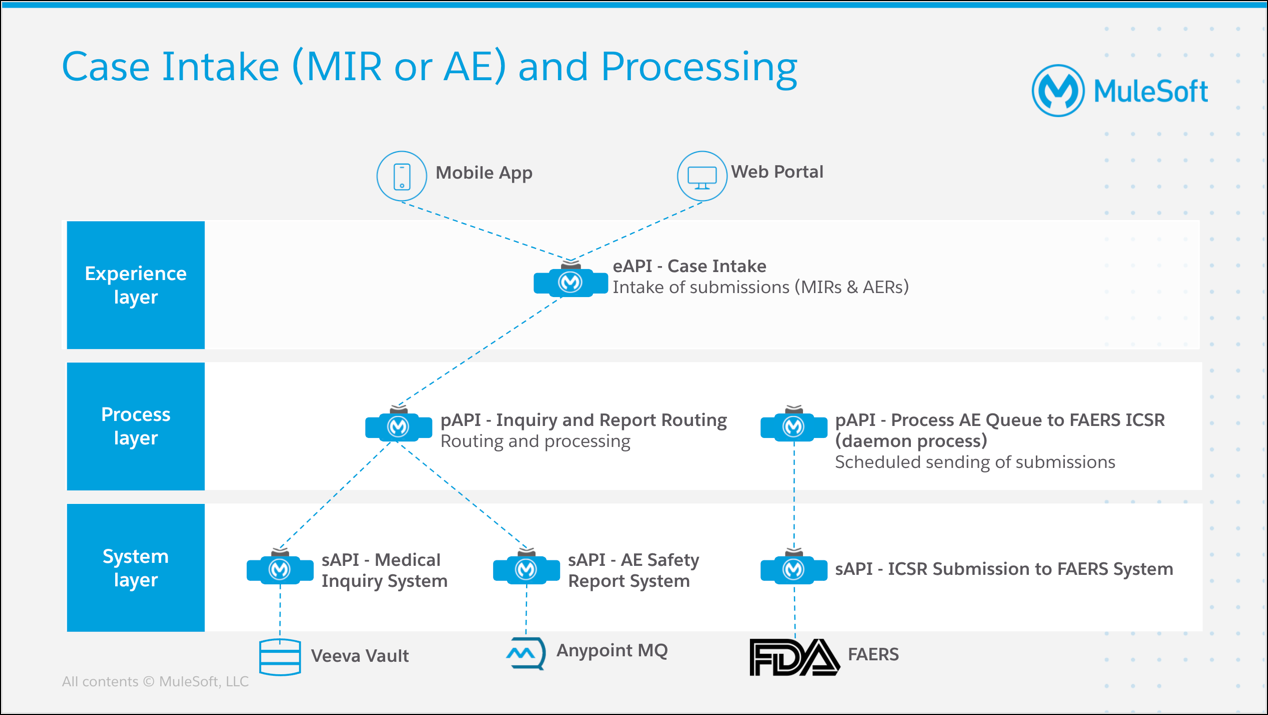
This lab exercise will lead you through the steps required to implement the Inquiry and Report Routing process API.
This "Process" API will call appropriate "System" APIs to pass case data to the appropriate back end systems. This API will, in turn, expose methods to enable "Experience" APIs to either GET or POST the case data that will ultimately get passed to the "System" APIs.
The value from this approach includes:
-
Enables a higher degree of reusability, thanks to well defined interfaces and a central catalog to store API specifications.
-
Provides integrated management for each API, which enables efficient and secure management of all APIs in the Application Network.
-
Supports a wide range of deployment options, which enables an organization to deploy APIs for an optimal Application Network as well as horizontal and vertical scaling of APIs.
Step 2: Review the Design Center Editor
An essential element in creating an API implementation is to have an API specification to describe the methods, data, security and other features of the API. Creating an API specification from scratch is out of scope for this lab exercise. Instead, you will review existing API specifications to gain an understanding of how the Anypoint Design Center can make creating API specifications easy.
Complete the following steps to review several of the API specifications that are used in this workshop:
-
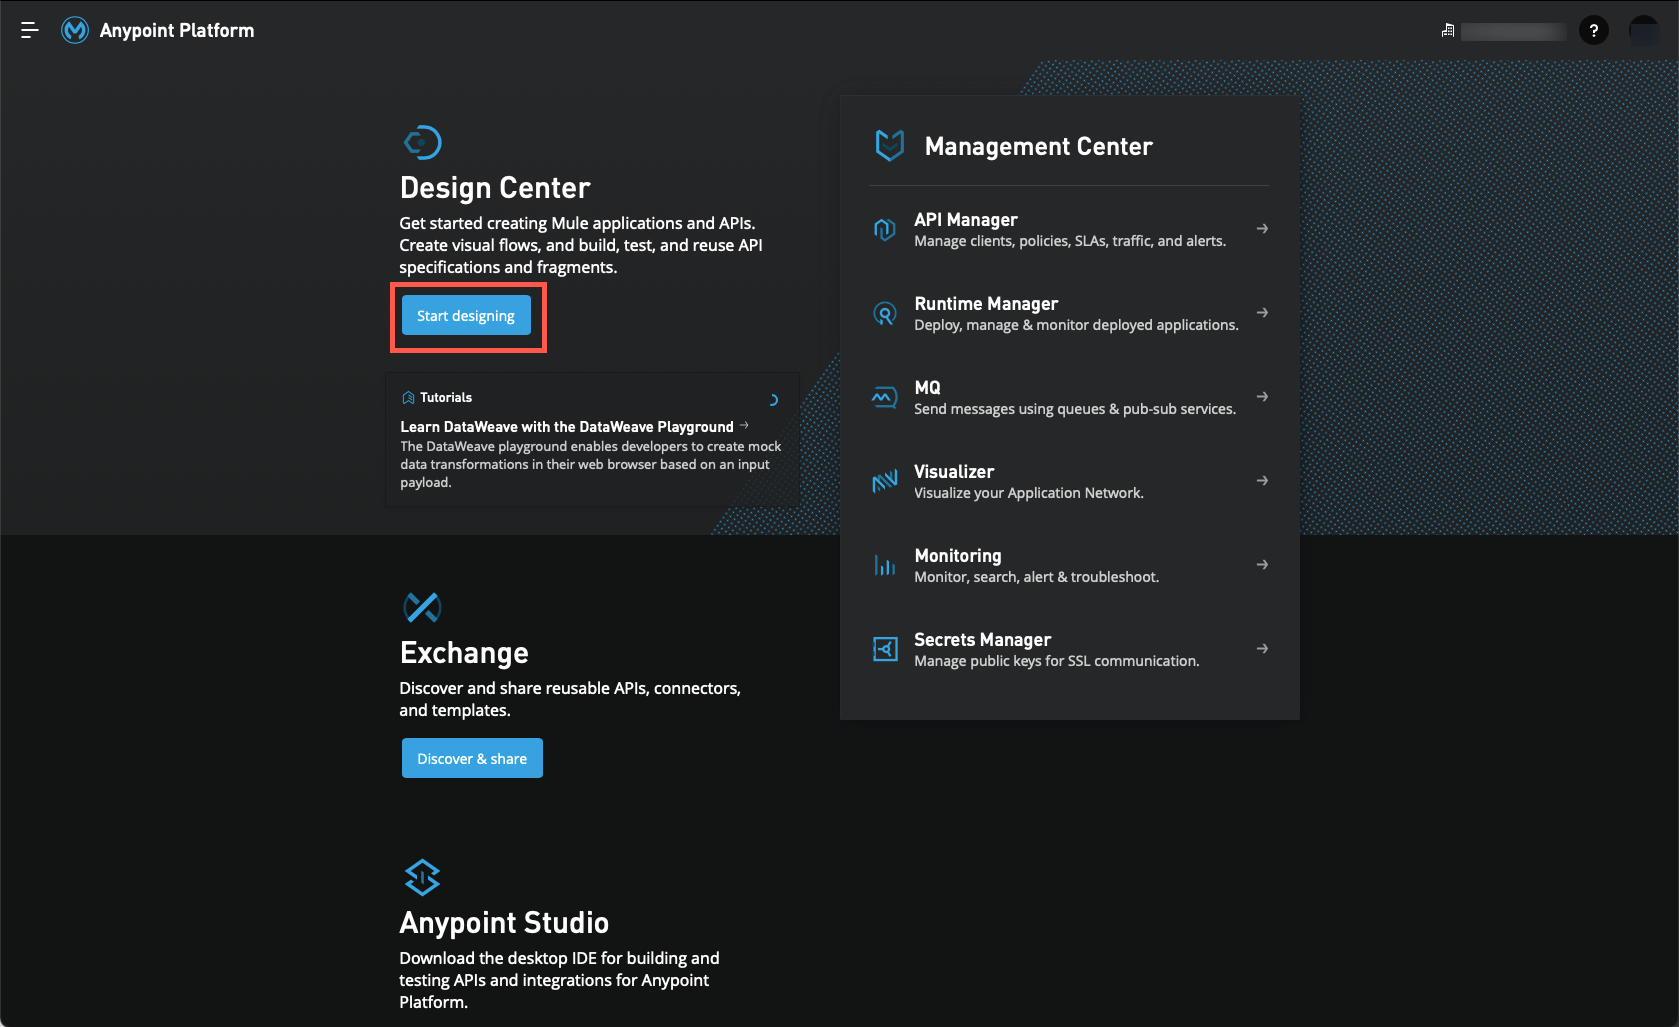
Login to the Anypoint Platform and then open the Design Center.
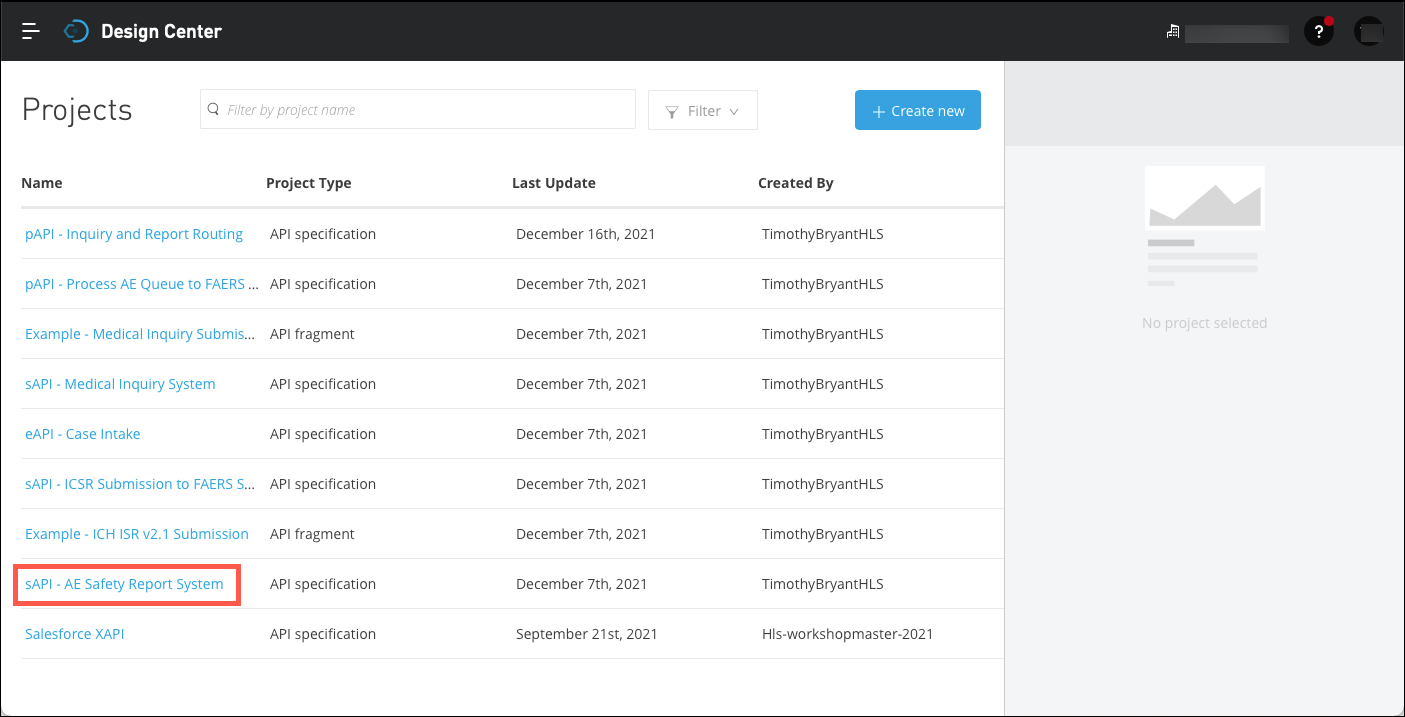
You will see a list of the various APIs that have been defined. Start by reviewing the sAPI - AE Safety Report System API. Click on the link for that API to continue.
-
The API editor is displayed. This API features many of the advanced features of the RAML editor that is provided by Design Center. Note the following sections that are available with this editor.
-
The Files section list all of the files that are used for this API specification. Note that there are two files with a suffix of "library" listed within the exchange_modules section. These files are imported into this API specification. The ability to import RAML fragments from one or more reusable files enables faster API development by supporting the definition of key elements of an API specification in one location, and then importing into any dependent API specifications.
-
The main editor window is where the API developer can specify all properties of the API they are creating.
-
The editor also provides context sensitive prompts to assist the API developer to determine what attributes are permissible at any given point in the API specification.
API specifications must follow a proper structure to be interpreted properly. By providing an intelligent editor along with the context sensitive prompts, an API developer can ensure that their API specifications are formatted properly before commiting them to Anypoint Exchange.
-
The editor also provides a Mocking Service that may be used to test out API functions using sample data. Again, this helps the API developer ensure that the API specification is configured properly, and provides the functions that consumers of the API are looking for.
-
The Publish button is used when you have completed your work on the API specification and want to share it via Anypoint Exchange.

-
-
For this exercise you will use Anypoint Studio to implement and test a less complex API: the pAPI - Inquiry and Report Routing API specification. Click on the Design Center link that is to the right of the "hamburger" menu. This will take you back to the list of projects. Next, click on the pAPI - Inquiry and Report Routing API specification.

-
Review the various API attributes that have been defined in this specification, but do not make any changes as you will need to use it in the following steps. Take note of the following:
-
This API exposes a single resource named /request.
-
The /request endpoint exposes two methods: GET and POST.
-
The API supports the HTTP protocol.
-
The API supports a media type of application/json.
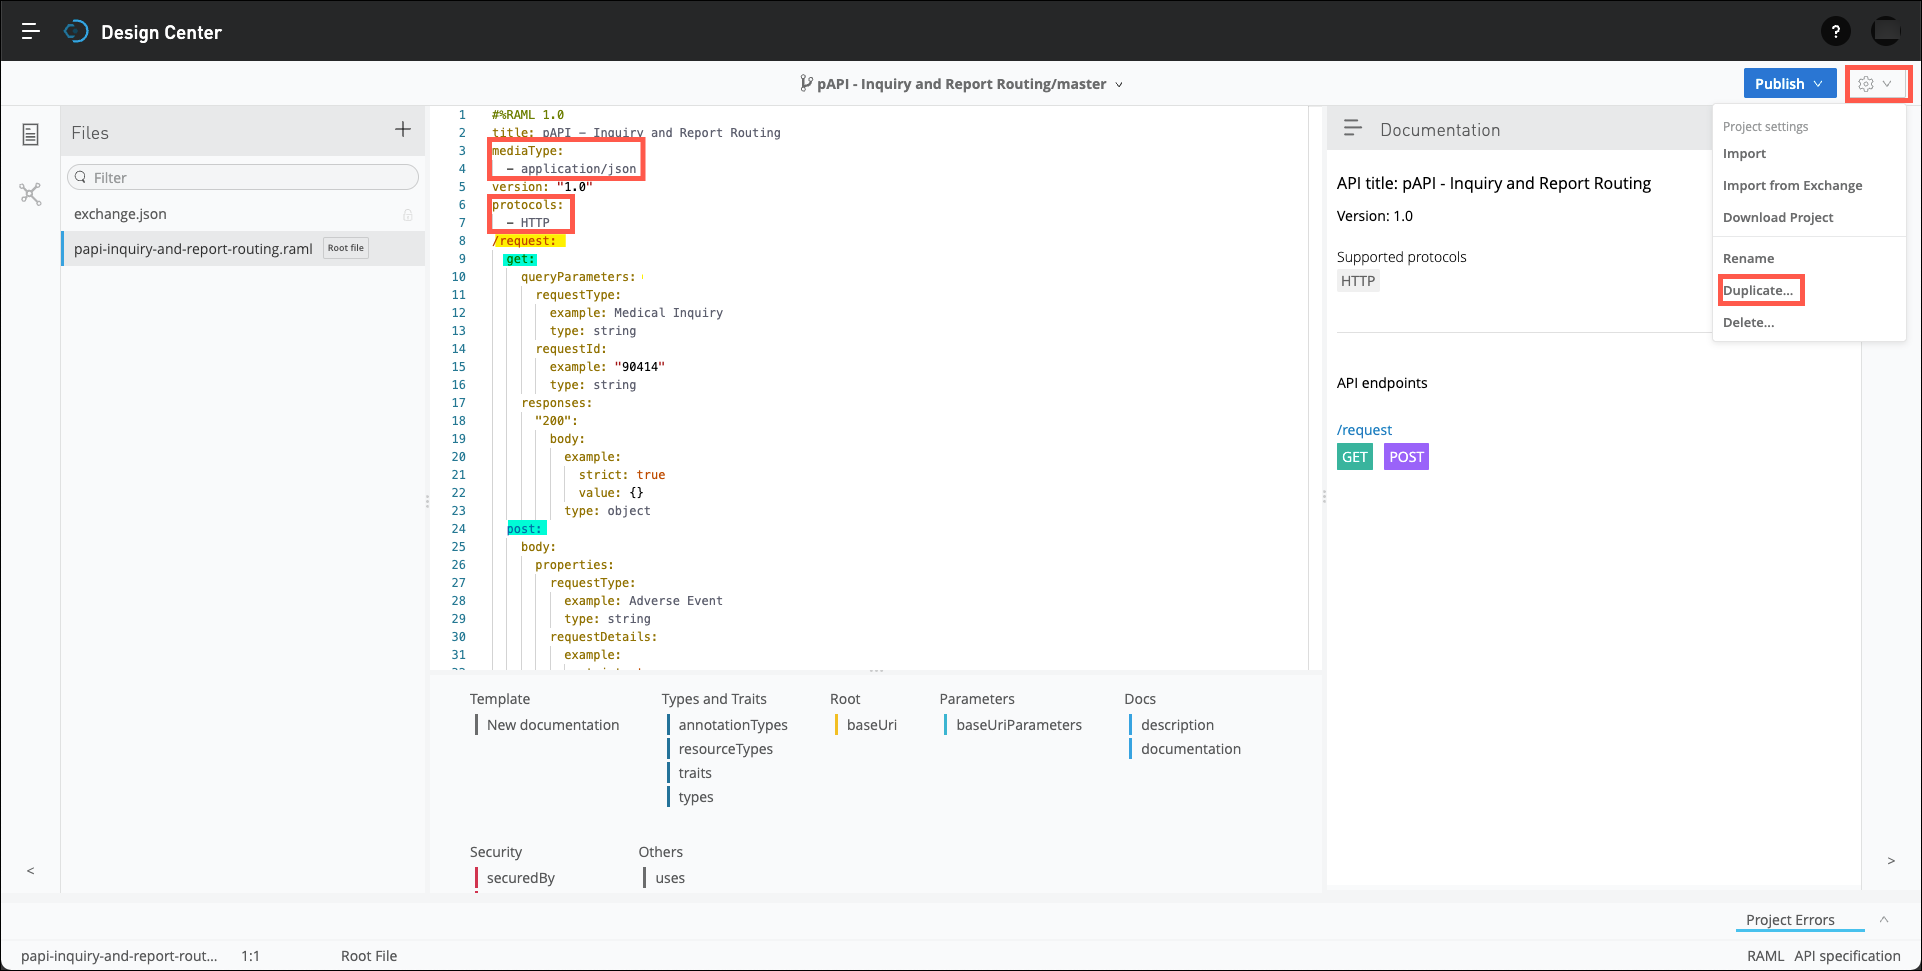
Note: If you would like to experiment with using any of the features of the Design Center You can make a copy of this specifcation by clicking on the gear icon in the upper right of the page and then clicking on the Duplicate… menu item.
-
-
The intent of this step was to introduce you to the tools that are available to create API specifications. If you are interested in gaining more experience with properly authoring an API specification you are welcome to explore this topic more in depth in module 1, lab 2 of the API-led Connectivity Workshop.
Step 3: Review Anypoint Exchange
Now that you’ve seen how to create and/or edit an API specification, you will need to catalog it in Anypoint Exchange to enable other developers to be able to find and use your asset. Complete the following steps to see how assets are published, and ultimately located, in Anypoint Exchange.
-
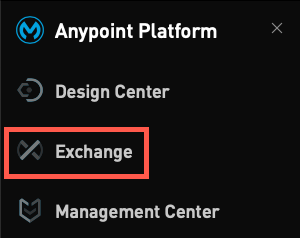
Open Anypoint Exchange by clicking on the "hamburger" menu in the upper left corner of the page and then selecting Exchange.
Click on the All assets business group on the left side of the page. A list of all of the assets stored in Exchange will be displayed. This includes assets for the current business group, the parent organization (varies by customer), and those provided by MuleSoft as well. Take a moment to explore the various types of assets that are available. As you can see, there are 100’s of prebuilt assets that are available to use for your projects.
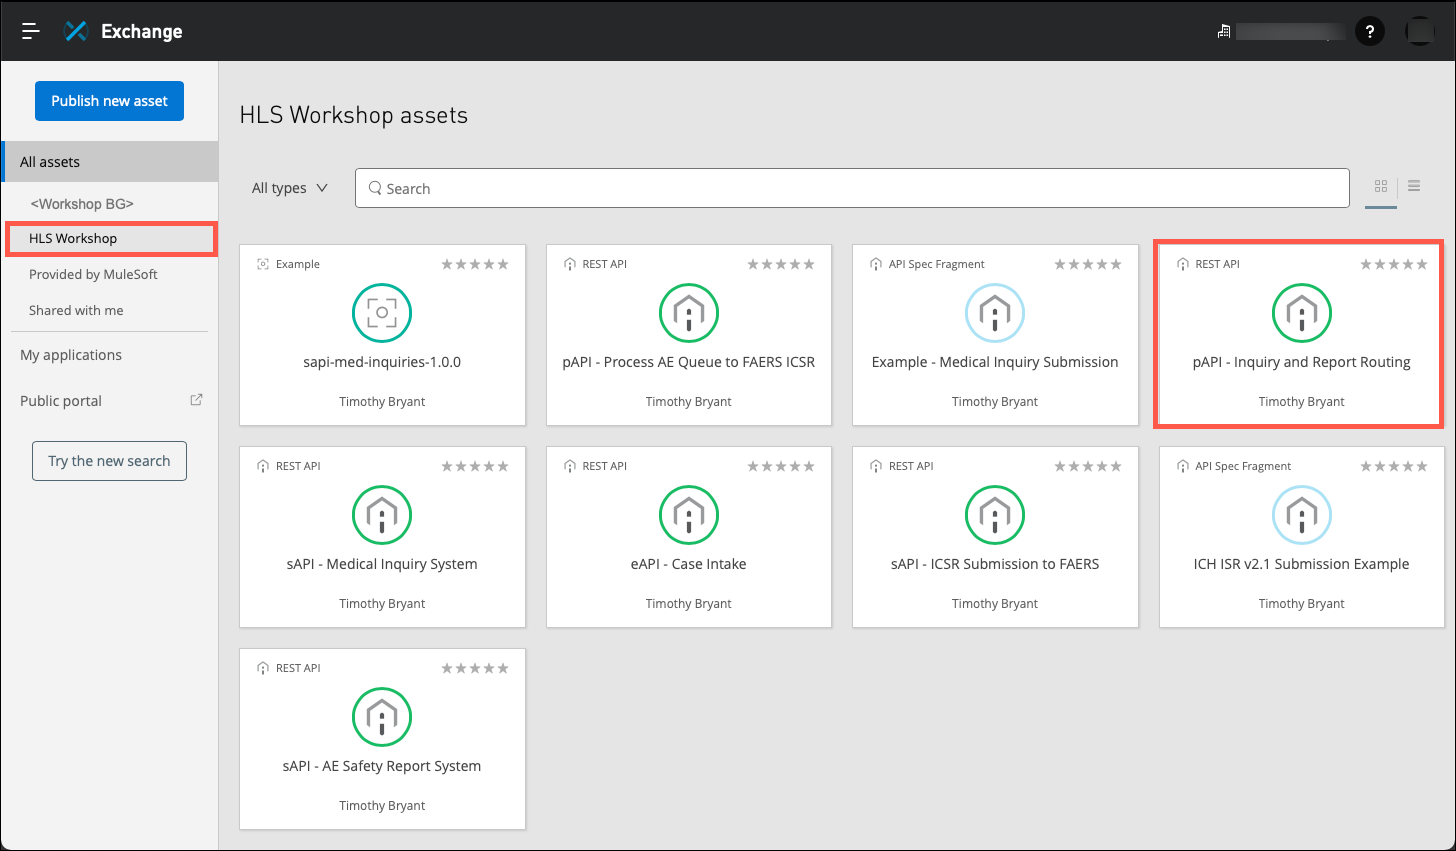
You may also filter the set of APIs that are listed by clicking on the HLS Workshop link in the left side of the page.
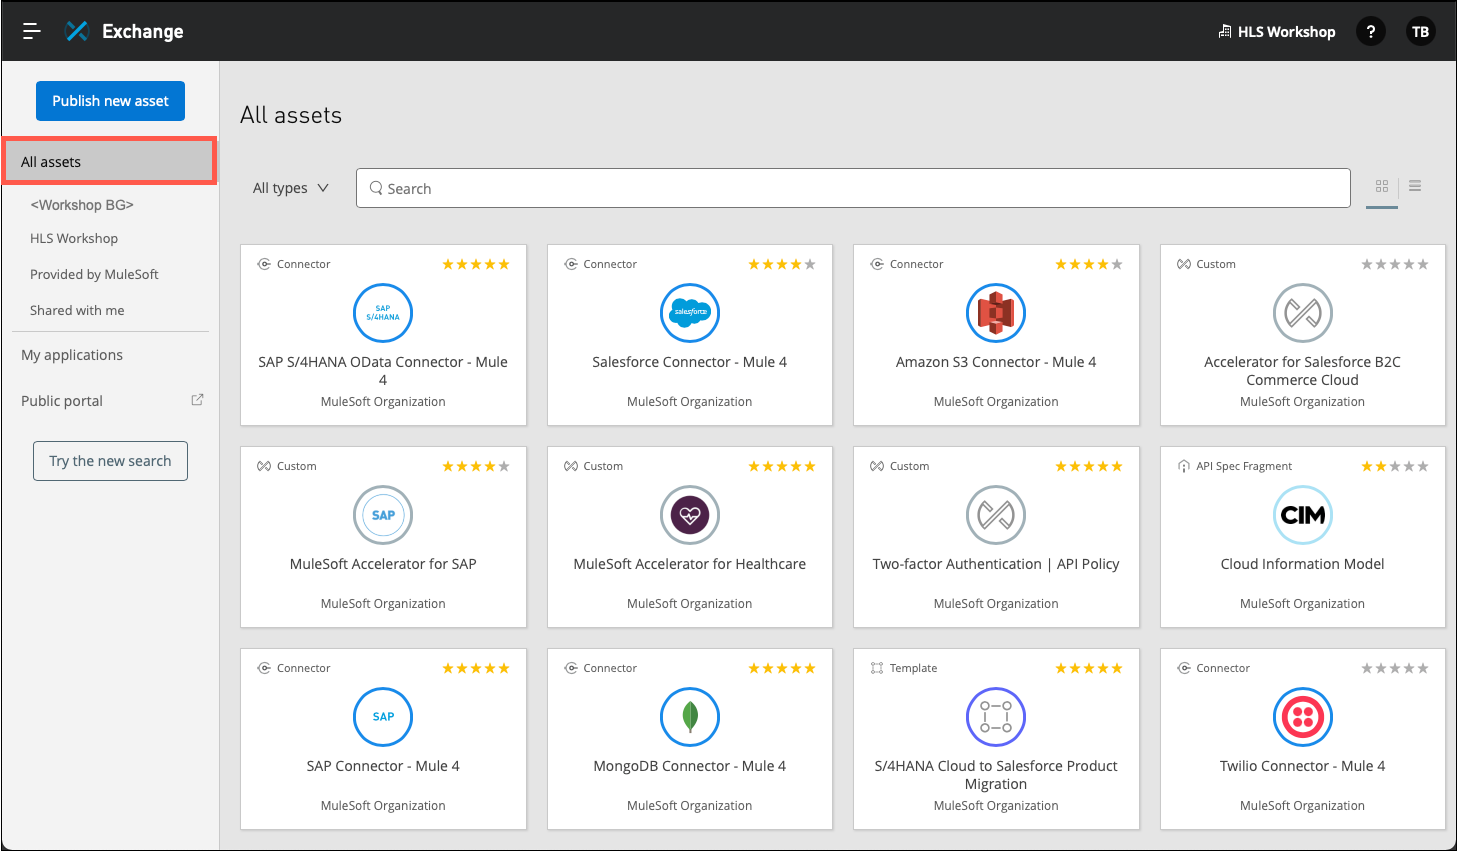
For this lab exercise we want to create an implementation of the pAPI - Inquiry and Report Routing API specification. Locate and click on the tile to view the details of the API.
-
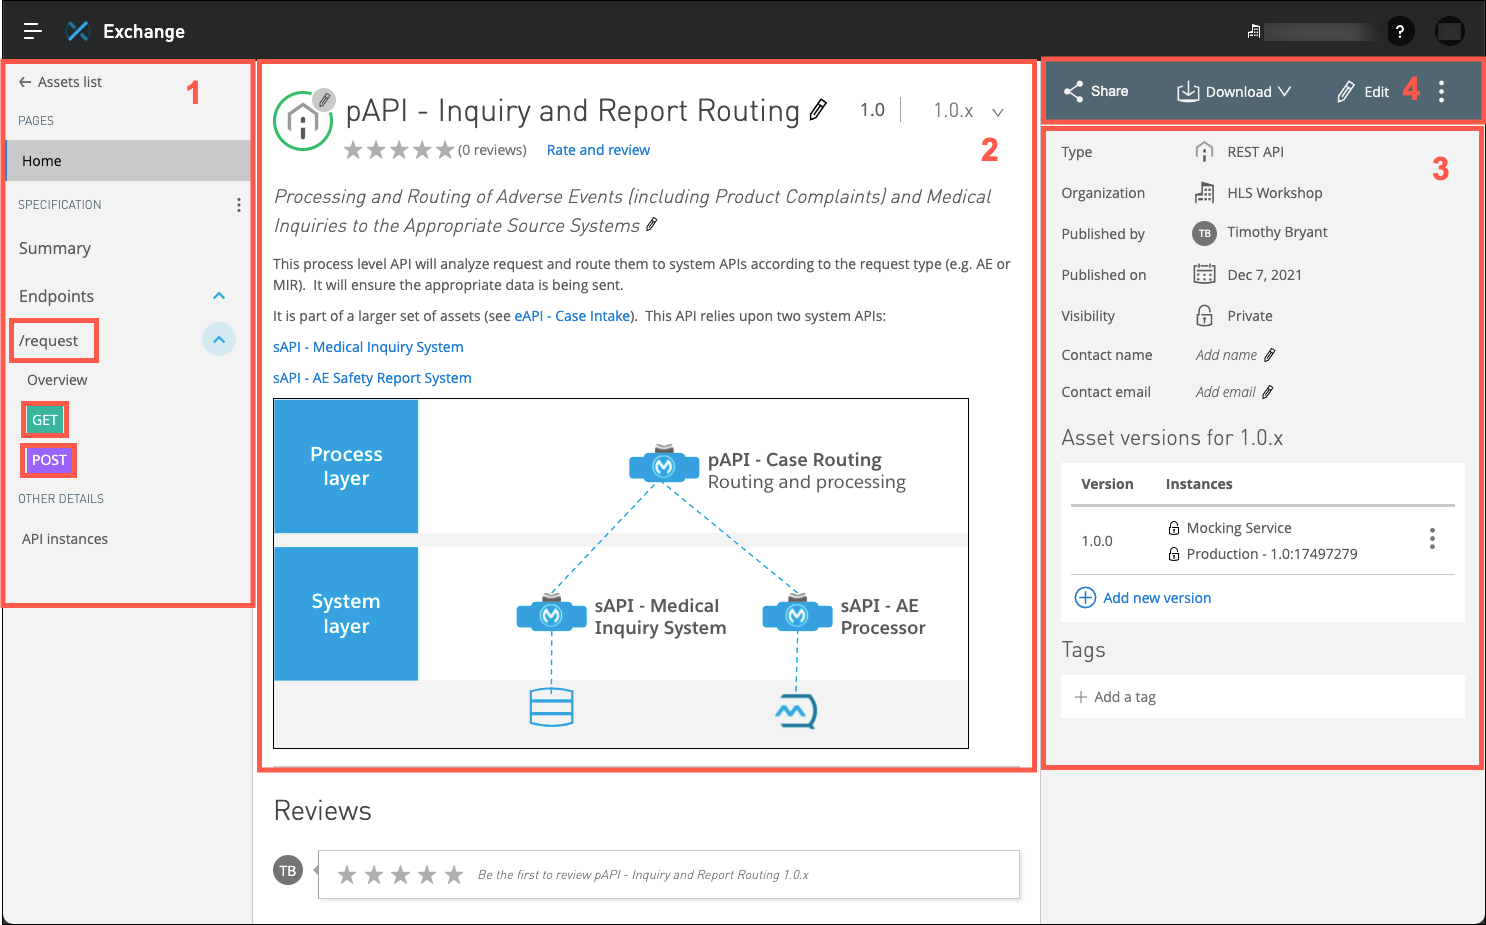
The documentation page for the API is displayed.
When an API is first published to Exchange a number of features are automatically generated. Note the following:
-
On the left side of the page you will see a summary of the resources and methods that make up the API. In the following screen capture you can see that there is a resource named request that supports two different HTTP methods: GET and POST. Clicking on those icons will launch the mocking service where you can test the operation of the API. You will investigate that more in a moment.
-
The center section is where the API developer can document the API. Documentation can be added using a visual editor as well as using Markdown.
-
The right side of the page is where you can see various metadata about the API specification.
-
The top right section of the page contains several links to additional tools such as sharing the API specification, editing the documentation and other features.
-
-
If you are interested in how learning more about using Exchange you are welcome to explore this topic more in depth in module 1, lab 1 of the API-led Connectivity Workshop
Step 4: Implement an API Using Anypoint Studio
Now that you’ve had an opportunity to see how an API specification is created and shared, you are ready to implement the API using the Anypoint Studio. Complete the following steps to implement the sAPI - AE Safety Report System API.
-
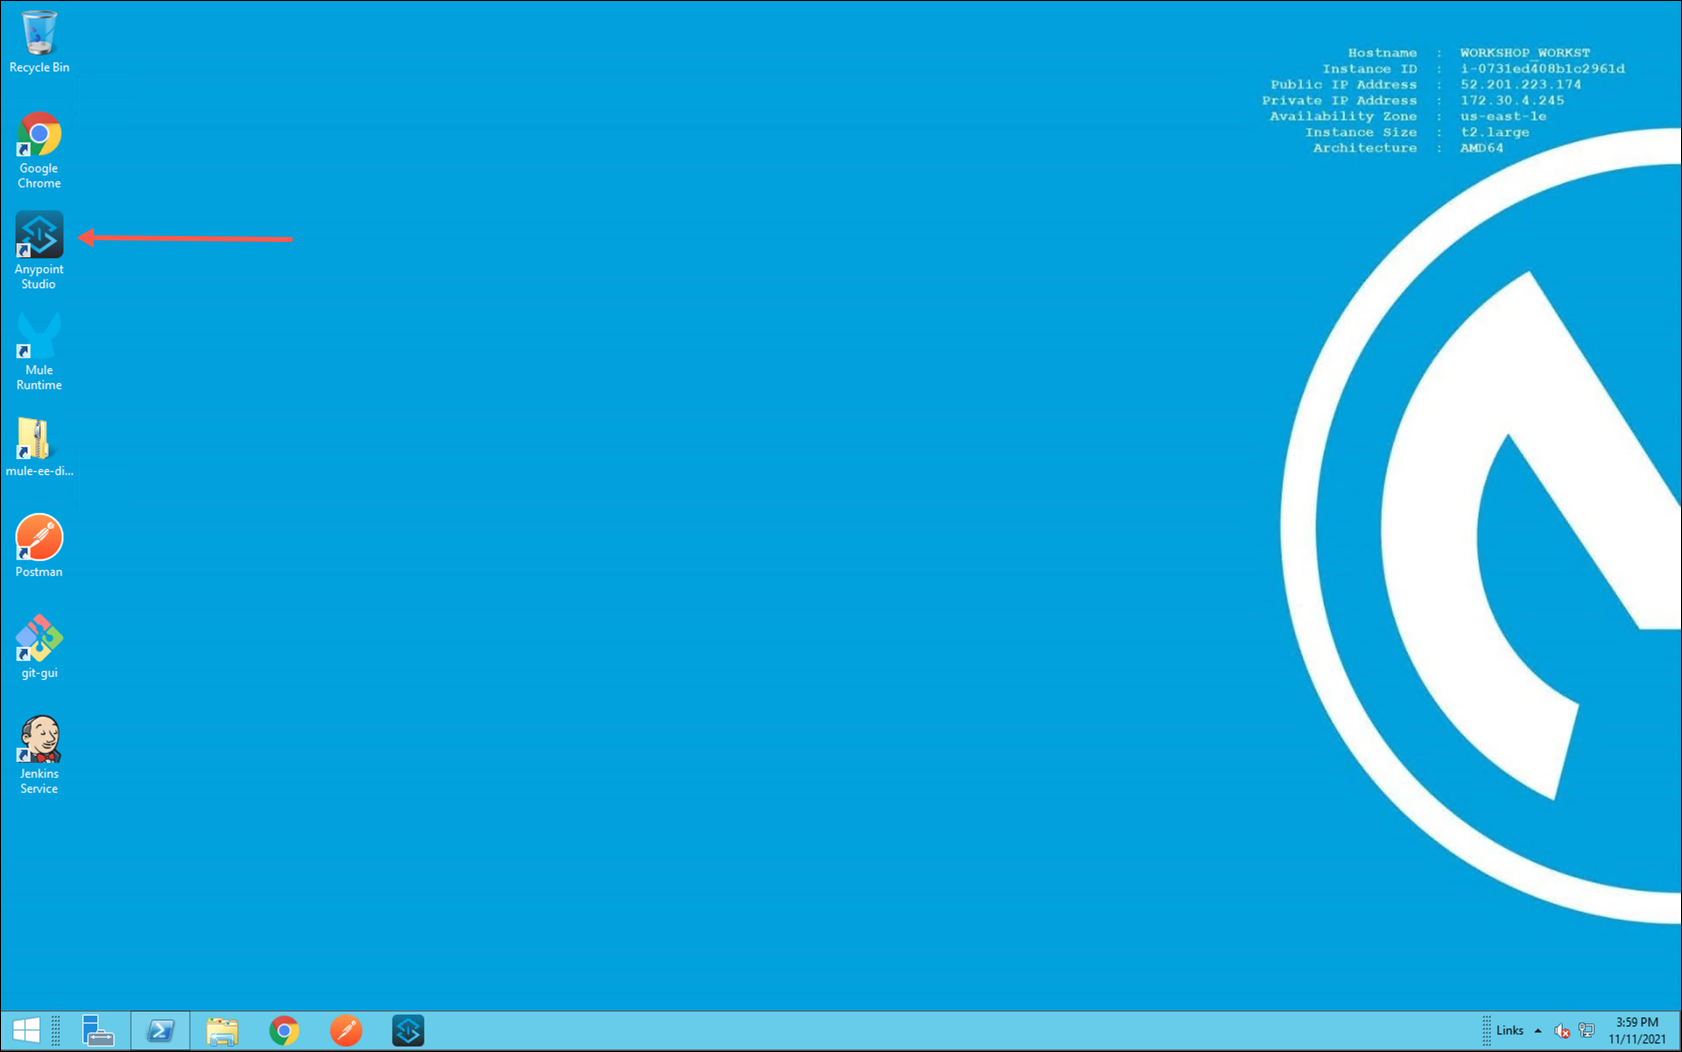
If Anypoint Studio is not currently open, locate and launch the Anypoint Studio icon in your workshop desktop image.
-
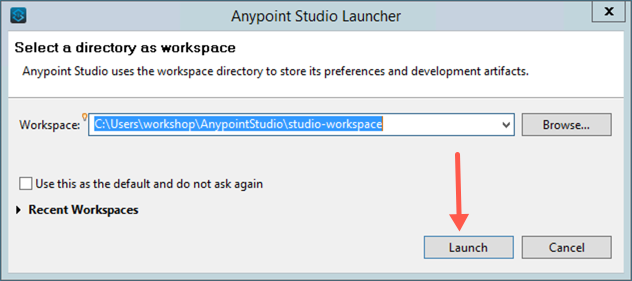
You may be prompted to select a directory to store your workspace. Accept the default value and then click on the Launch button to continue.
-
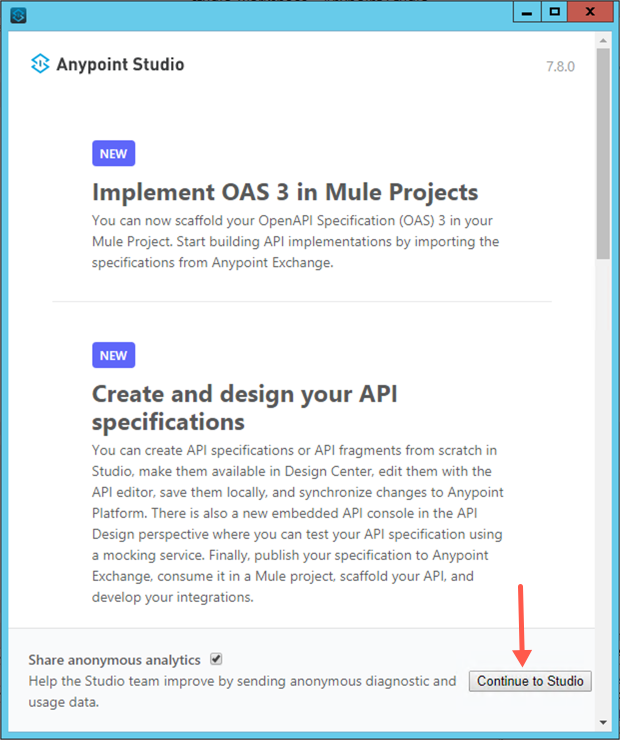
The Anypoint Studio welcome screen may appear. Click on the Continue to Studio button if it appears.
-
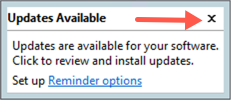
Whenever you launch Anypoint Studio it will check all of the projects in the current workspace for updates to MuleSoft components. If the Updates Available window appears simply close the window to continue. (Updating components is not required to complete this workshop.)
-
-
If you have not completed Lab 3: Overview of Anypoint Studio you should complete that lab first, then return to this step.
-
In Lab 3 you had created a project from the Omnichannel Experience API specification in Exchange. For this lab you will create and implement the pAPI - Inquiry and Report Routing API that you had seen earlier.
-
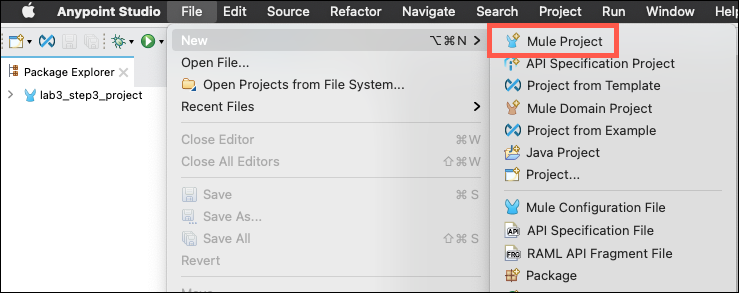
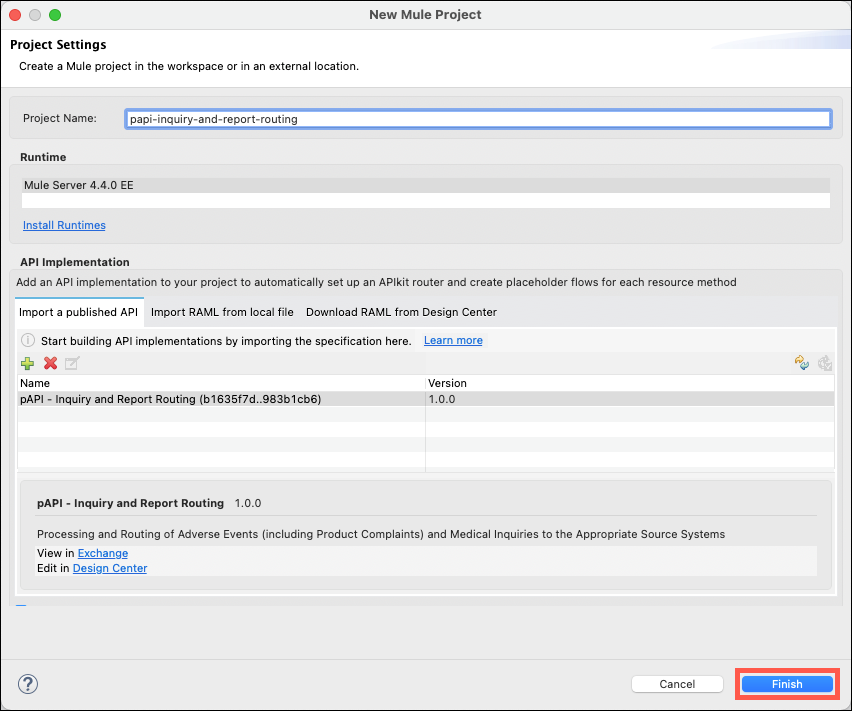
Create a new project by either right-clicking in the Package Explorer or using the File→New menu options. Select the Mule Project menu item.
-
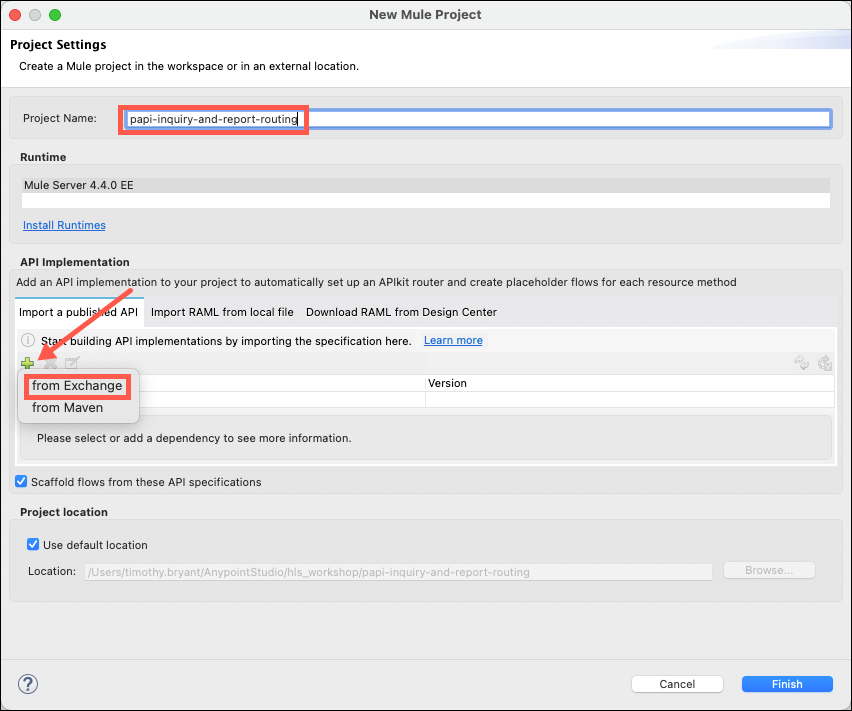
Name your project papi-inquiry-and-report-routing and then click on the green + icon to select and import the desired API specification from Exchange.
Note: A common naming standard for APIs is to use papi as a prefix to all "Process" APIs. You may also see sapi as a prefix for "System" APIs and eapi as a prefix for "Experience" APIs.
-
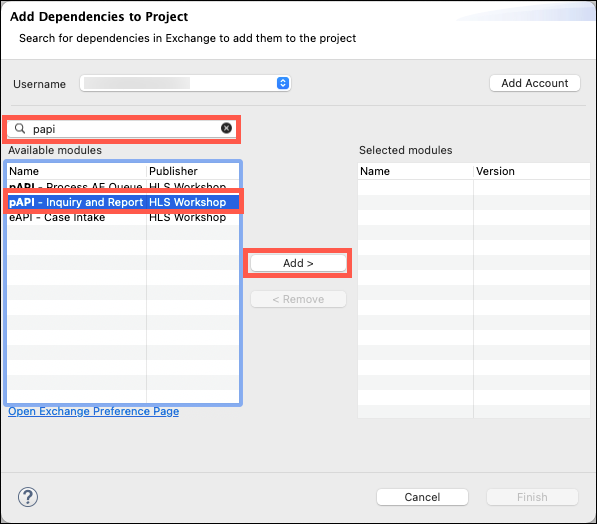
Ensure you are logged in by verifying the Username field has your userid in it. Login if necessary.
Enter papi in the search box, then select the pAPI - Inquiry and Report module. Click the Add > button to add the module to the list of selected modules.
-
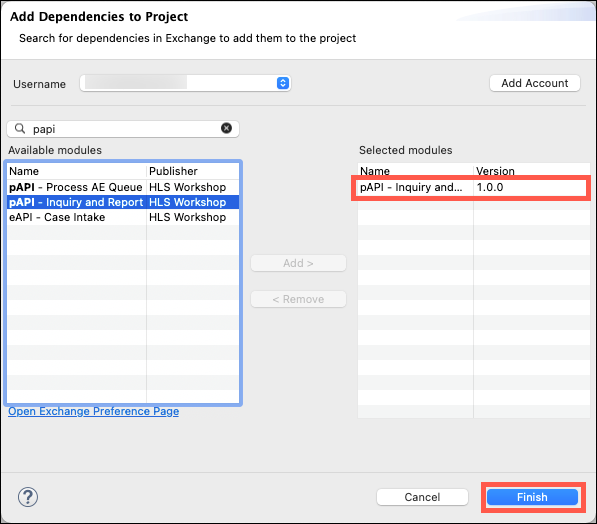
Ensure that the most current version of the module is selected and then click on the Finish button.
-
Click on the Finish button to start the scaffolding process.
-
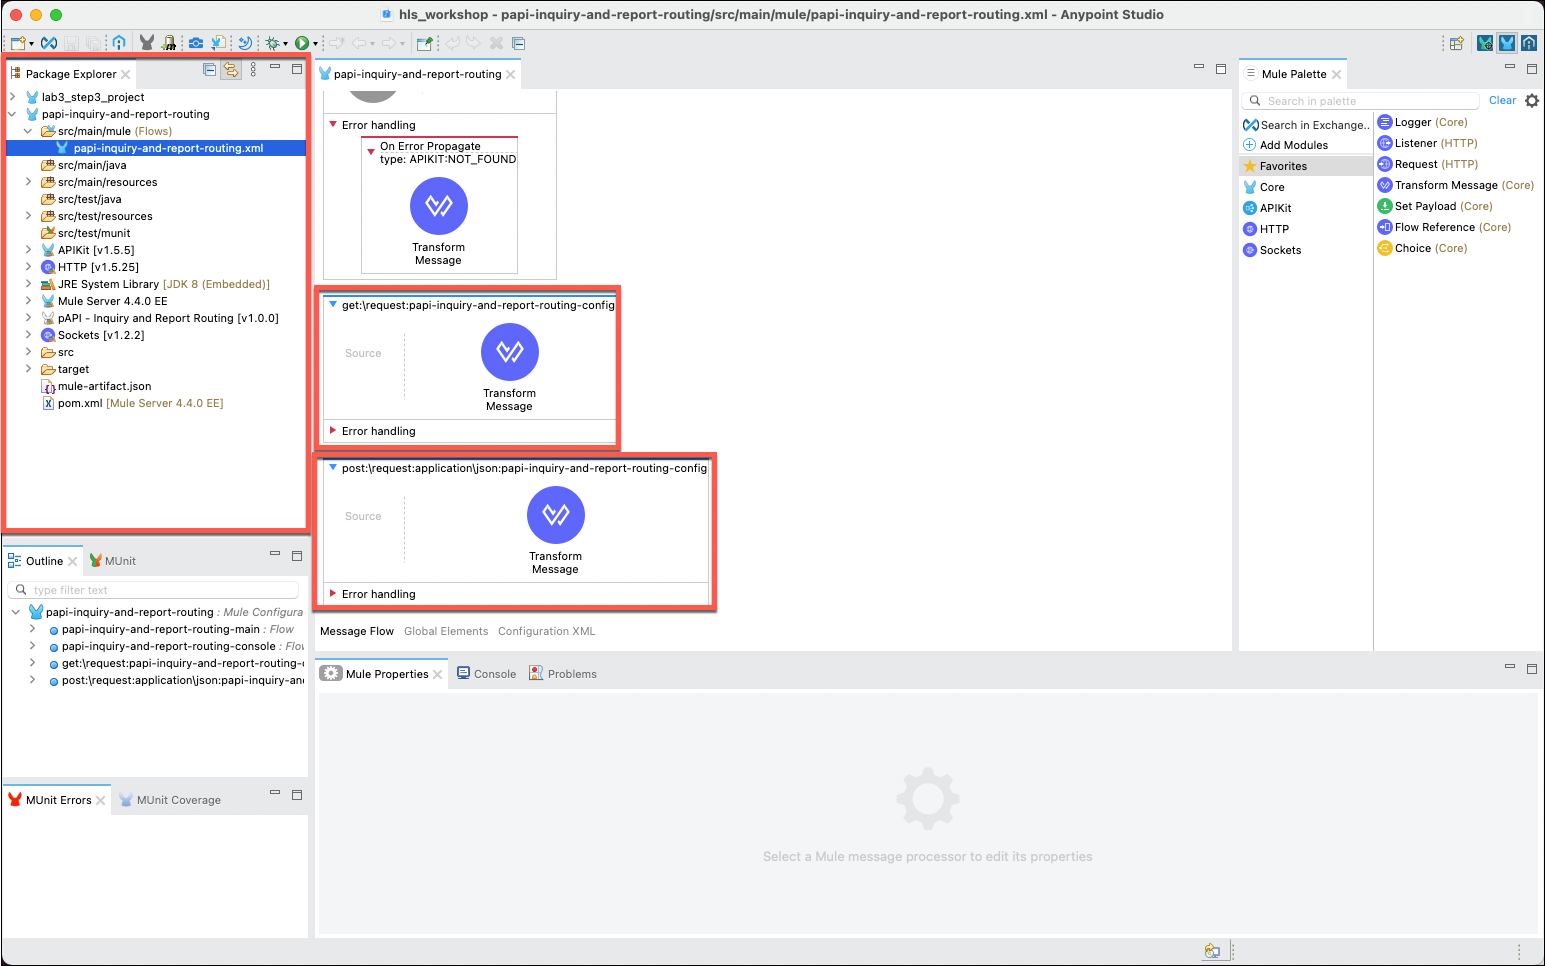
Scroll the main editor window to the bottom to observe that the two HTTP methods that were defined in the API specification have been created with placeholders. These are labeled:
-
get:\request:papi-inquiry-and-report-routing-config
-
post:\request:application\json:papi-inquiry-and-report-routing-config
Also, take a moment to review the Package Explorer and note the other files that were created as a result of the scaffolding process.
-
-
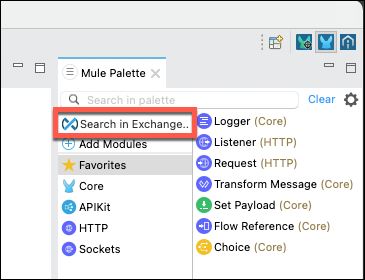
A primary requirement of this "Process" API is to interact with two "System" APIs to either GET or POST information. Since these System APIs are cataloged in Anypoint Exchange, you can download "connectors" to these APIs to make calling this APIs much simpler.
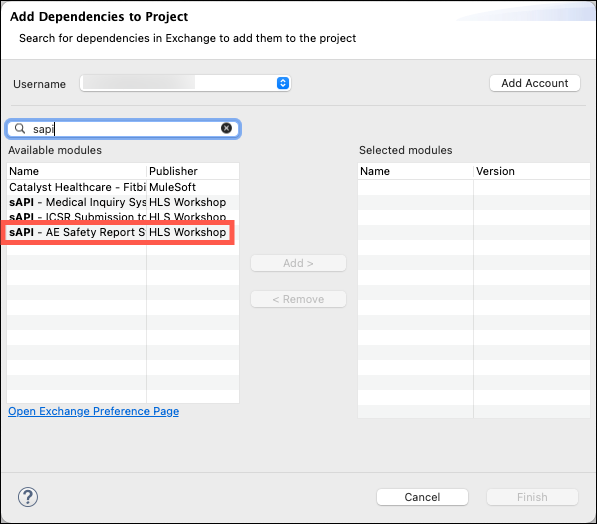
To download these connectors go to the Mule Palette in the upper right side of the Studio and then click on Search in Exchange. The Add Dependencies to Project dialog will appear.
-
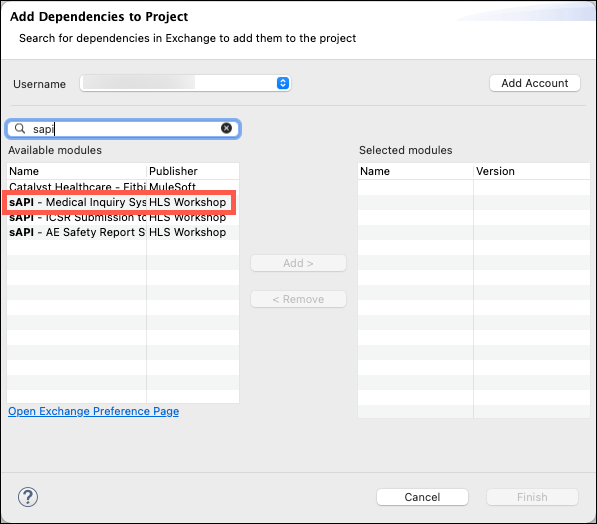
Enter sapi in the search window, add the sAPI - Medical Inquiry System System API to the Add Dependencies to Project dialog box, and then click on the Finish button.
Note: Although the dialog will allow you to select multiple modules at the same time, you will need to add each module in a separate operation.
-
Now you will repeat these steps to add another System API. Enter sapi in the search window, add the sAPI - AE Safety Report System System APIs to the Add Dependencies to Project dialog box, and then click on the Finish button.
-
You should now see that connectors for both System APIs have been added to the Mule Palette.
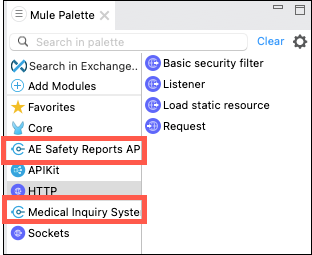
The connectors contain information on what method(s) and message formats are supported by the API, however they do not have connection information for where the APIs are deployed. You can locate this information from the Runtime Manager in the Anypoint Platform.
Open Runtime Manager and ensure that the Sandbox environment has been selected. You should see the two System APIs that we need to find connection information for.
Note: For lab exercises associated with this workshop you will note that there is an additional prefix of lsw- added to each API. Also, each API may have a suffix appended to them to accomodate times when multiple workshops have been scheduled for overlapping times.
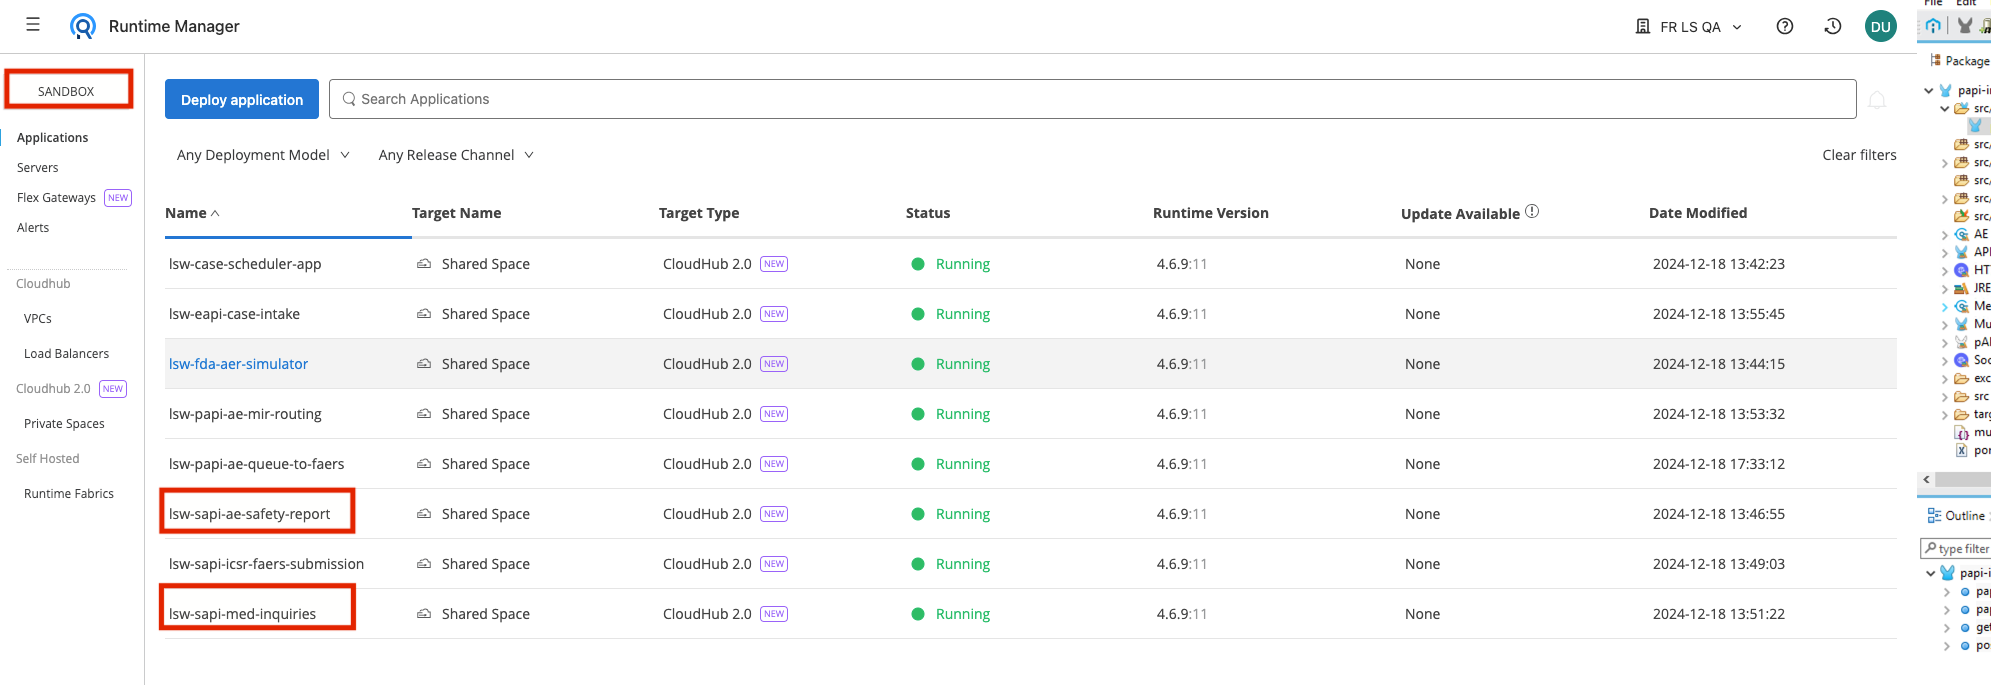
-
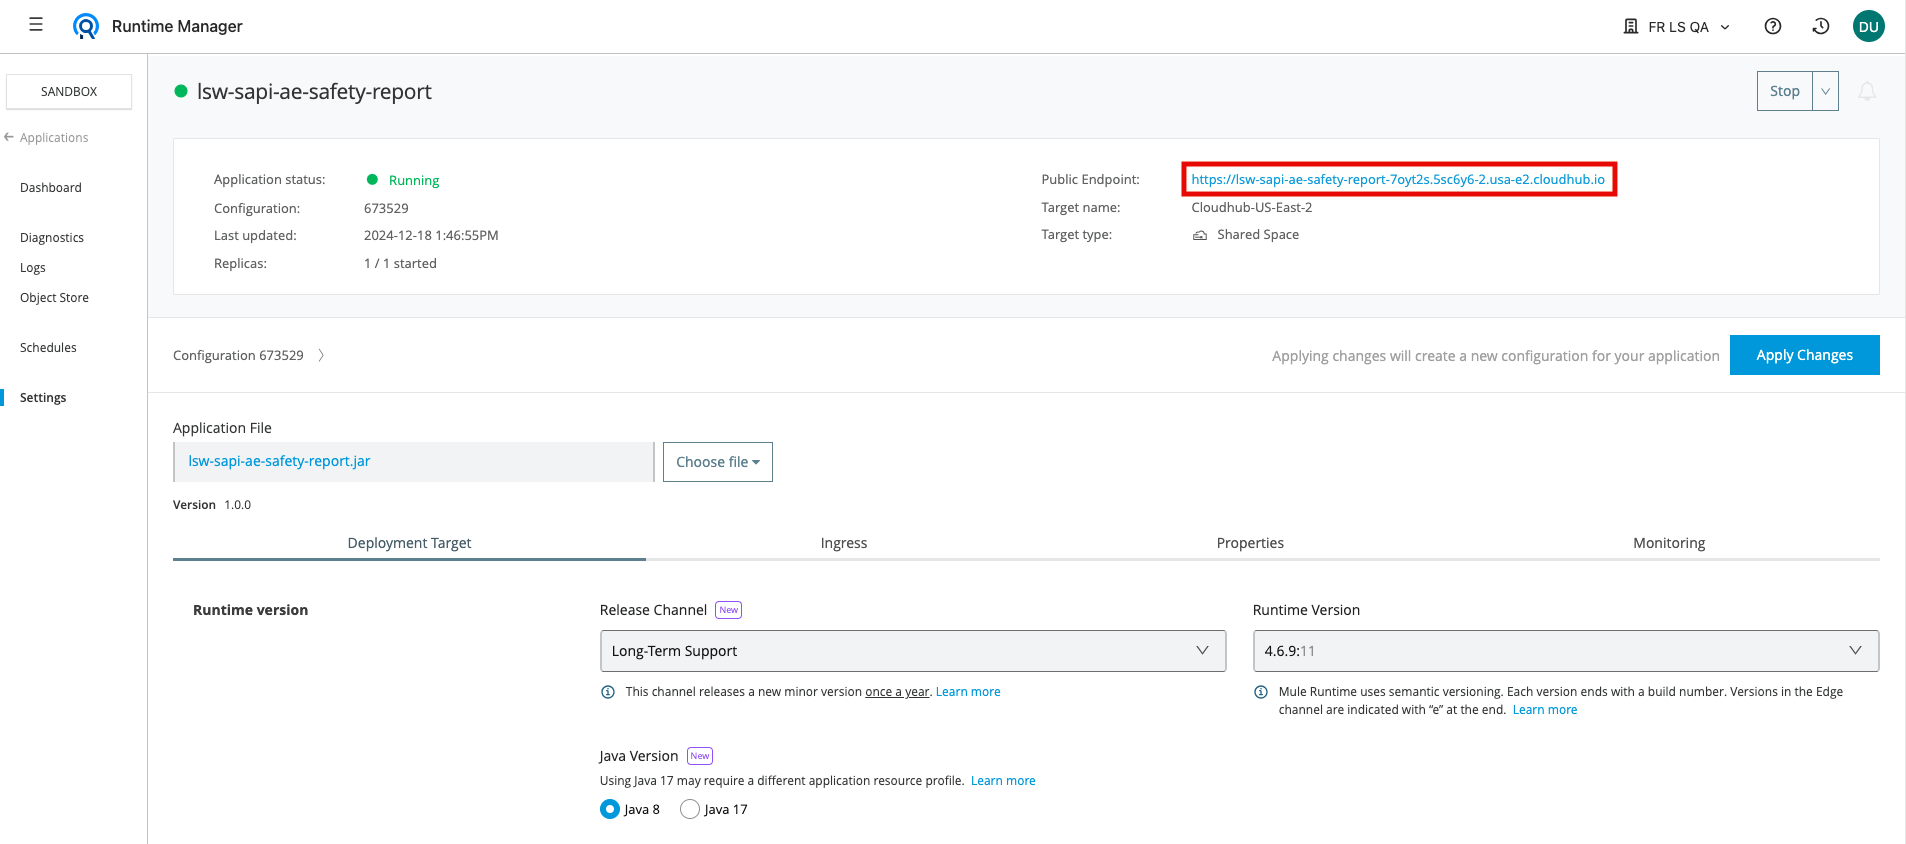
Click on each of the System APIs to view a dashboard of details regarding the API. Capture the Domain value for each System API.
Note: You need to capture the Domain value only. Using Ctrl-C and Ctrl-V on some systems will capture only the Domain value. If you right-click and use the Copy Link that is available on some systems it may also capture the http:// prefix and a trailing / character. Ensure that you do not include these characters when you complete later steps in this lab.
-
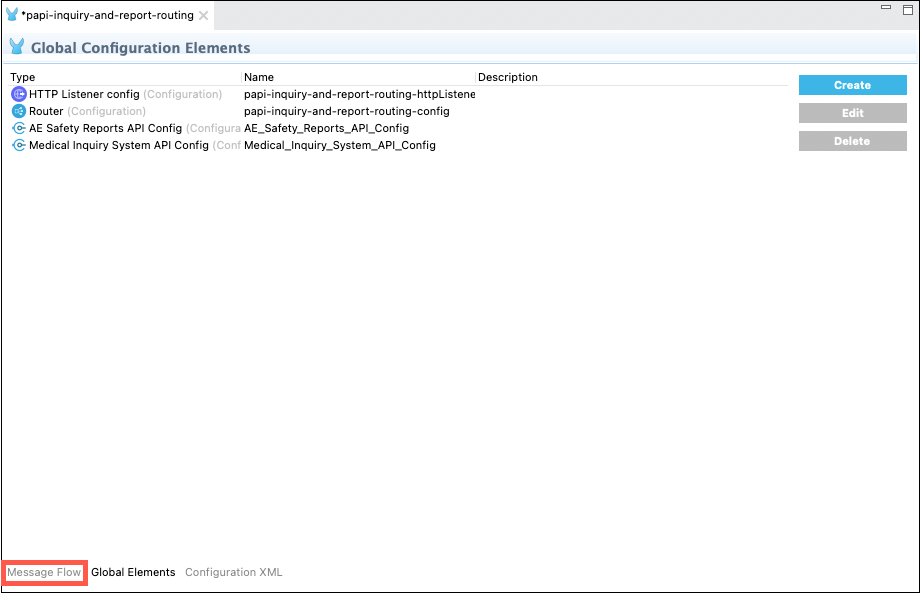
Return to Anypoint Studio and click on the Global Elements tab at the bottom of the flow editor.
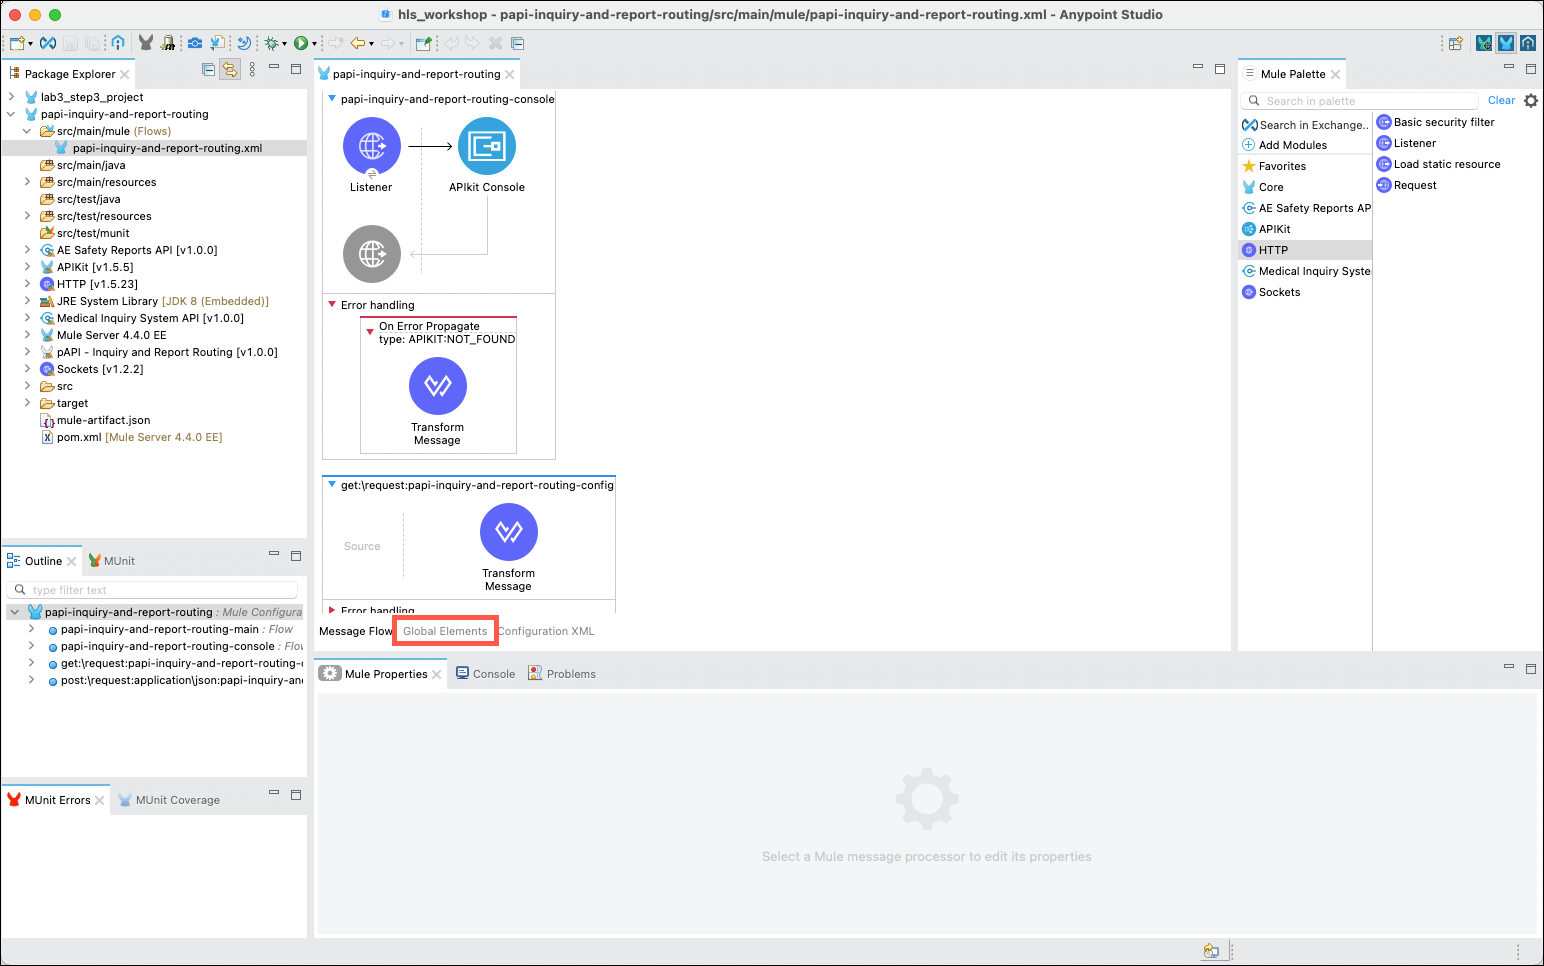
-
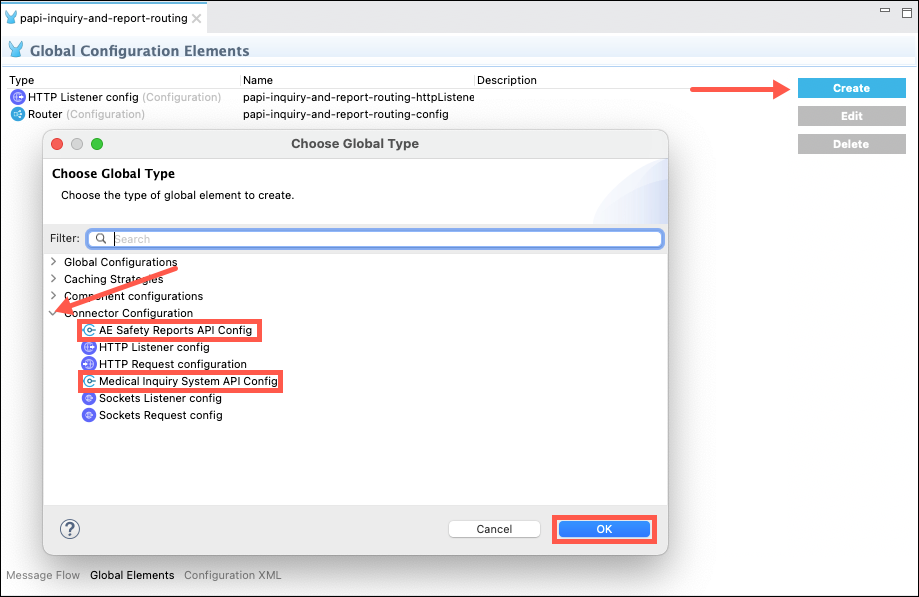
You will need to create a Connector Configuration for each of the System APIs. Click on the Create button, expand the Connector Configuration section, select the desired System API and then click on the OK button.
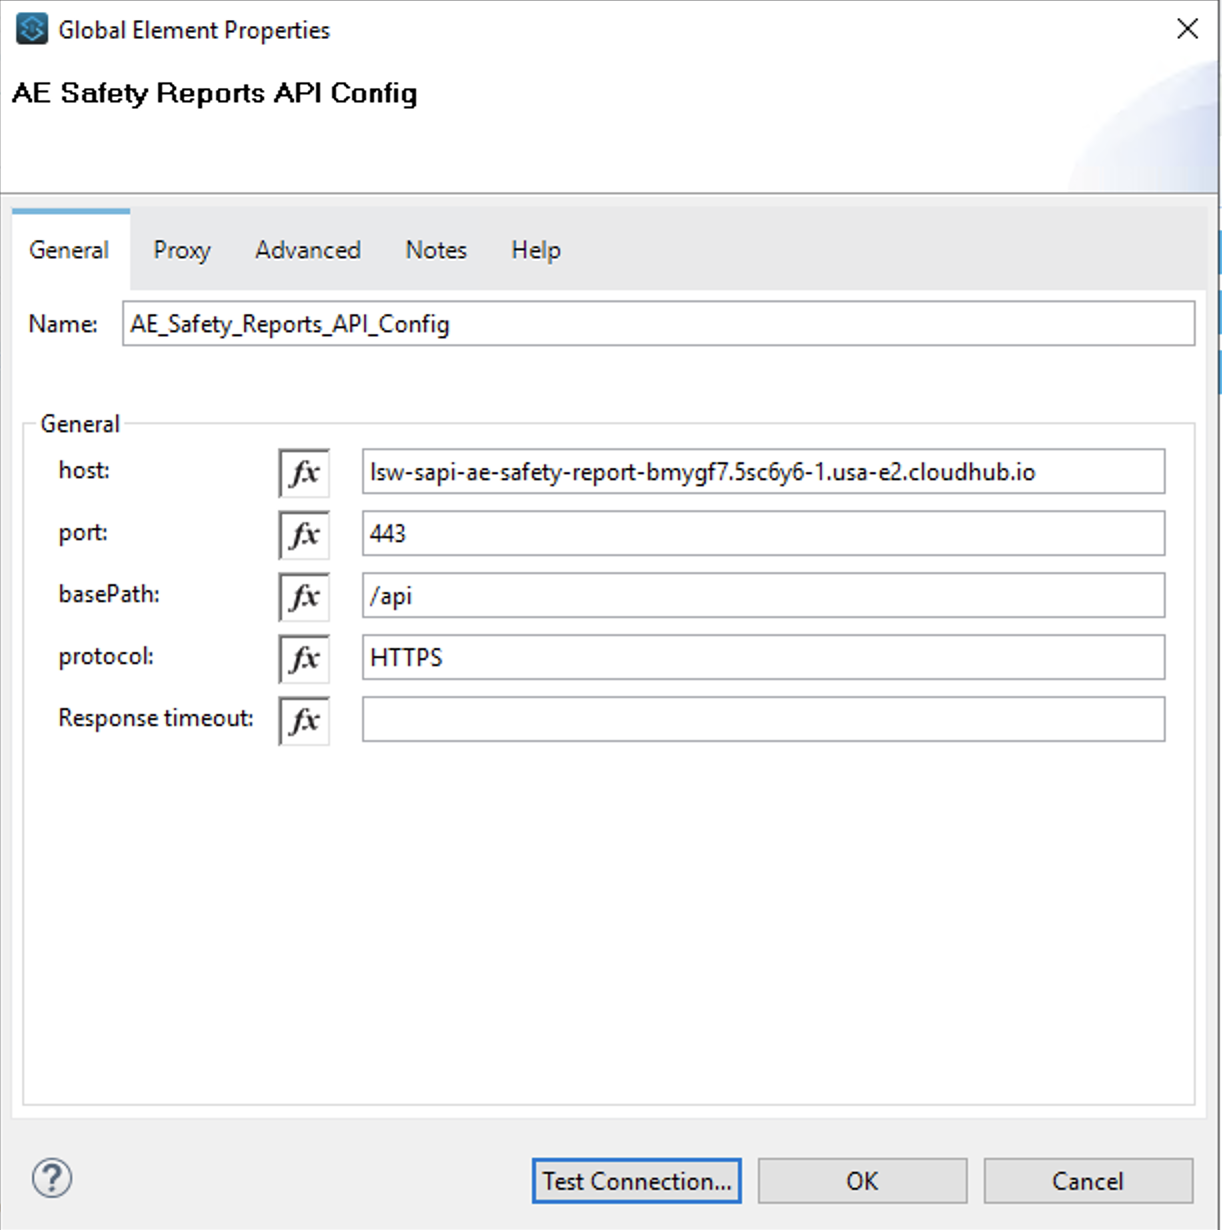
The host: value should be set to the Domain value from the Runtime Manager. Ensure that you do not include http:// and a trailing / when you set the host value. Set the remaining properties as highlighted in the following screen capture and then click on the OK button.
Note: Ensure that you use upper case letters for HTTPS.
-
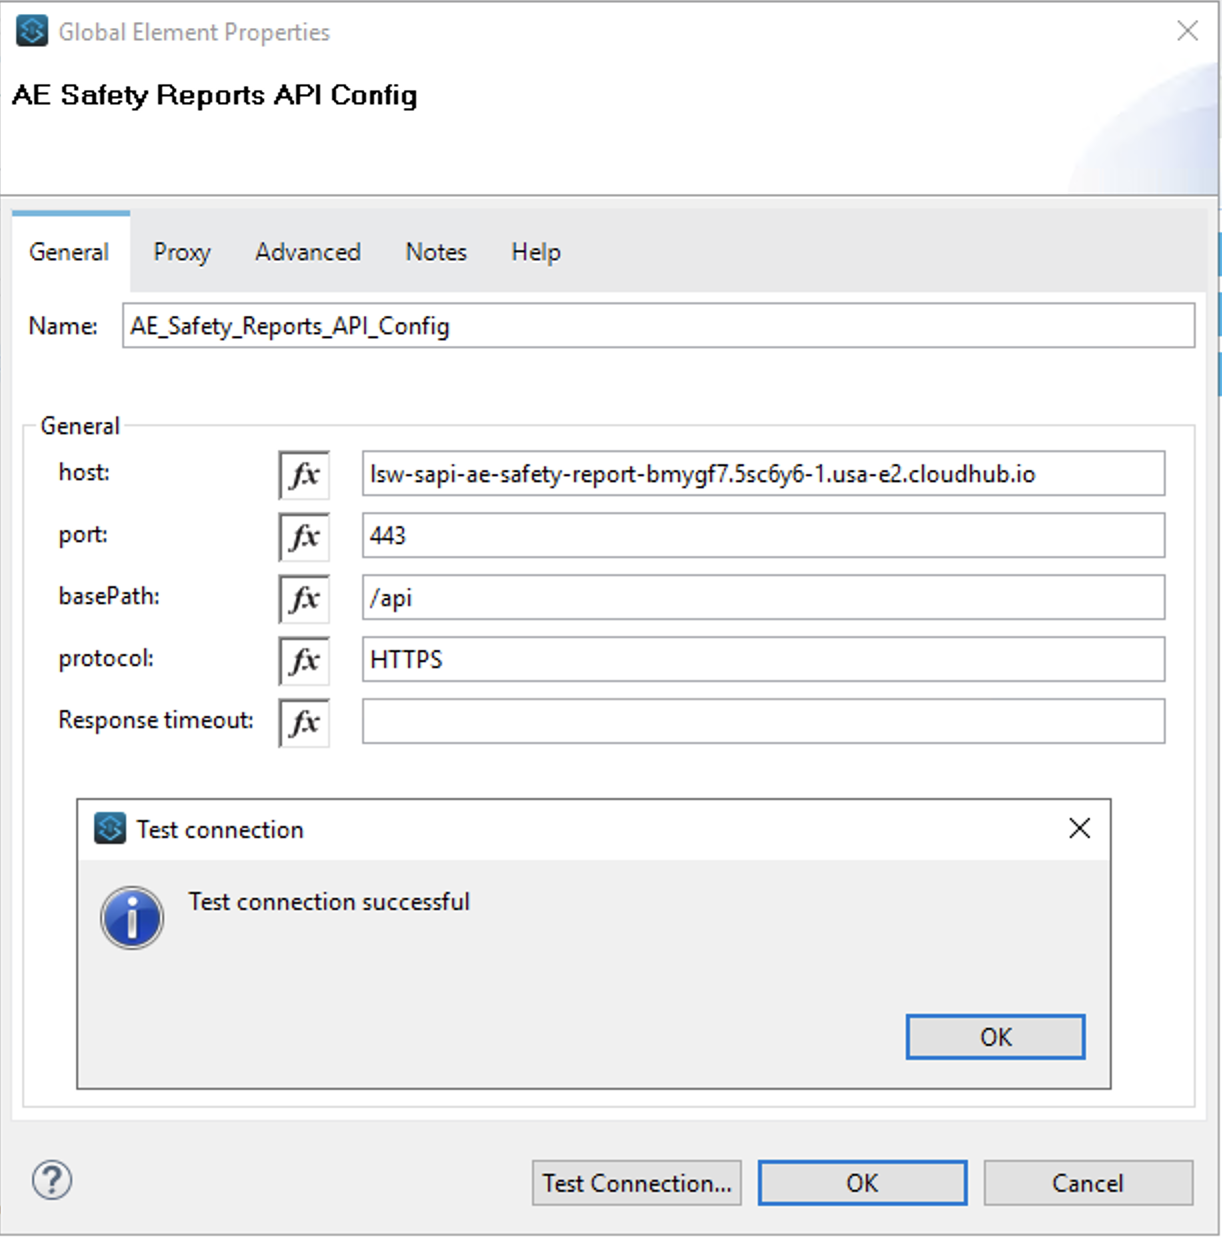
Now that the connection properties have been saved you can double-click on the connector configuration and use the Test Connection… button to ensure that you have entered proper values.
-
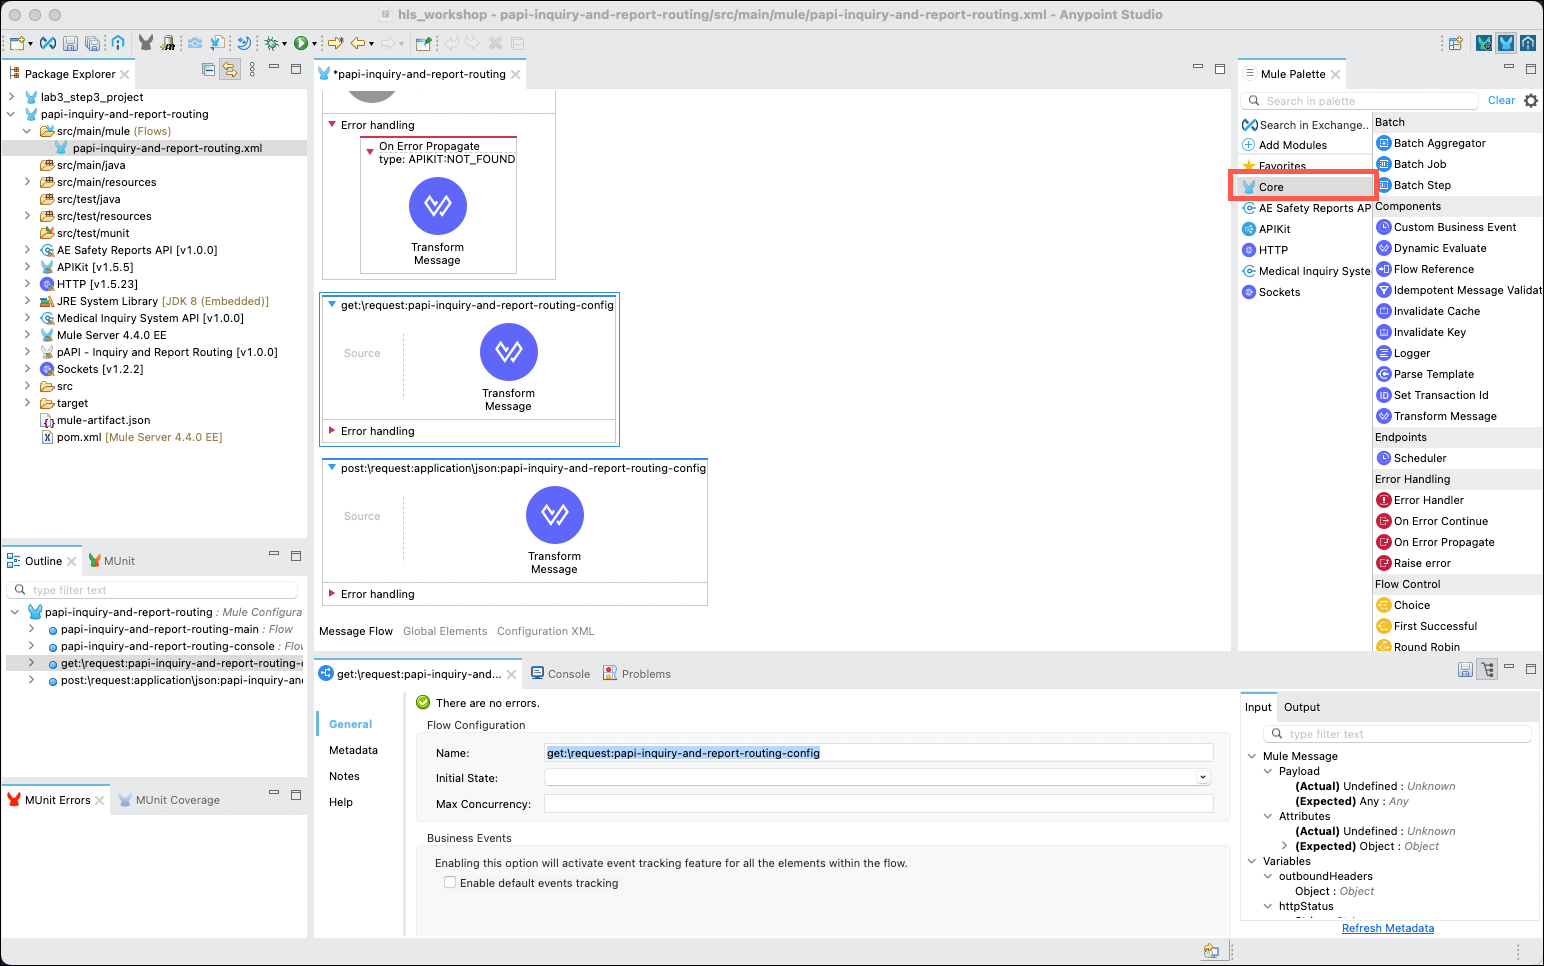
Once you have created connector configurations for both System APIs you can edit the flows to meet your requirements. Click on the Message Flow tab at the bottom of the main editor to continue.
-
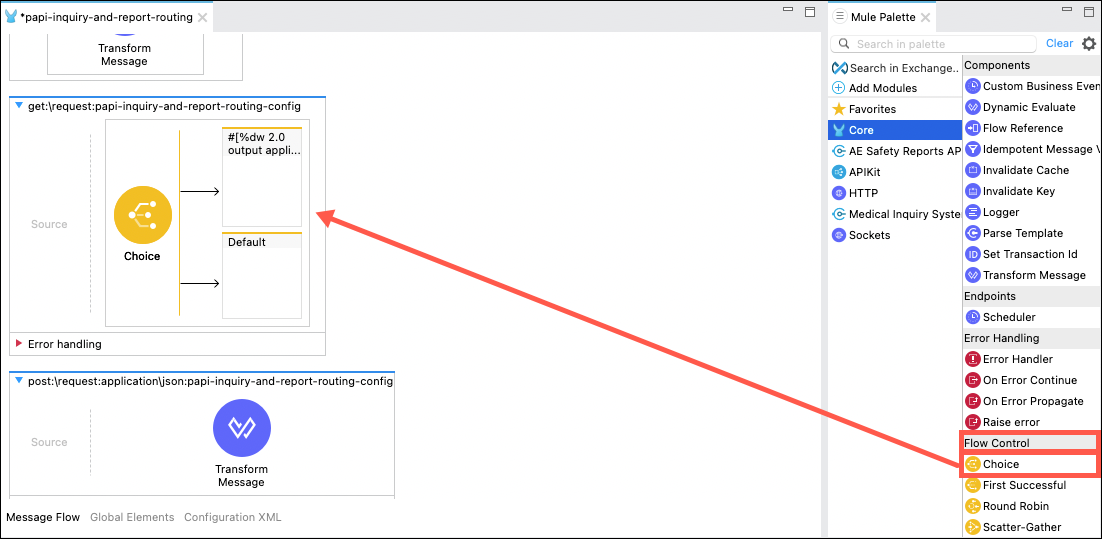
Implementing the functions of your API implementation is mostly a matter of dragging and dropping various message processors from the Mule Palette and setting properties for each processor. In the Mule Palette click on the Core category to access the pre-provisioned processors that are available.
Step 5: Implement the GET Method
-
In the Message Flow editor scroll to the bottom where you will find the get:\request:papi-inquiry-and-report-routing-config flow. Click on the the Transform Message processor and delete it using the Delete key or by right clicking on it and using the Delete menu option. Next, expand the Core category of components, then drag and drop the Choice processor from the Flow Control cateogry onto the flow.
-
The Choice processor enables you to control which set of actions you want to process, based on the value you set in the Expression property. For this API, you will want to invoke the GET method on either the Medical Inquiry System API or the AE Safety Report API, depending on the query parameter passed to the API.
Note: This API requires two query parameters when invoking the GET method: requestType and requestId.
Click on the top When branch. The property editor for this branch will open in the lower part of the Studio. Click on the fx button. Copy and paste the following expression into the Expression field.
%dw 2.0
output application/java
---
attributes.queryParams.requestType=="Medical Inquiry"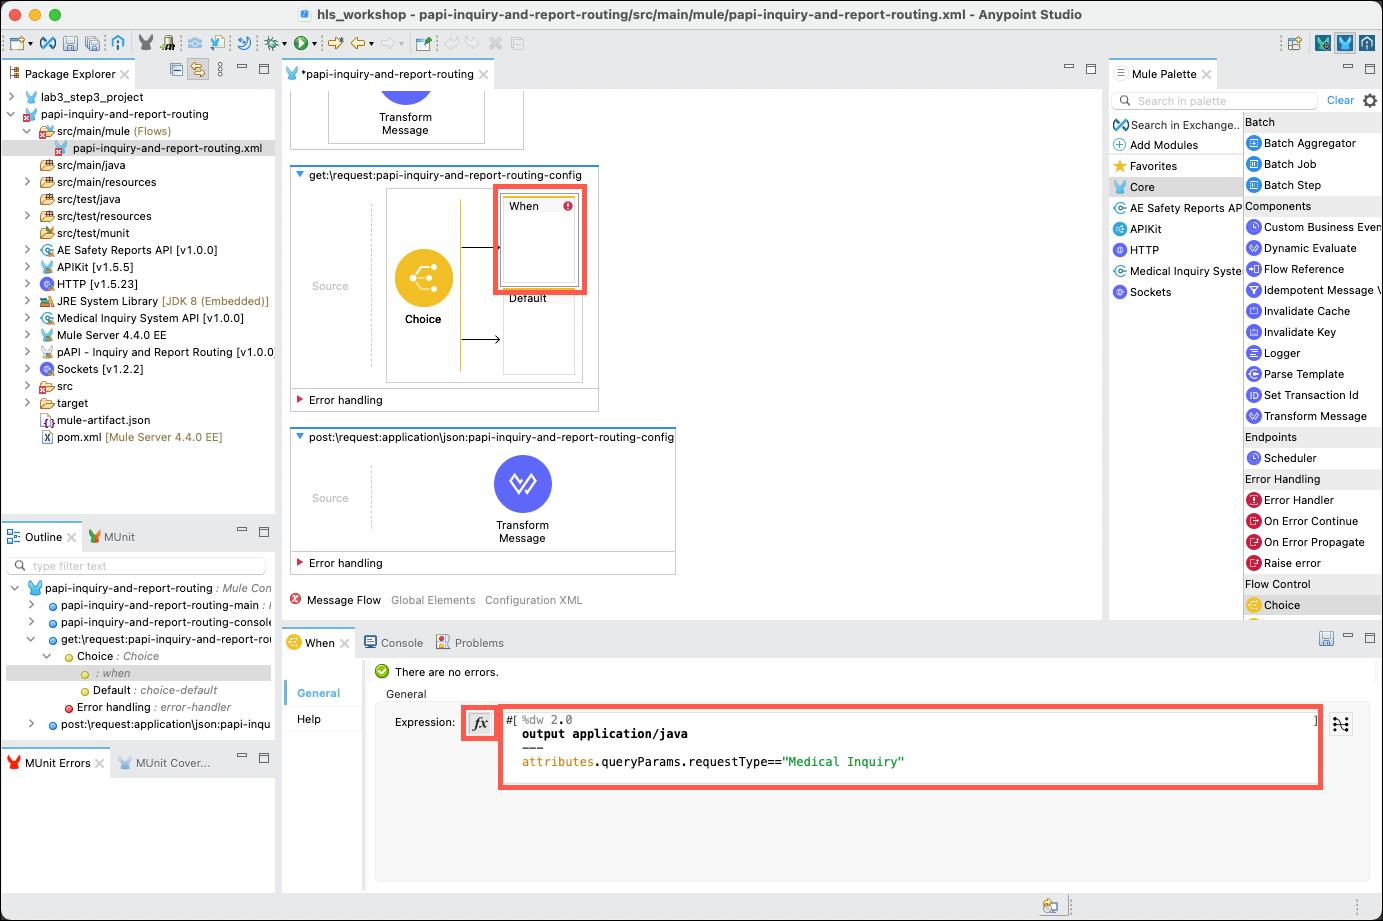
-
You will need to add the appropriate methods to submit GET requests for each of the System APIs.
-
Start with the Medical Inquiry System connector. Click on the connector in the Mule Palette, then drag and drop the Get inquiries operation into the When branch. The property editor should appear. Select the Medical_Inquiry_System_API_Config connector configuration, click on the fx button, then copy and paste the following expression into the Expression field.
attributes.queryParams.requestId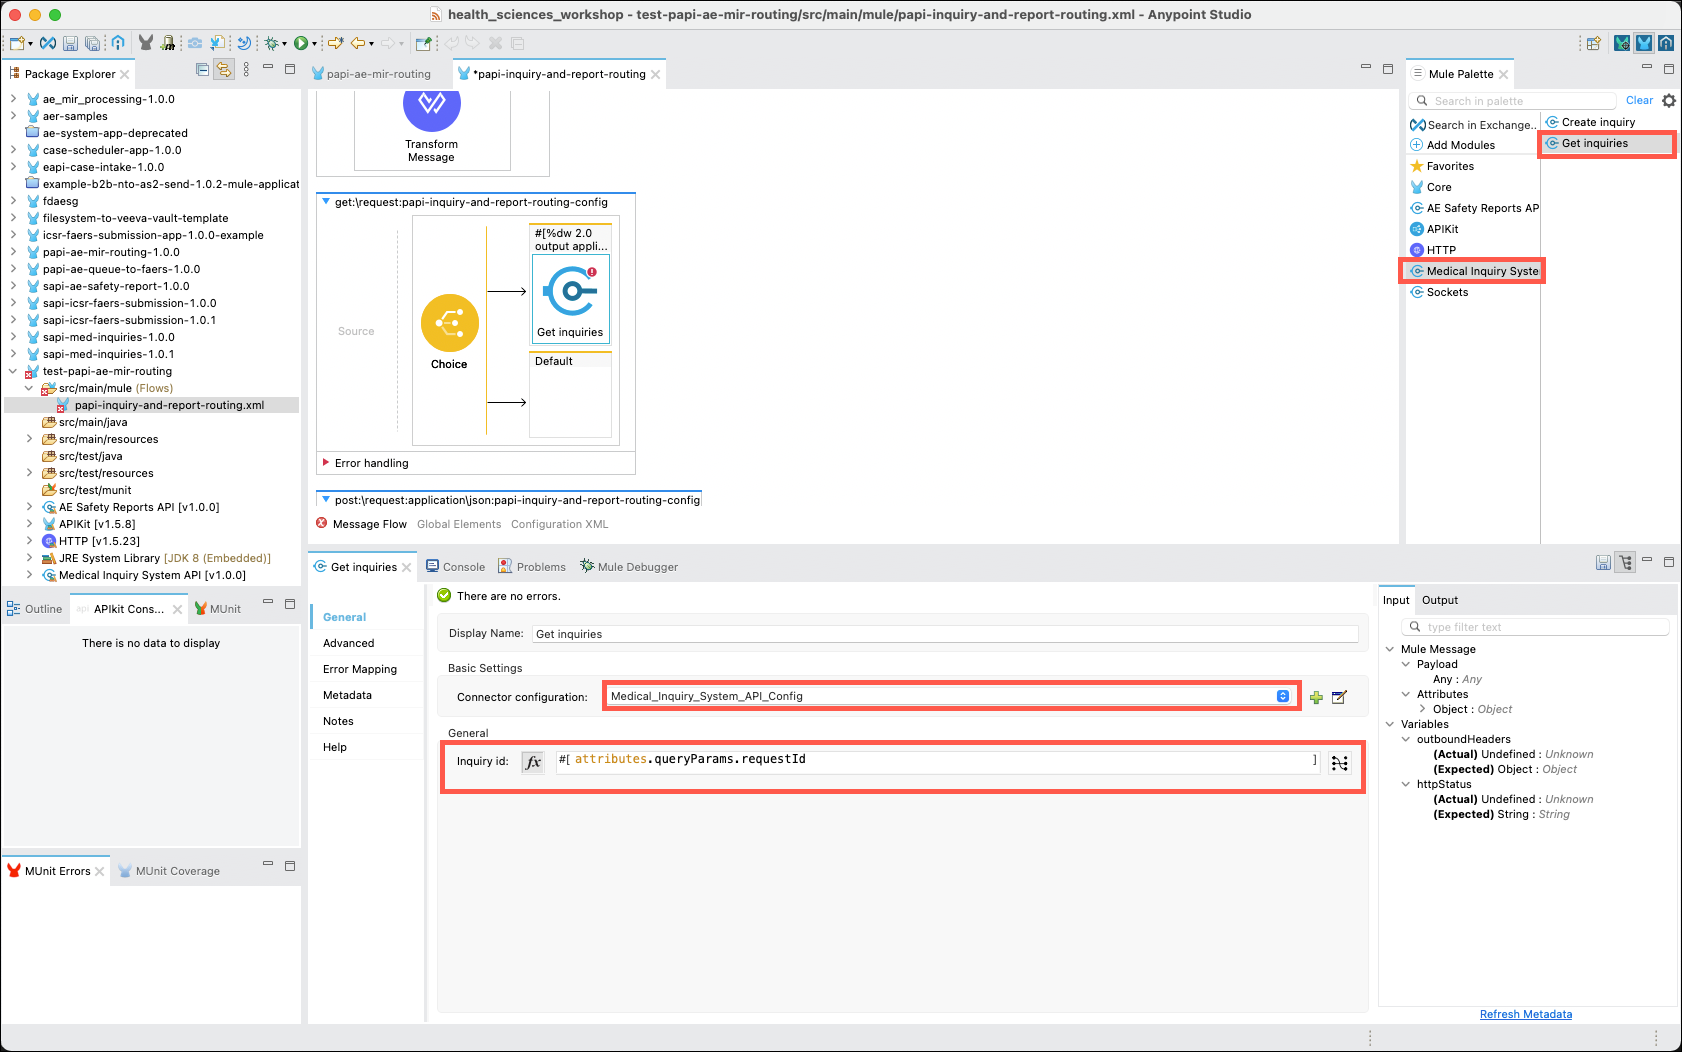
-
Next, click on the AE Safety Reports connector, then drag and drop the Get adverse events operation into the Default branch. The property editor should change to reflect the Get adverse events processor. Select the AE_Safety_Reports_API_Config connector configuration, click on the fx button, then copy and paste the following expression into the Expression field.
attributes.queryParams.requestId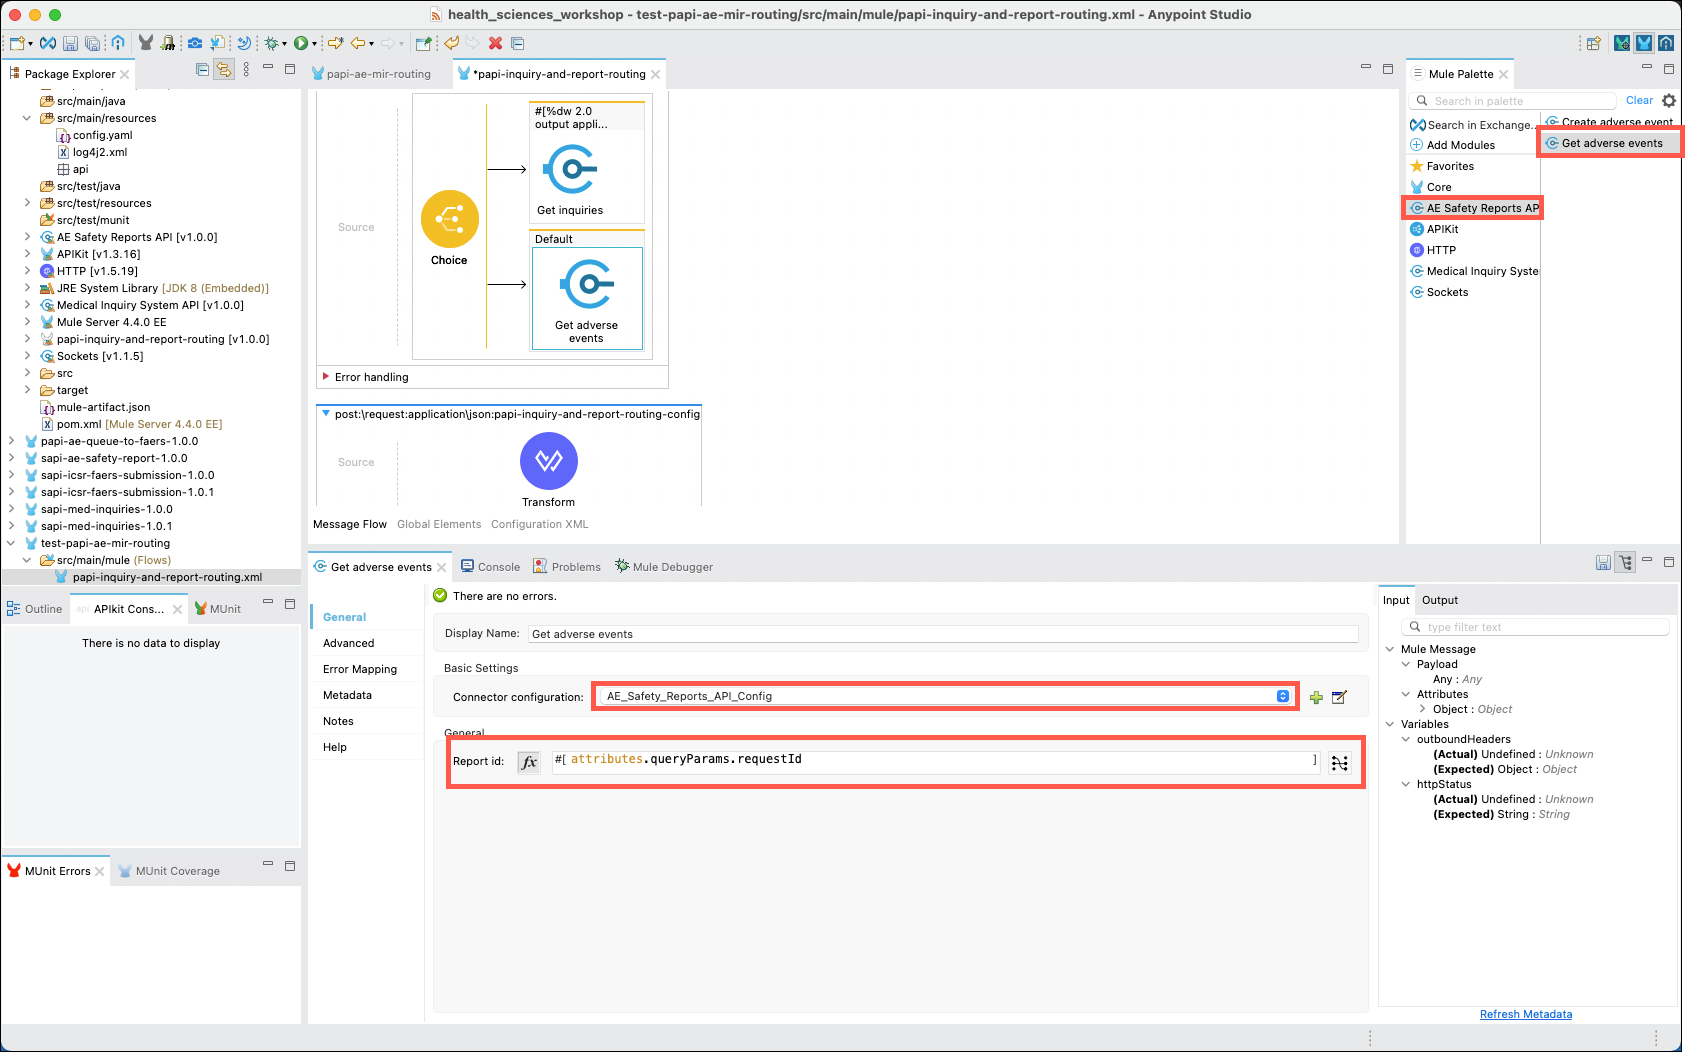
-
Your final task for this method is to transform the messages that have been returned from the System APIs into a JSON payload. Click on the Favorites category in the Mule Palette, then drag and drop the Transform Message operation into the flow, to the right of the Choice processor. Set the Output expression to the following:
%dw 2.0
output application/json
---
payload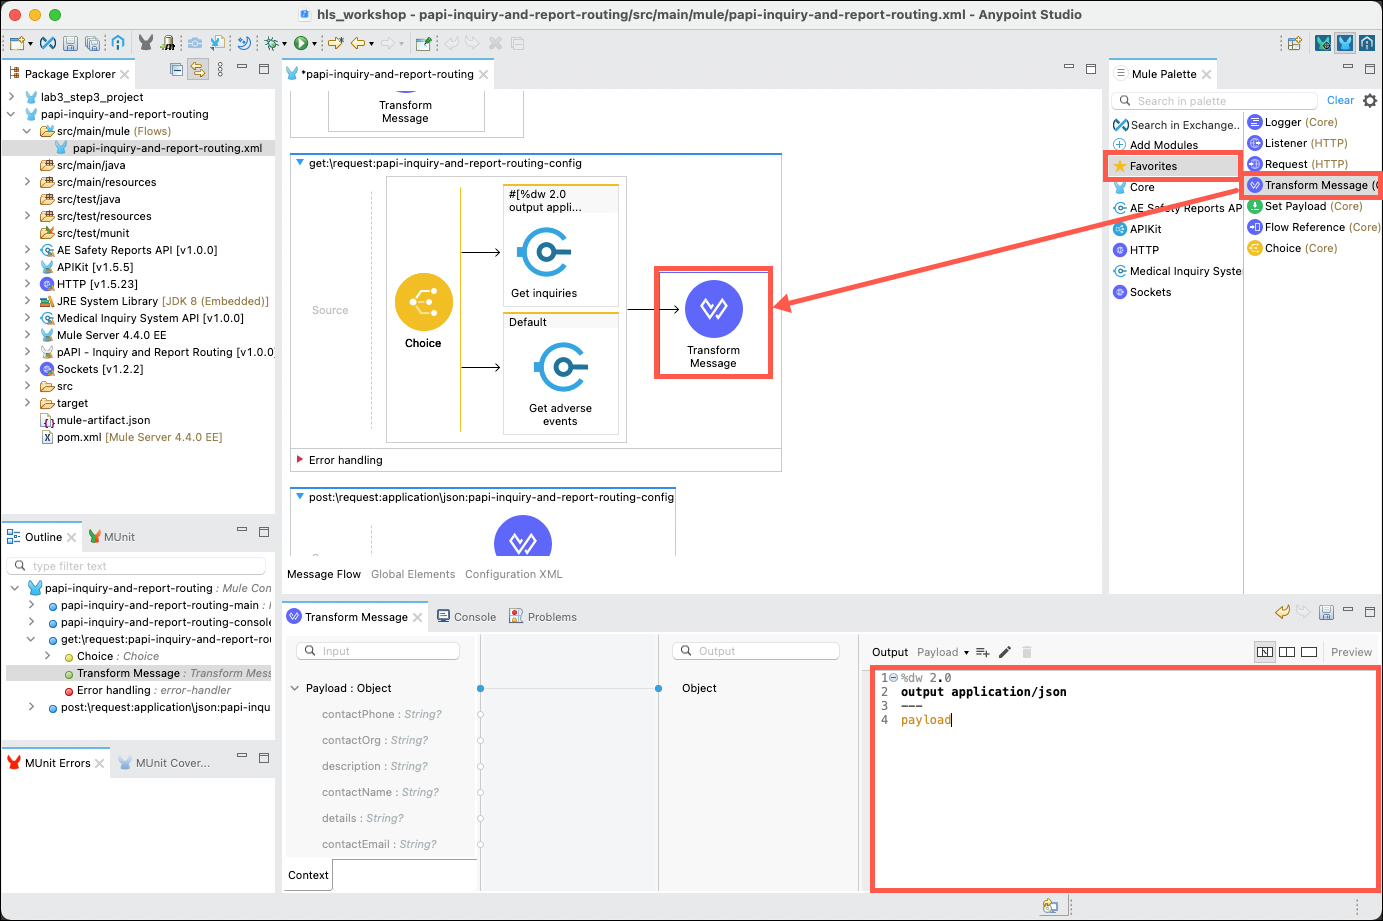
Step 6: Implement the POST Method
-
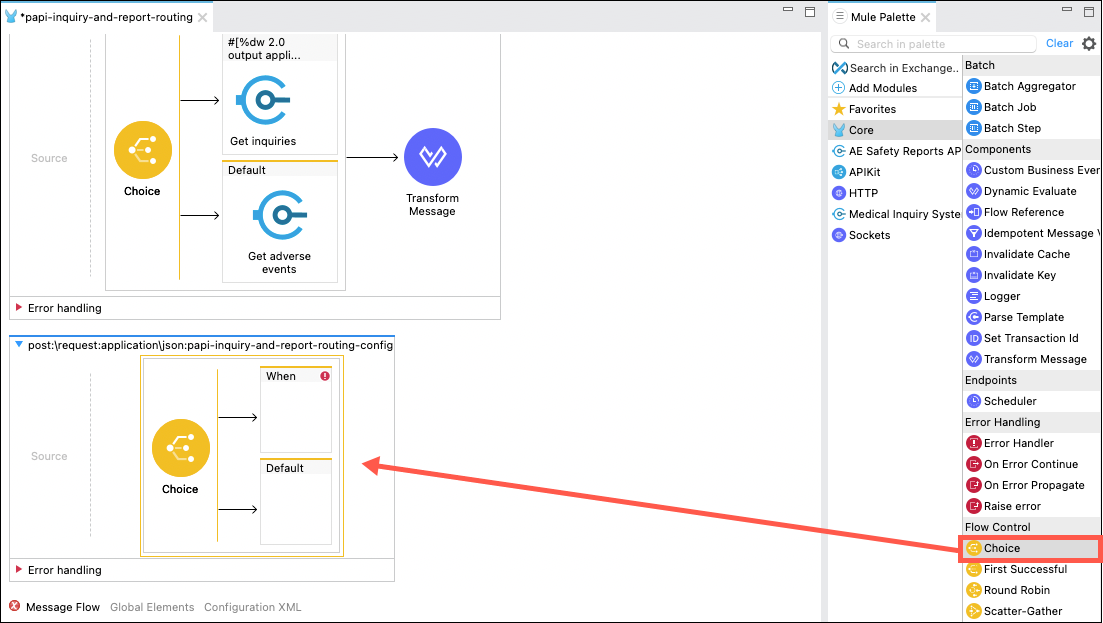
Now, turn your attention to the post:\request:application\json:papi-inquiry-and-report-routing-config method. You will need to perform a similar set of tasks that you did for the get:\request:papi-inquiry-and-report-routing-config method.
Delete the Transform Messsage processor, then drag and drop the Choice processor onto the flow.
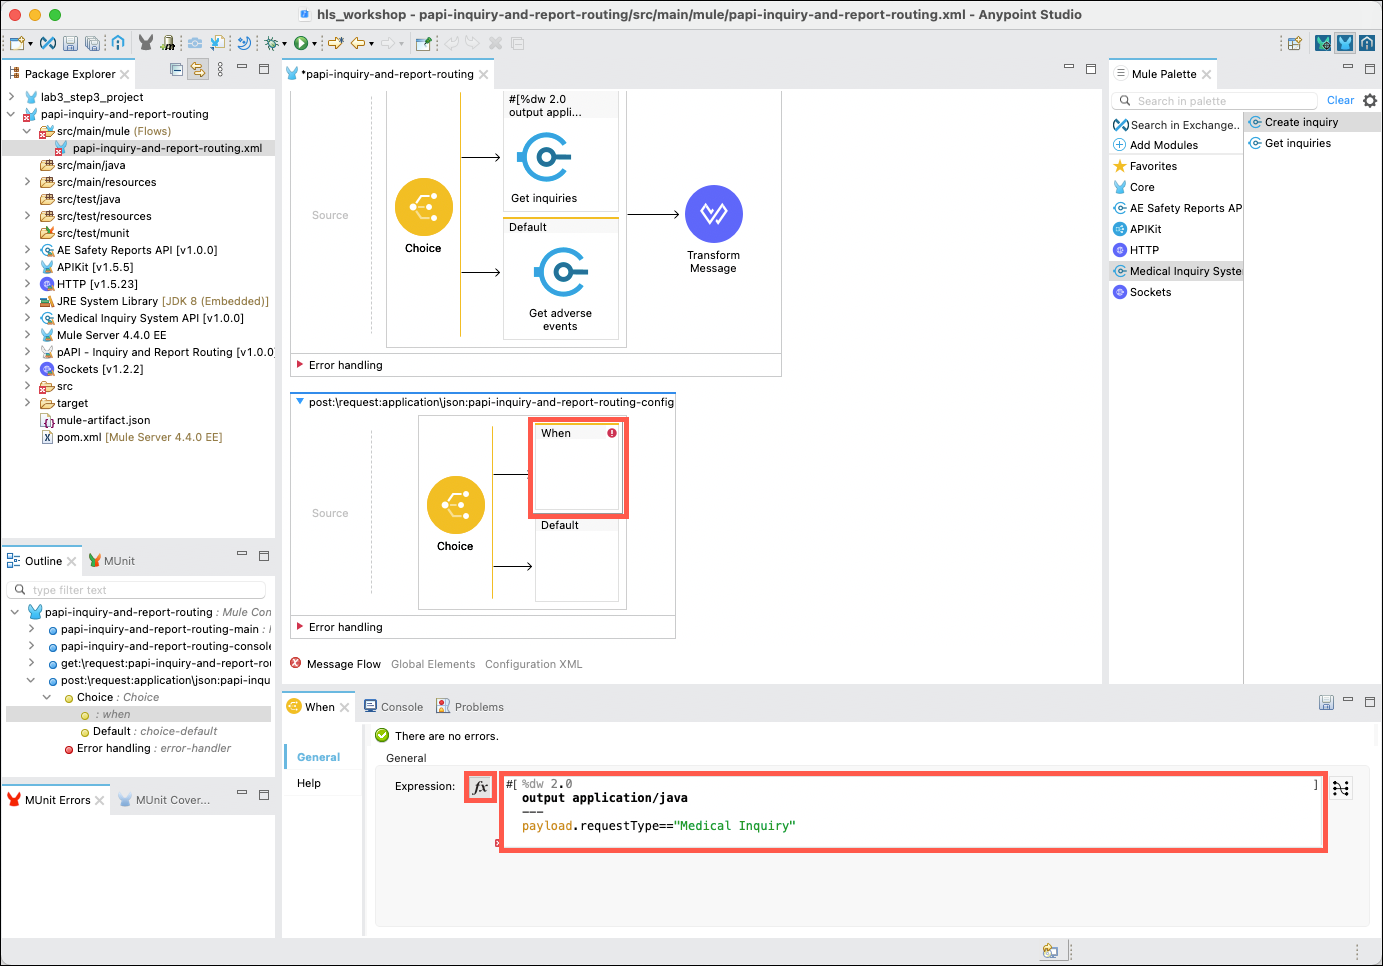
Click on the top When branch. The property editor for this branch will open in the lower part of the Studio. Click on the fx button. Delete any existing content, then copy and paste the following expression into the Expression field.
%dw 2.0 output application/java
---
payload.requestType=="Medical Inquiry"
Note: Notice that the GET method referenced a query parameter to select which branch to follow, whereas the POST method uses a value from the payload of the message.
These are simple examples of the power of the DataWeave language that underpins the MuleSoft runtime. API developers have access to message payloads, query parameters, external environment variables and a wide range of other data sources and transformation functions.
If you’re interested in learning more about the power of DataWeave when you’ve completed this workshop go to the following URL: https://developer.mulesoft.com/learn/dataweave/
-
Click on the Medical Inquiry System connector in the Mule Palette, then drag and drop the Create inquiry operation into the When branch. The property editor should appear. Ensure that payload is set in the Create inquiry request data field.

-
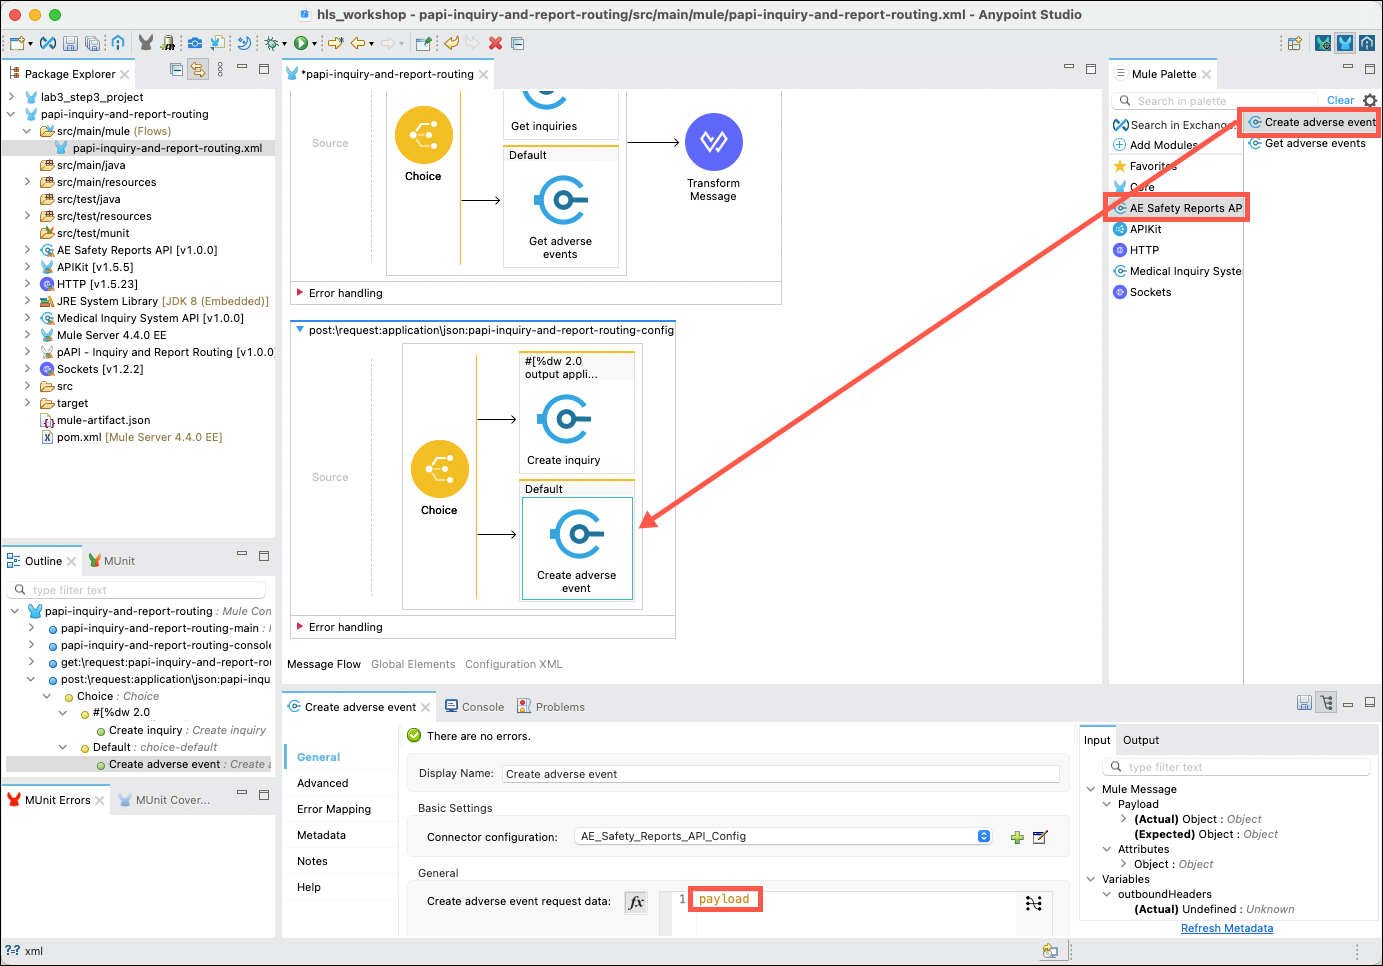
Next, click on the AE Safety Reports connector, then drag and drop the Get adverse events operation into the Default branch. The property editor should change to reflect the Create adverse event processor. Ensure that payload is set in the Create adverse event data field.
-
Save your flow.
Note Anypoint Studio provides several options to save your work. You may use menu options, or you may use the Save or Save All icons in the upper left of the Studio. The Save icon will save just the currently selected editor, whereas the Save All icon will save all files that have been edited.
-
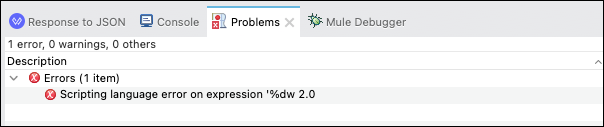
Check the Problems tab in the lower portion of the Studio and correct any problems that may appear.
Note: You may see a Scripting language error… error reported. This appears whenever there is a Transform Message processor that cannot find metadata for a given message payload.
This error may be safely ignored.
Step 7: Test the API
You are now ready to test out the API that you have implemented. Anypoint Studio includes a version of the MuleSoft runtime along with debugging tools to enable testing of APIs before they are deployed to a MuleSoft runtime.
The Remote Desktop image that you are using for this workshop is currently set to use Internet Explorer as the default browser. You will need to complete the following steps to change the default browser to Google Chrome, which will enable easier testing of your API. |
-
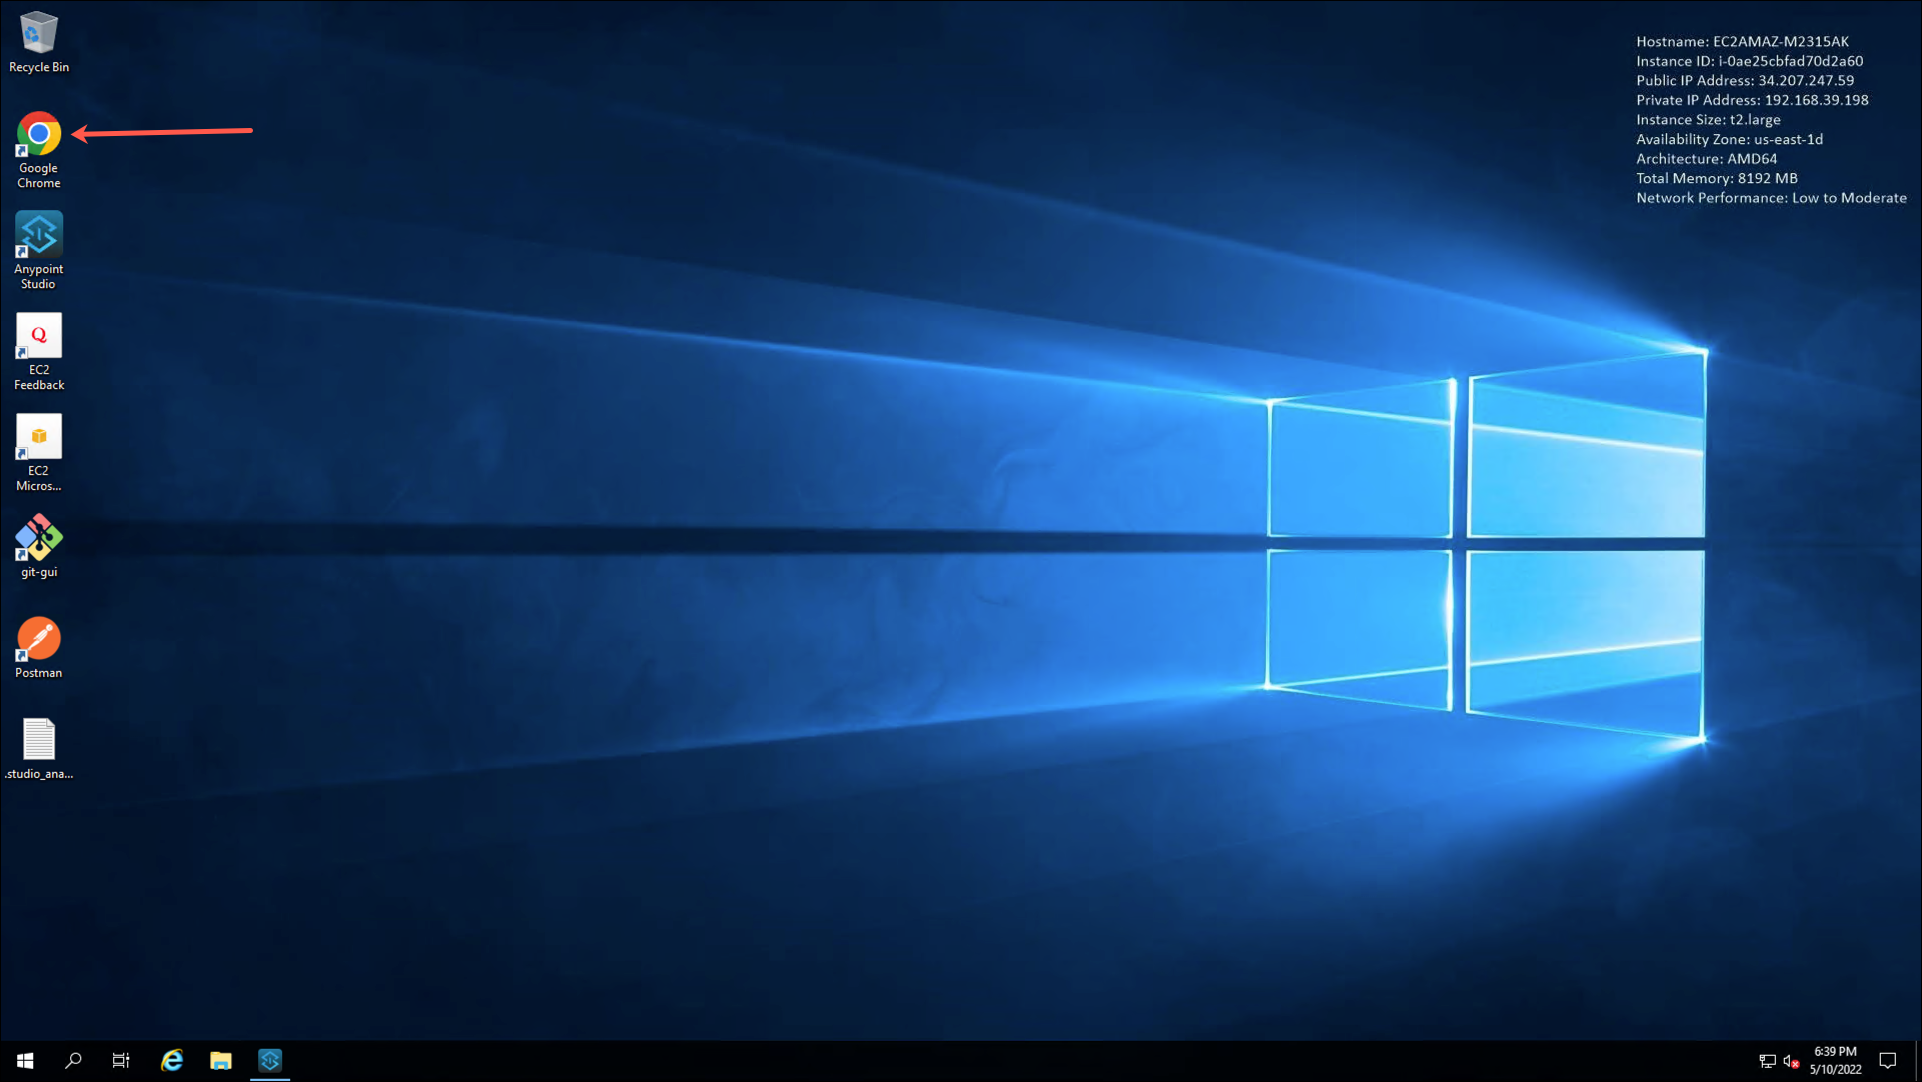
Double click on the Google Chrome icon on the desktop.
-
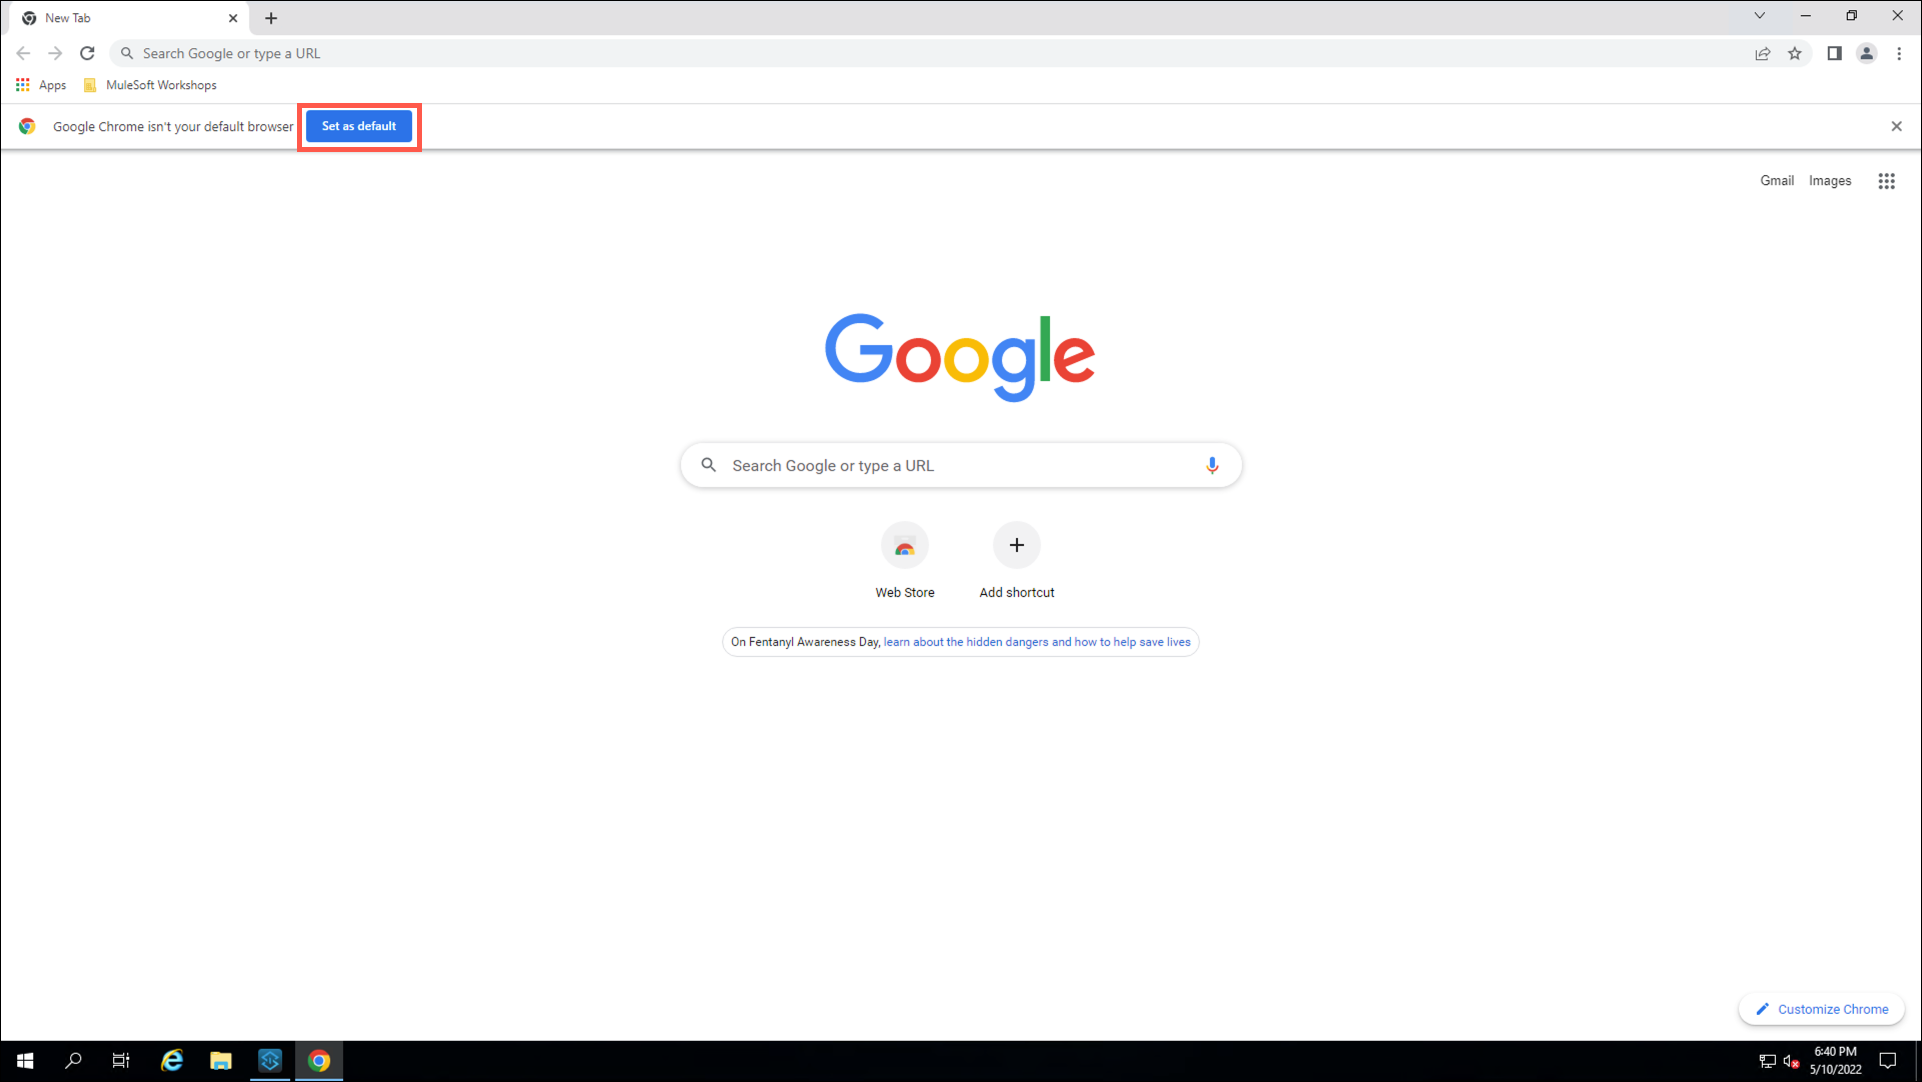
Click on the Set as default button.
-
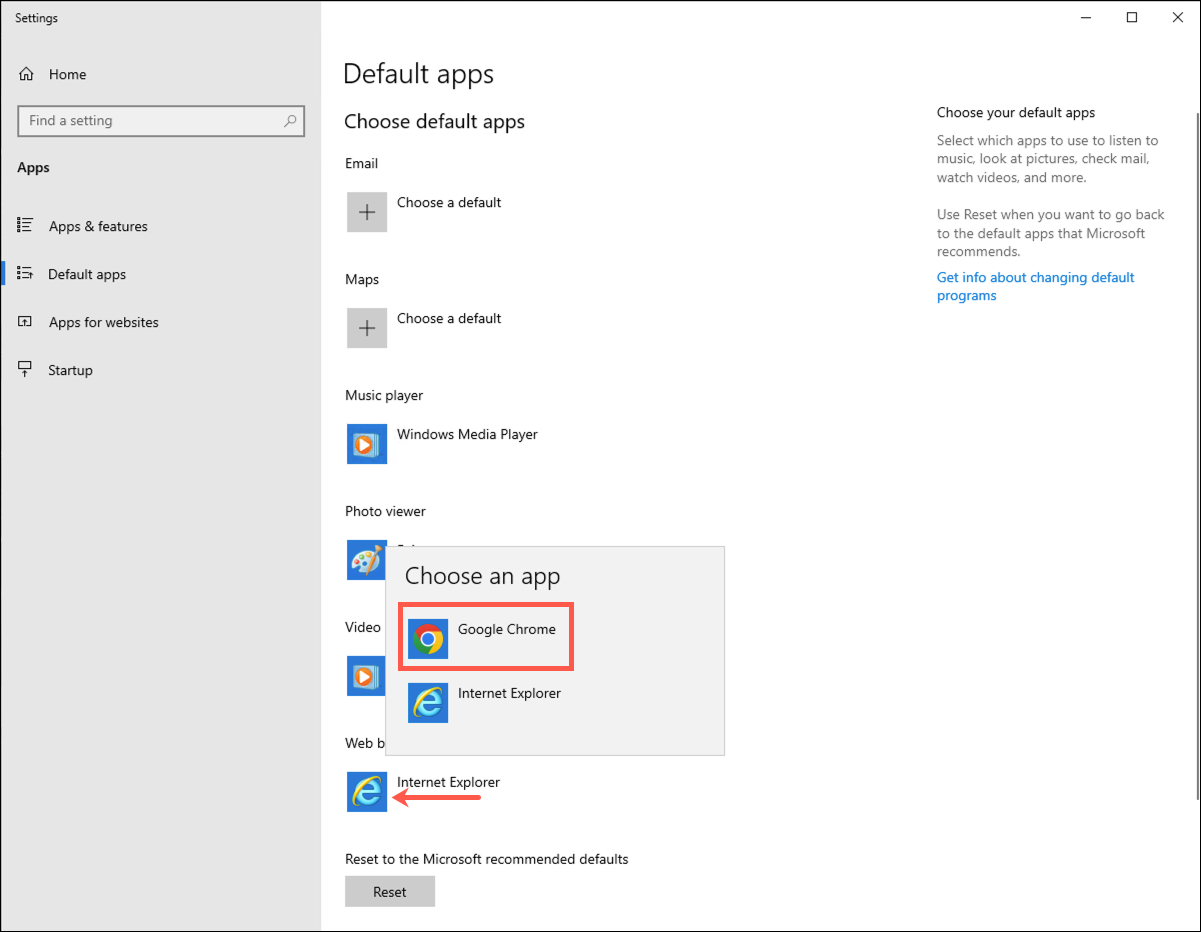
Click on the Internet Explorer link found under the Web Browser item, then select Google Chrome.
-
Close the Default apps dialog.
-
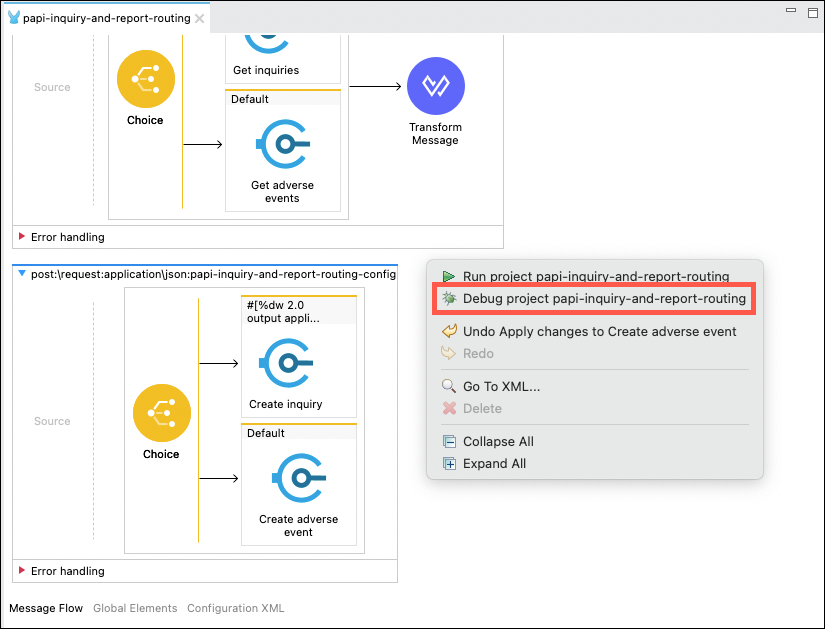
You are now ready to begin testing your API. Right click in the main editor and then select the Debug project papi-inquiry-and-report-routing menu item.
-
During the startup phase of the test you may see several messages appear in the Console tab, and will ultimately be presented with a Confirm Perspective Switch dialog. Click on the Yes button to proceed.

-
The layout of the Studio will change to accomodate testing and debugging of your application. Before you begin to test your application you should review the Console tab to ensure that your application has started successfully.
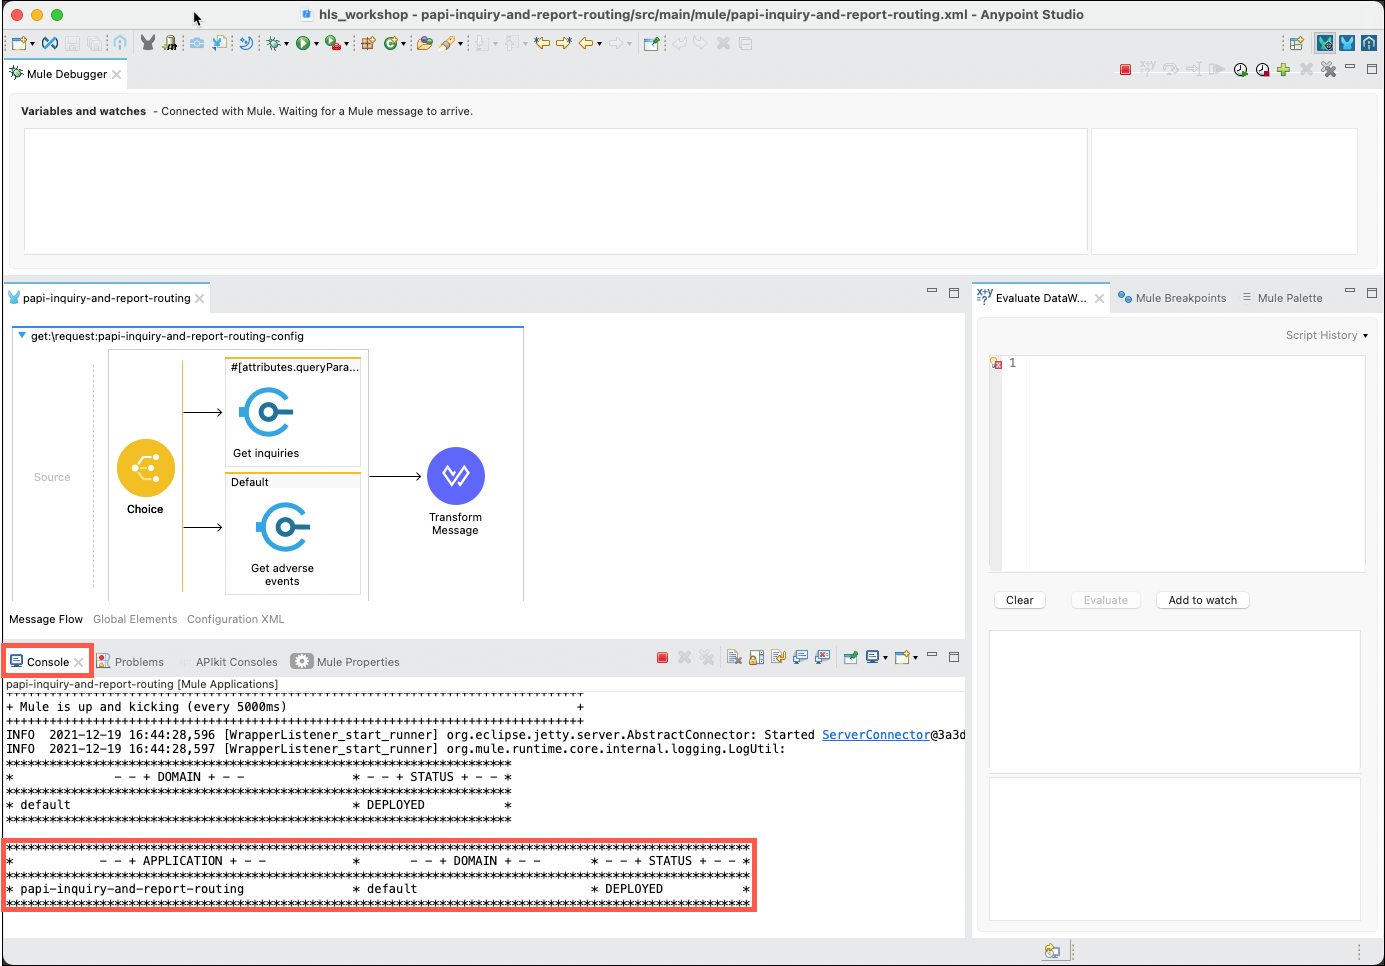
-
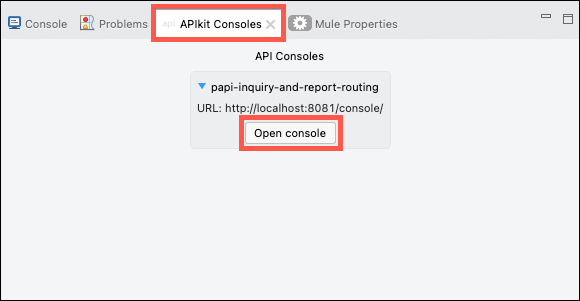
Anypoint Studio includes APIkit, which is an API testing tool. Click on the APIkit Consoles tab, then click on the Open console button to launch the testing tool. The tool will open in a new browser window.
-
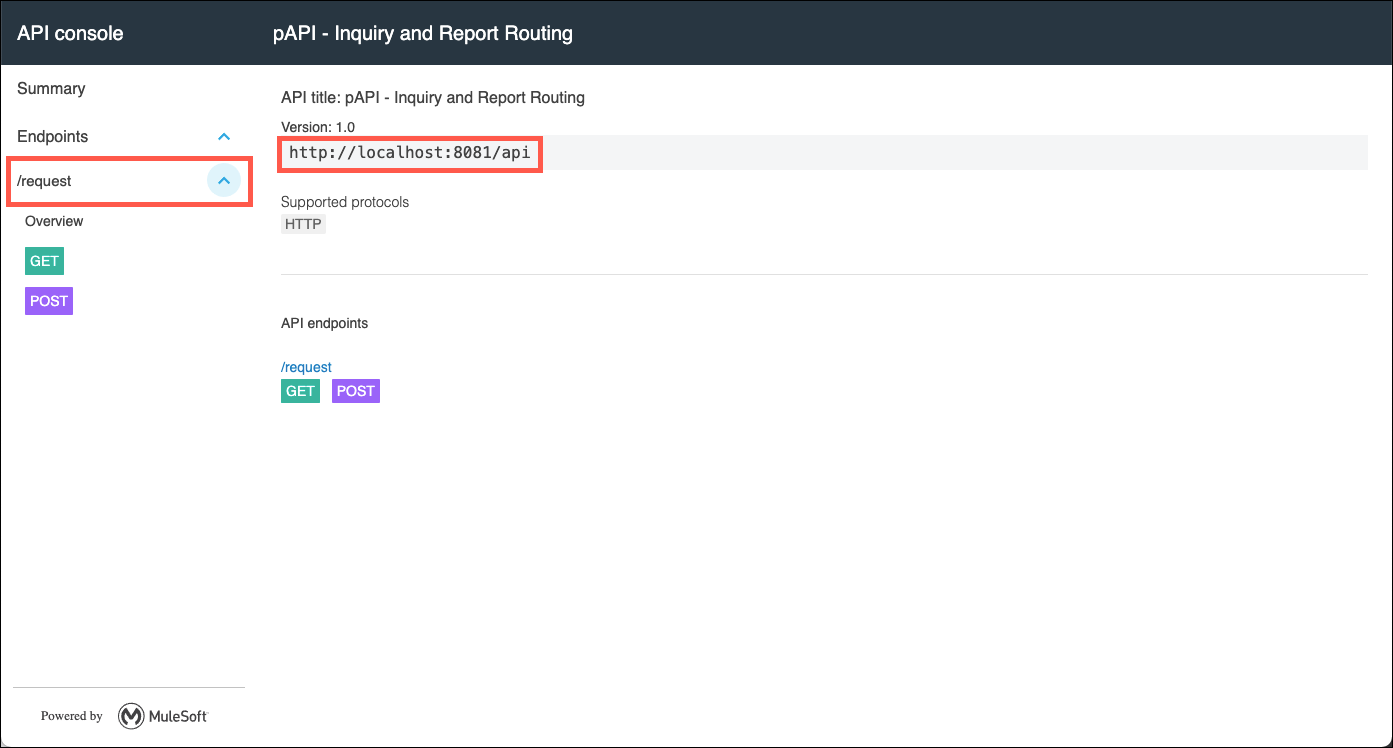
The API console will display the resources and methods that have been scaffolded in your API. Note that although this testing tool is running in your local Studio instance, it will still invoke the System APIs that you have configured in your application.
-
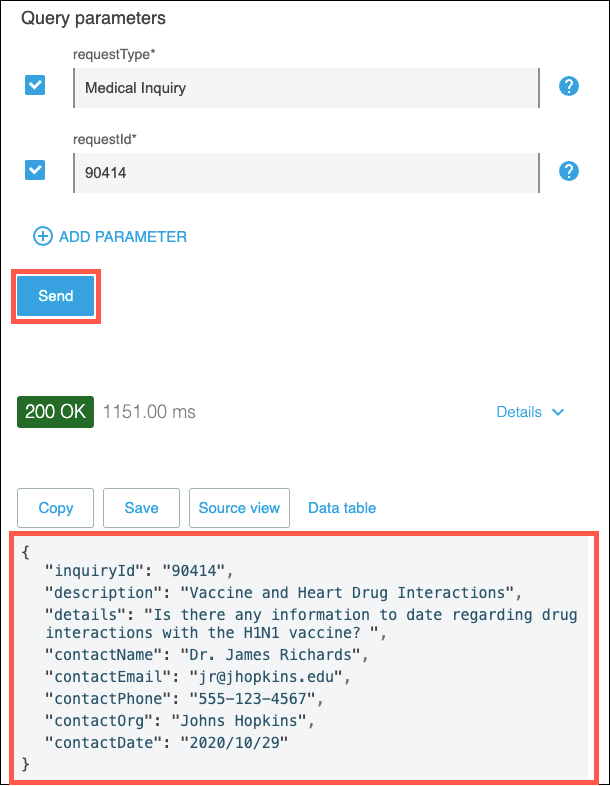
Click on the GET method. Note that the requestType and requestId query parameters have test values already assigned to them. These test values came from the API specification when it was developed. Review the contents of the test console, then click on the Send button to execute a test.
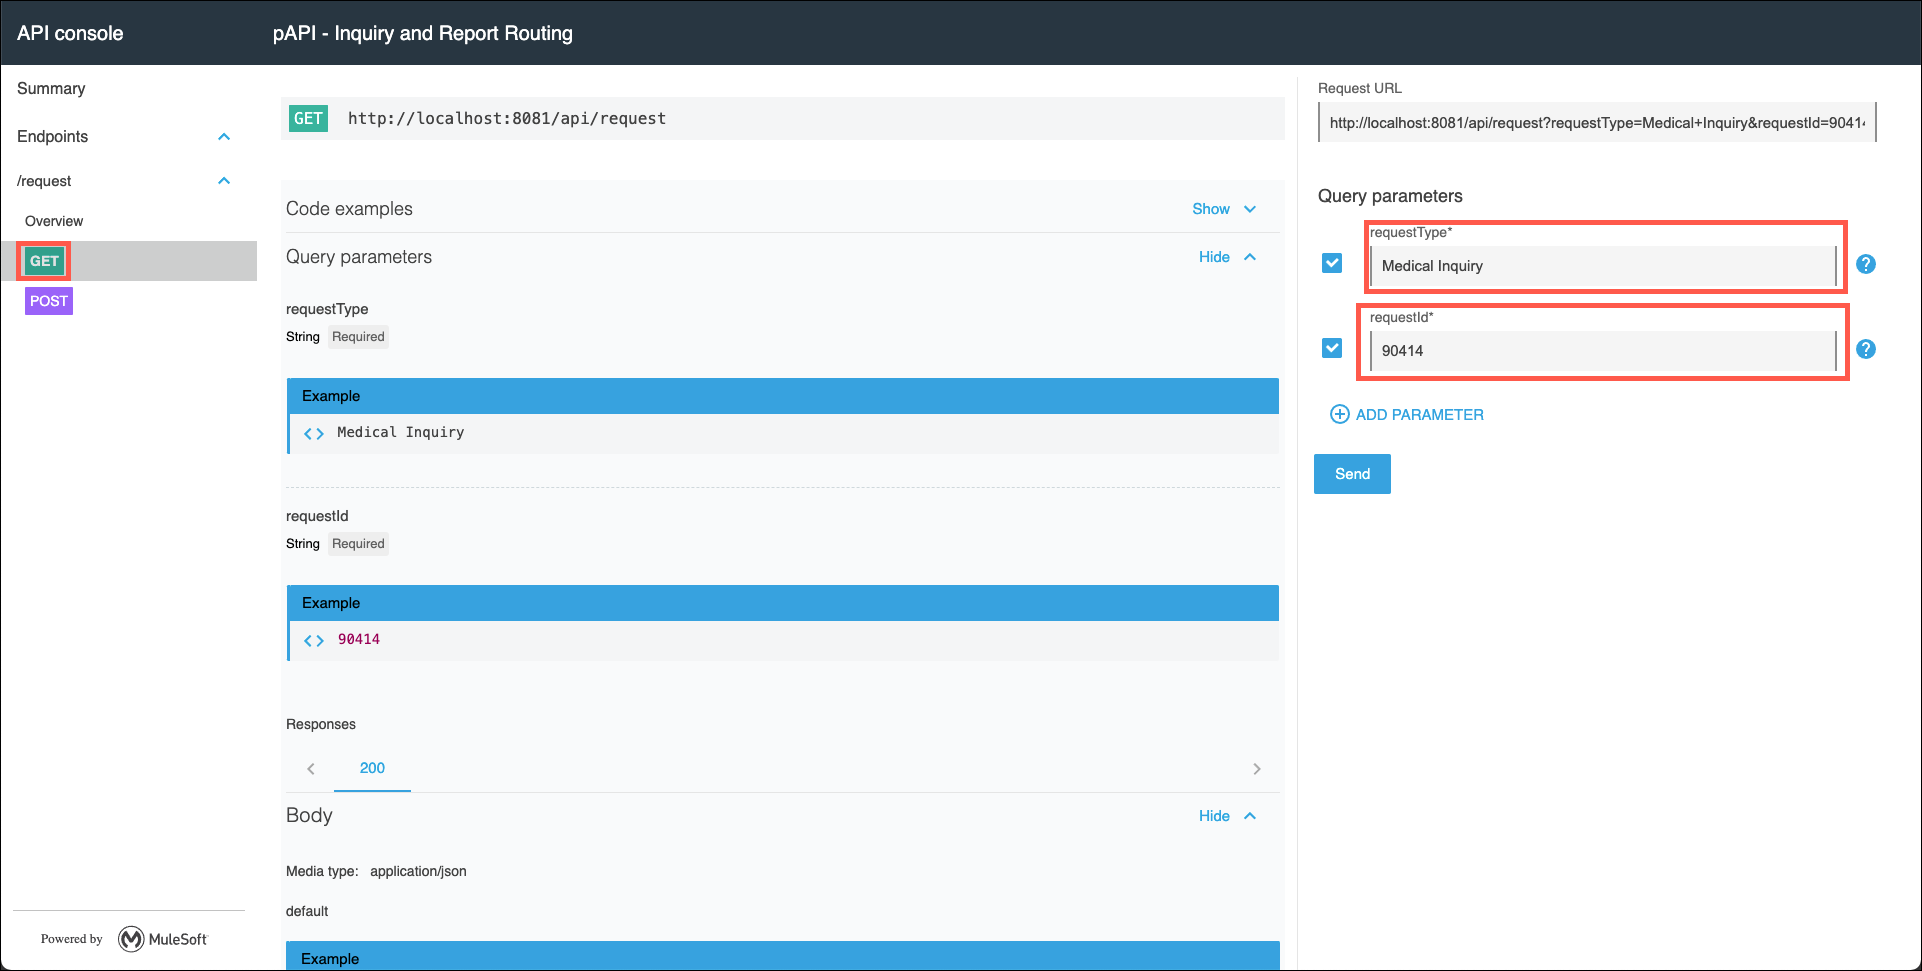
-
Note the response message that was returned for the Medical Inquiry request. This is the response message that was returned from the sapi-med-inquires System API.
-
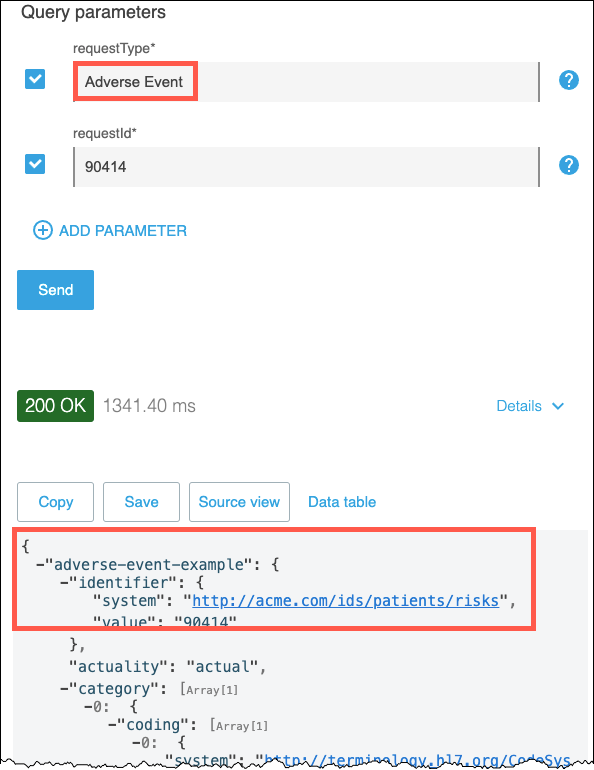
Change the requestType value to Adverse Event and then click on the Send button. You should see a response with adverse event data.
-
Your next test is to try submitting "medical inquiry" and "adverse event report" messages via the POST method.
Click on the POST method.
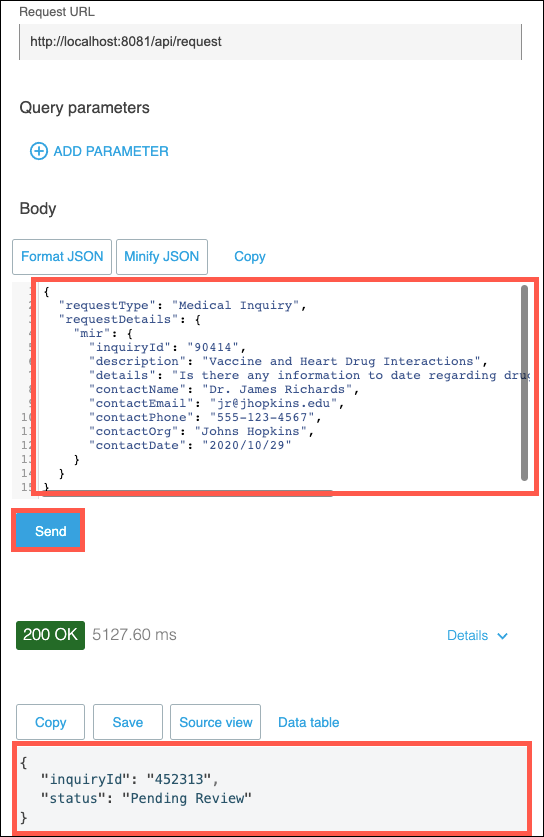
The POST method will require a JSON message in the Body of the request. Copy and paste the following JSON code into the Body section of the APIkit Console, and then click on the Send button. You should receive a response message stating Pending Review.
{
  "requestType": "Medical Inquiry",
  "requestDetails": {
    "mir": {
      "inquiryId": "90414",
      "description": "Vaccine and Heart Drug Interactions",
      "details": "Is there any information to date regarding drug interactions with the H1N1 vaccine? ",
      "contactName": "Dr. James Richards",
      "contactEmail": "jr@jhopkins.edu",
      "contactPhone": "555-123-4567",
      "contactOrg": "Johns Hopkins",
      "contactDate": "2020/10/29"
    }
  }
}
Note: Your test may return a null value for inquryId. This is due to a back level version of the sapi-med-inquiries System API accidentally being deployed to the Workshop environment. You may safely ignore this.
-
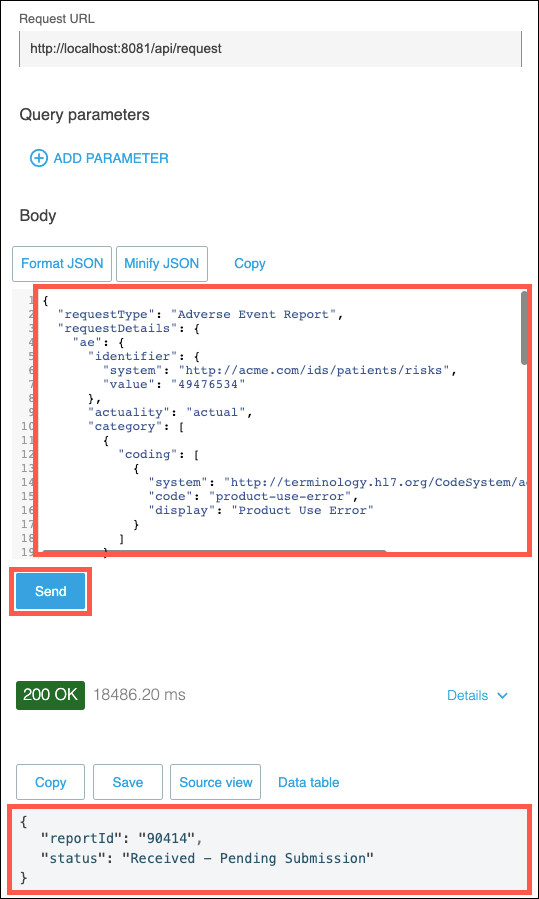
The last test to execute is to submit an "adverse event report". Copy and past the following JSON message into the Body of the APIkit Console and then click on the Send button. You should receive a response message stating Received - Pending Submission.
{
  "requestType": "Adverse Event Report",
  "requestDetails": {
    "ae": {
      "identifier": {
        "system": "http://acme.com/ids/patients/risks",
        "value": "49476534"
      },
      "actuality": "actual",
      "category": [
        {
          "coding": [
            {
              "system": "http://terminology.hl7.org/CodeSystem/adverse-event-category",
              "code": "product-use-error",
              "display": "Product Use Error"
            }
          ]
        }
      ],
      "event": {
        "coding": [
          {
            "system": "http://snomed.info/sct",
            "code": "304386008",
            "display": "O/E - itchy rash"
          }
        ],
        "text": "This was a mild rash on the left forearm"
      },
      "subject": {
        "reference": "Patient/example"
      },
      "date": "2017-01-29T12:34:56+00:00",
      "seriousness": {
        "coding": [
          {
            "system": "http://terminology.hl7.org/CodeSystem/adverse-event-seriousness",
            "code": "Non-serious",
            "display": "Non-serious"
          }
        ]
      },
      "severity": {
        "coding": [
          {
            "system": "http://terminology.hl7.org/CodeSystem/adverse-event-severity",
            "code": "mild",
            "display": "Mild"
          }
        ]
      },
      "recorder": {
        "reference": "Practitioner/example"
      },
      "suspectEntity": [
        {
          "instance": {
            "reference": "Medication/example"
          }
        }
      ]
    }
  }
}
Note: Your test may return a null value for reportId. This is due to a back level version of the sapi-ae-safety-report System API accidentally being deployed to the Workshop environment. You may safely ignore this.
-
At this point you have successfully tested out your API implementation. From this point your dev/ops team would configured their CI/CD pipeline to automatically promote and deploy this API to the runtime environment. If you would like more information on configuring DevOps for your MuleSoft applications please click on the following link to download the following MuleSoft whitepaper: APIs and DevOps - Great alone, better together
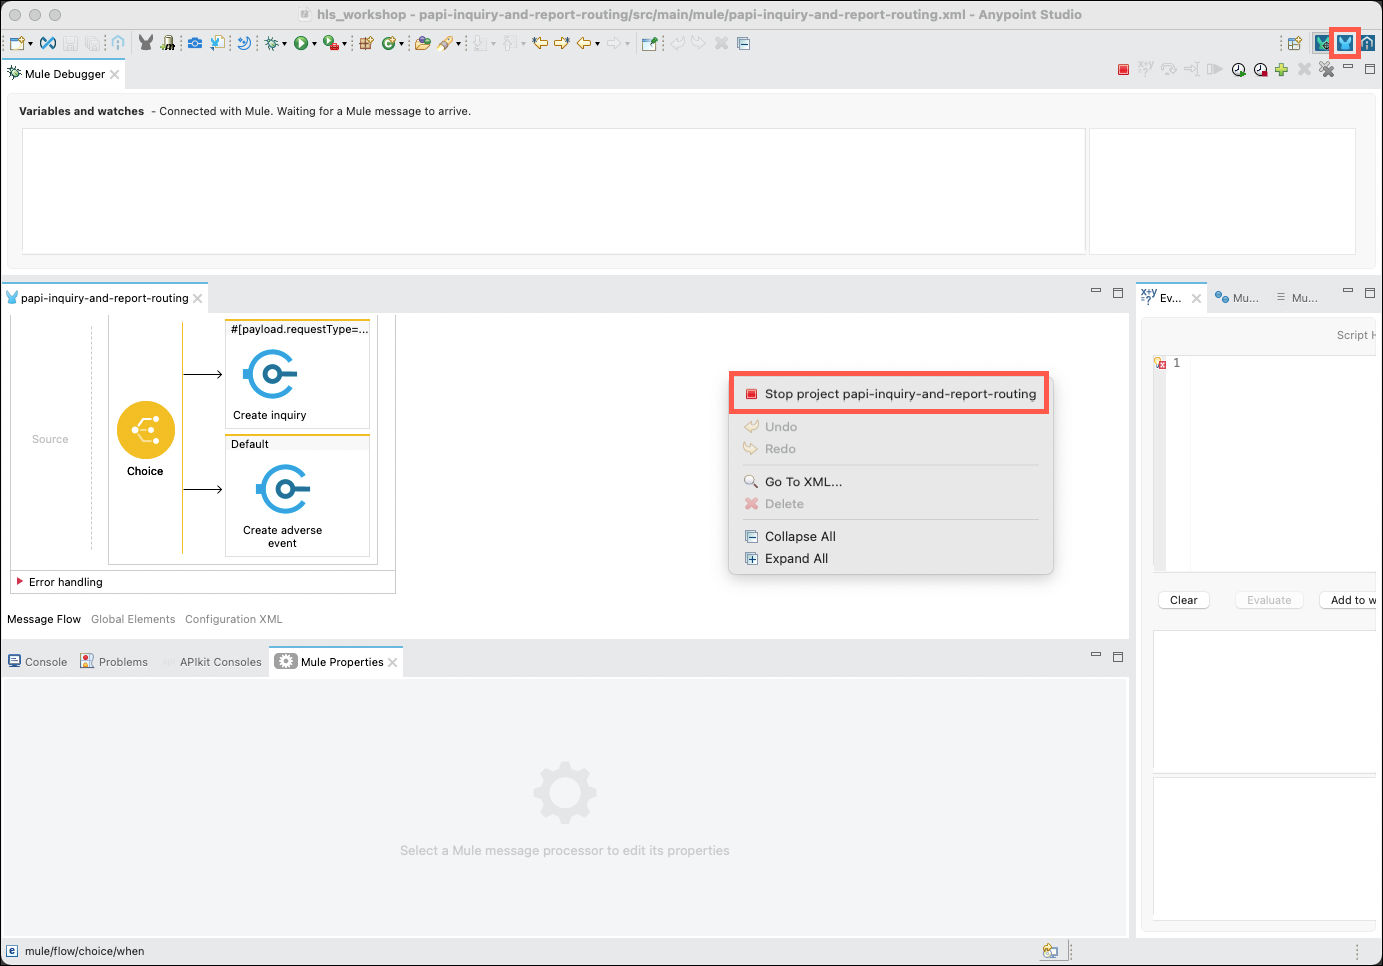
Right click on the main editor window and select the Stop project papi-inquiry-and-report-routing menu item to stop the MuleSoft runtime. Click on the Mule Design button in the upper right corner of the Studio to return to the API designer perspective.
Summary
Congratulations! You have now seen how to use MuleSoft’s Anypoint Platform and Studio to find and implement an API.
Now go to Lab 7: Monitoring the Application Network to see how to ensure that your Application Network is functioning as it should.